Advice and answers from the E-Kenana
- On-boarding for Teachers
- 1. How to use Zoom Breakout Rooms - level 1.0?23.04.20
Breakout rooms allow you to split your Zoom meeting in up to 50 separate sessions.
The meeting host can choose to split the participants of the meeting into these separate sessions automatically or manually, and can switch between sessions at any time.
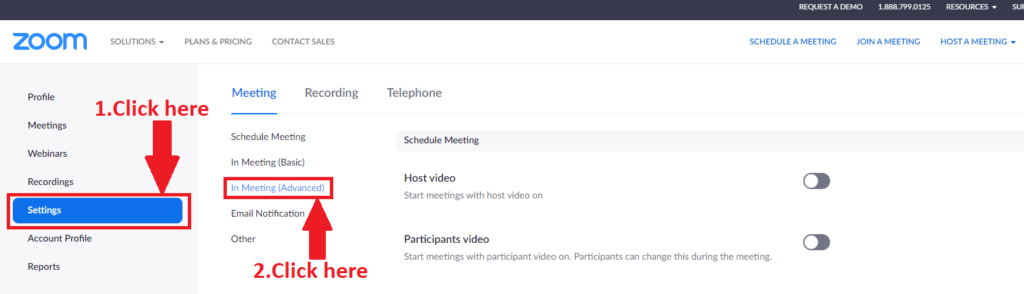
-First you need to enable breakout rooms by doing the following:
-Open your account on https://zoom.us/
Creating breakout rooms
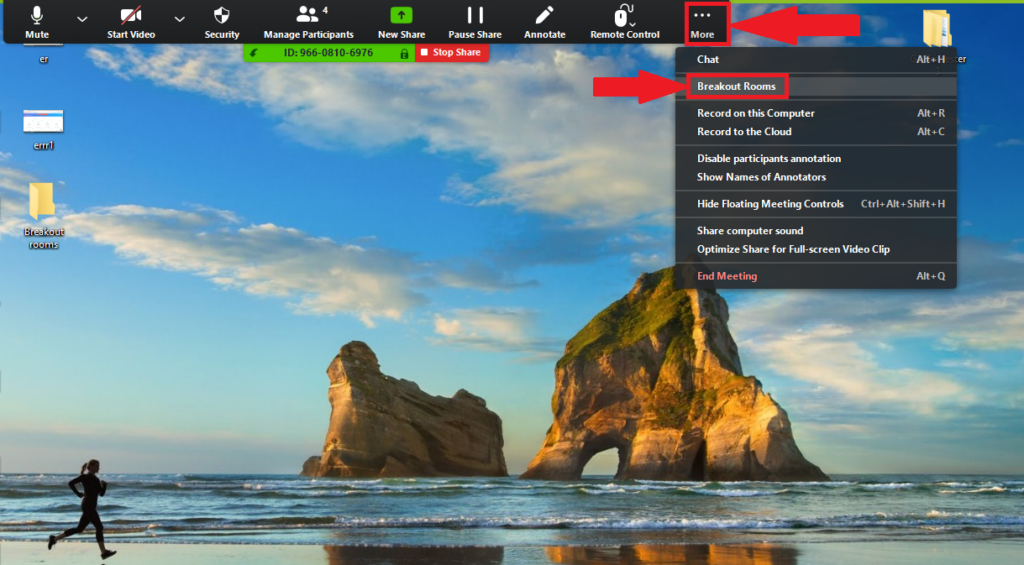
-During your zoom session you can use the breakout rooms as following:
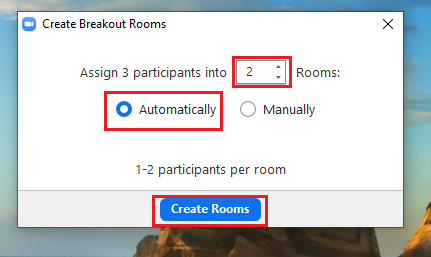
-Click "More"----"Breakout rooms".
-This window will come up,set the numbers of the rooms as you like and Zoom will split your participants up evenly into each of the rooms Automatically ,then click "Create Rooms".
-Here the rooms have been created.
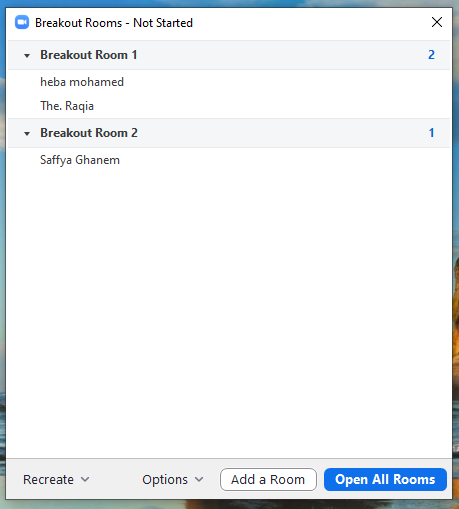
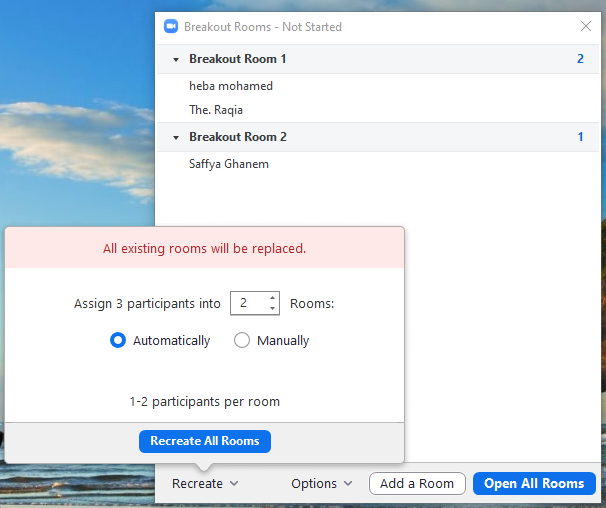
-Click "Recreate" if you want to reset the rooms.
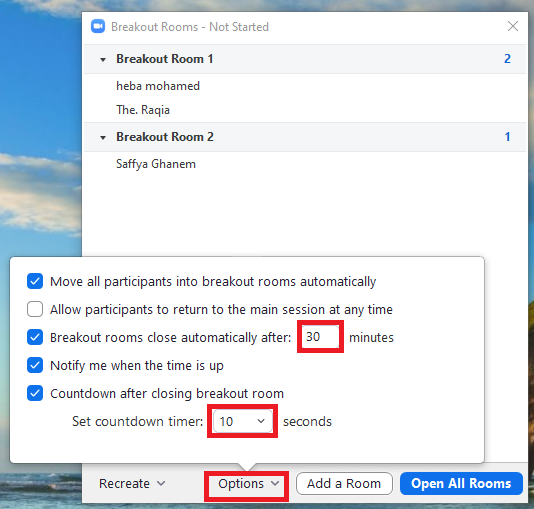
-Click "Options" to view additional breakout rooms options.
1-Move all participants into breakout rooms automatically: Checking this option will move all participants into the breakout rooms automatically. If this option is unchecked, the participants will need to click Join to be added to the breakout room.
2-Allow participants to return to the main session at any time: If this option is checked, the participants can move back to the main session from their meeting controls. If this is disabled, they need to wait for the host to end the breakout rooms.
3-Breakout rooms close automatically after x minutes: If this option is checked, the breakout rooms will automatically end after the configured time.
4-Notify me when the time is up: If this option is checked, the host will be notified when the breakout room time is up.
5-Countdown after closing breakout rooms: If this option is checked, the participants will be given a countdown of how much time they have left before being returned to the main room.
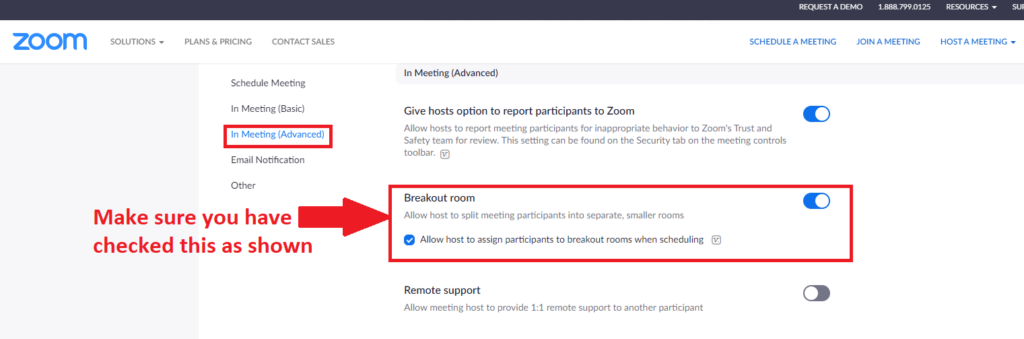
-Make sure that all checkbox is checked as shown , you can set the time as you prefer.
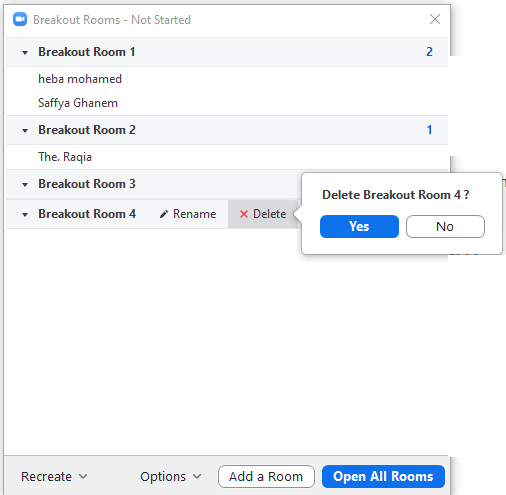
-Click "add a Room" if you want.
-After you have finished setting the rooms up click "Open All Rooms" to start the rooms. .
-Here all participants have been moved to their respective rooms.
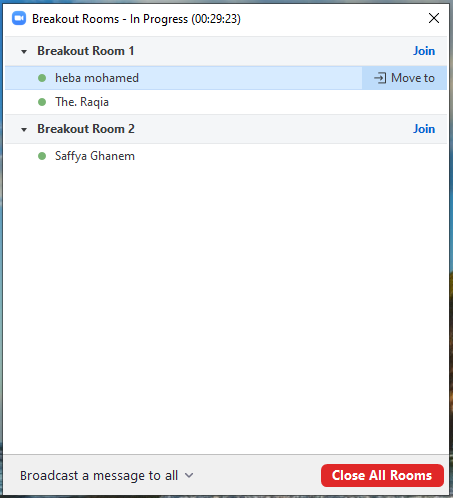
-The host will be left in the main meeting until manually joining one of the rooms.

-Join: Join the breakout room.
-Leave: Leave the room and return to the main meeting (only shows when in a breakout room).
-Close All Rooms: Stops all rooms after a x second countdown, shown to the host and participants, and returns all participants back to the main meeting.
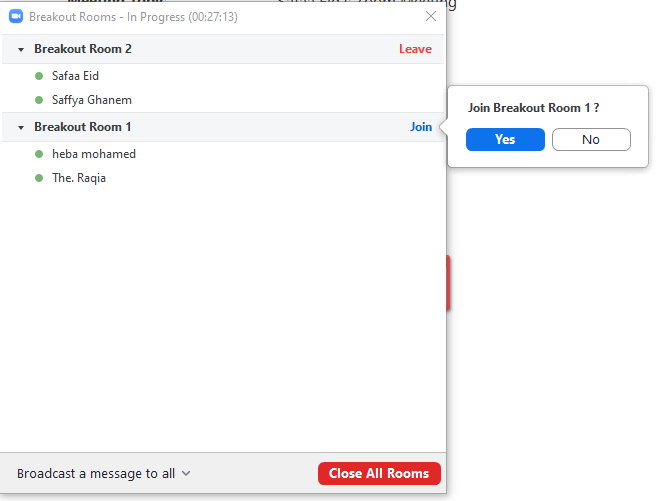
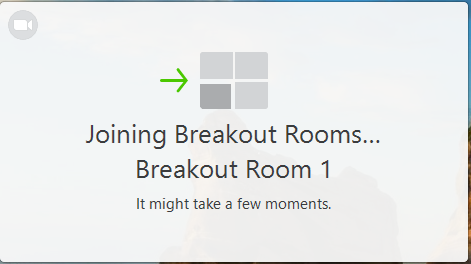
-The participants (and the host when manually joining a room) will see the following message shown when joining the breakout room.
-You can either Delete or Rename a Room.
Managing breakout rooms in progress
-After automatically assigning participants to rooms, you can rearrange the participants.
-Participants who are not assigned to breakout sessions will remain in the main meeting when the rooms are started.
- Move to (participant): Select a room to move the participant to.
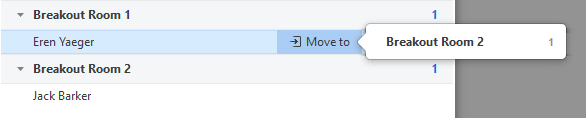
- Exchange (participant): Select a participant in another room to swap the selected participant with.

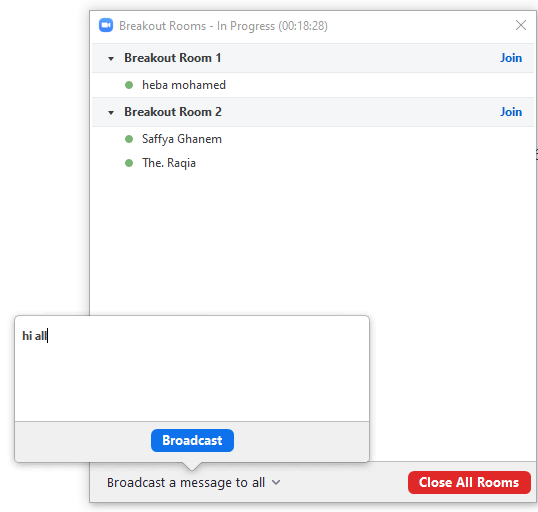
Broadcasting a message to all breakout rooms
-The host can broadcast a message to all breakout rooms to share information with all participants,The message will appear for all participants in all Breakout Rooms.
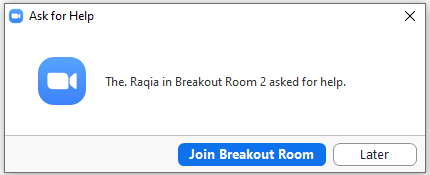
Responding to requests for help
Participants in breakout rooms can request that the meeting host join their meeting by clicking Ask for Help. (which will be in the student`s account)

You will be prompted to join the room where the request originated from. Click Join breakout room to join the room.
- Move to (participant): Select a room to move the participant to.
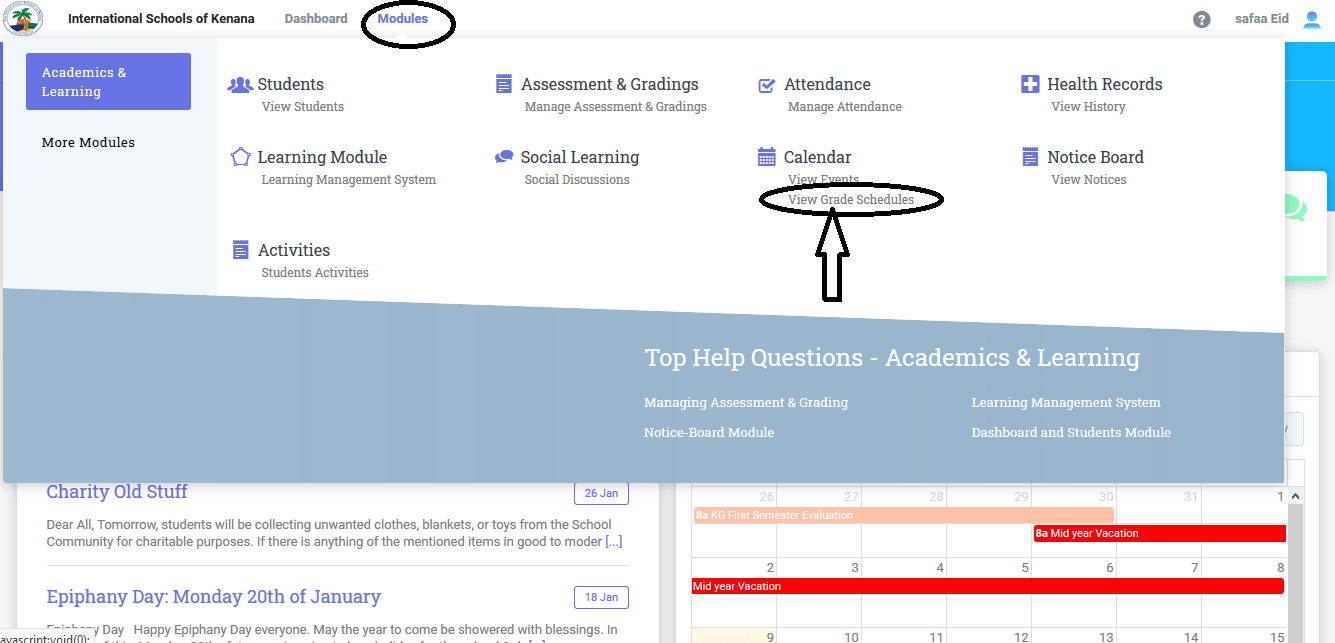
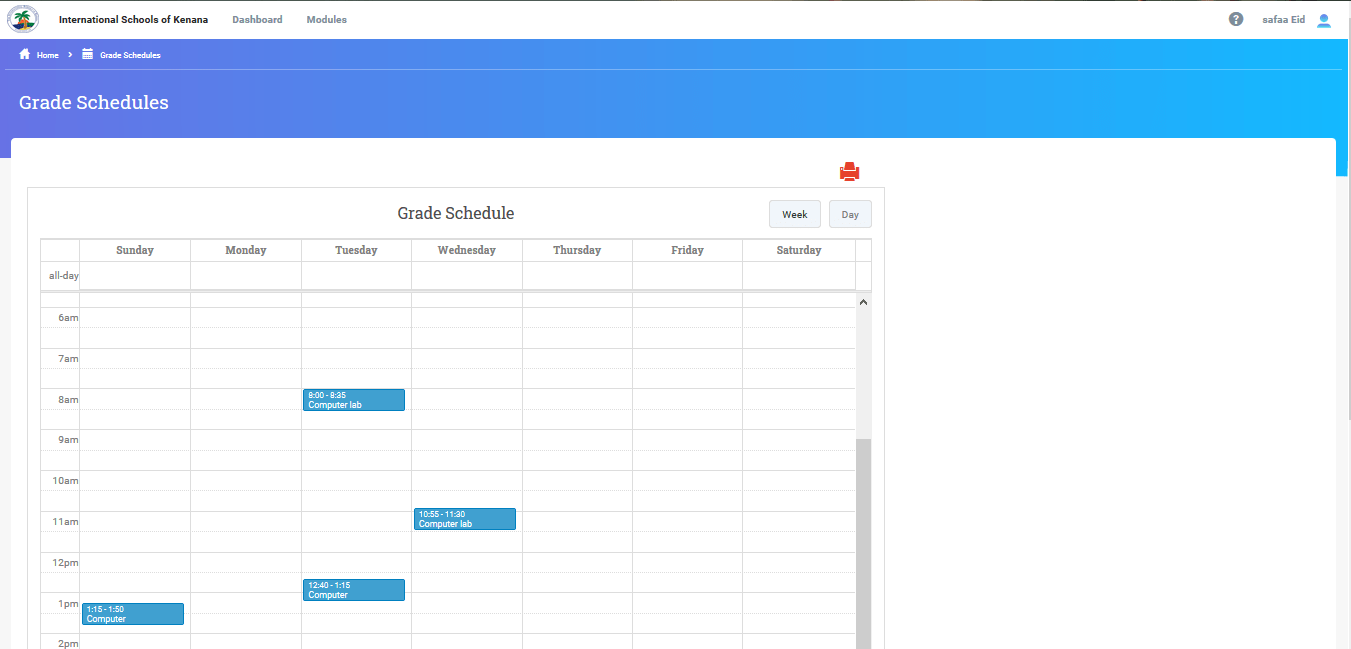
- 8. How To Access Grade Schedules (Teacher)09.02.20
1-Using the website.
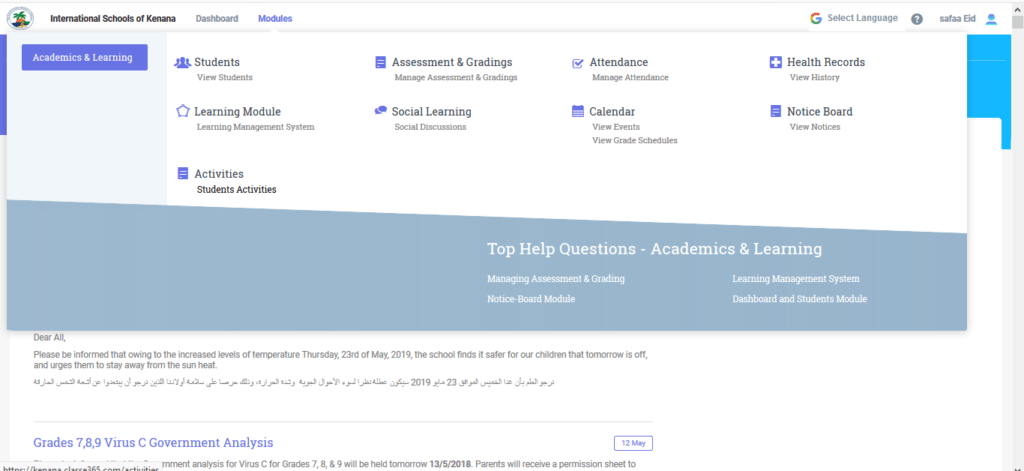
Go to Modules —->Academics & Learning—->View Grade Schedules as you can see below.
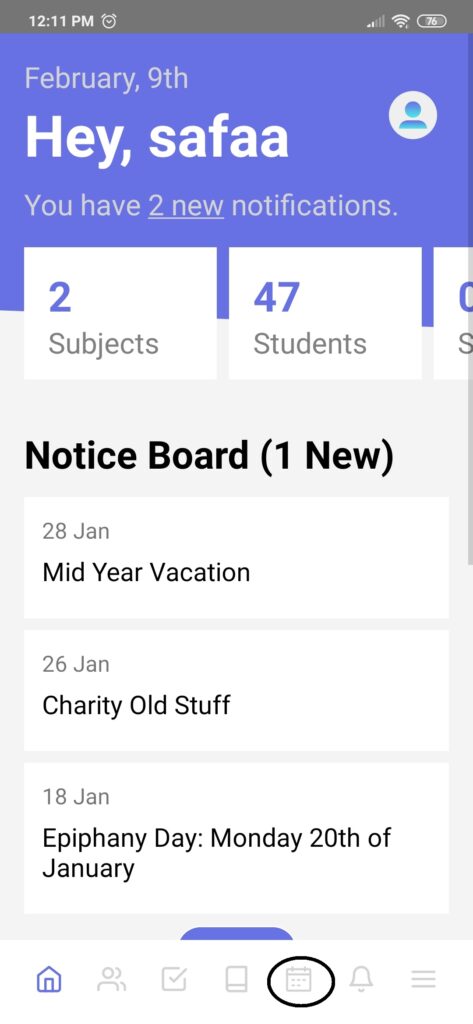
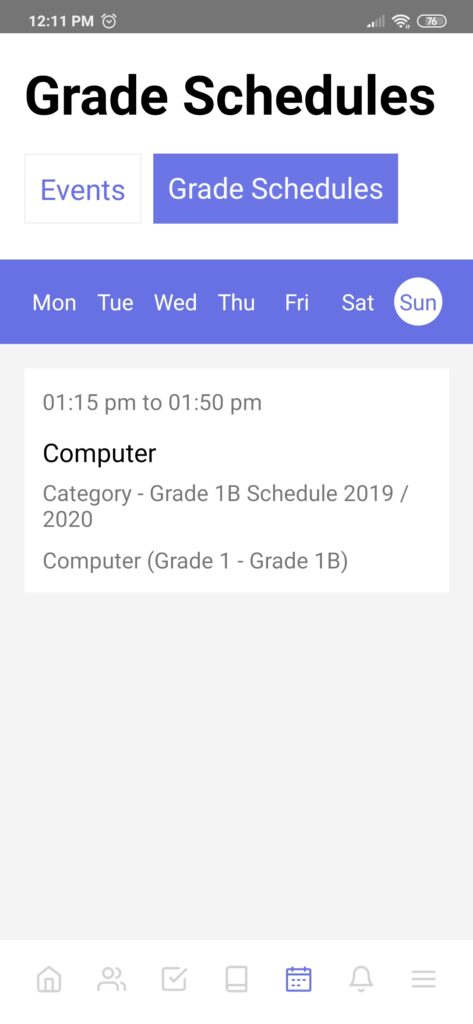
2-Using the "Classe365"application
-Click On Calendar Icon —-> Grade Schedules as you can see below.
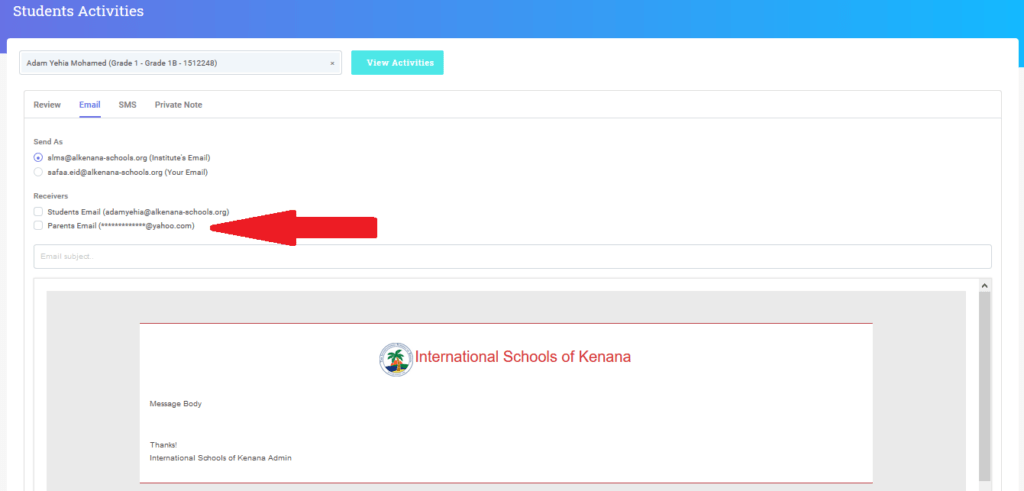
- 9. how to send message to parents from slms?24.02.20
-Open Your Account and follow the steps
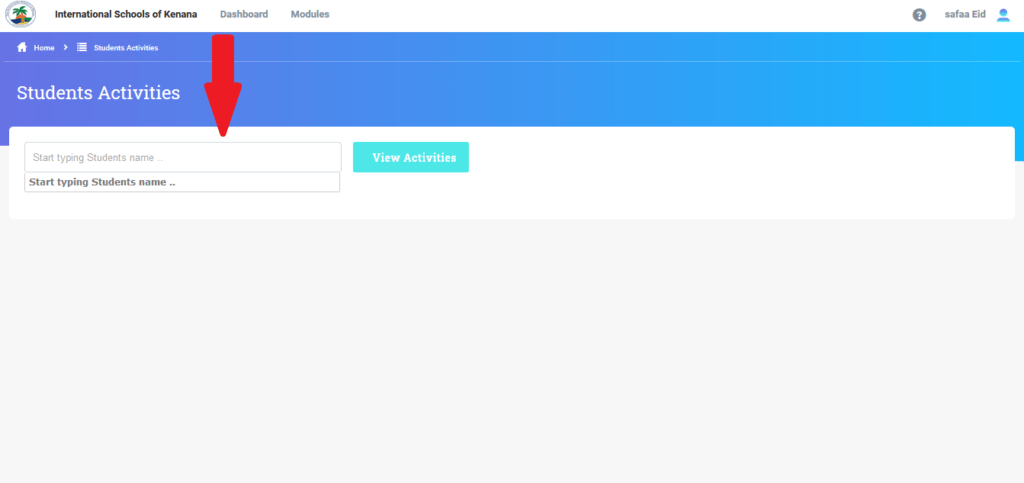
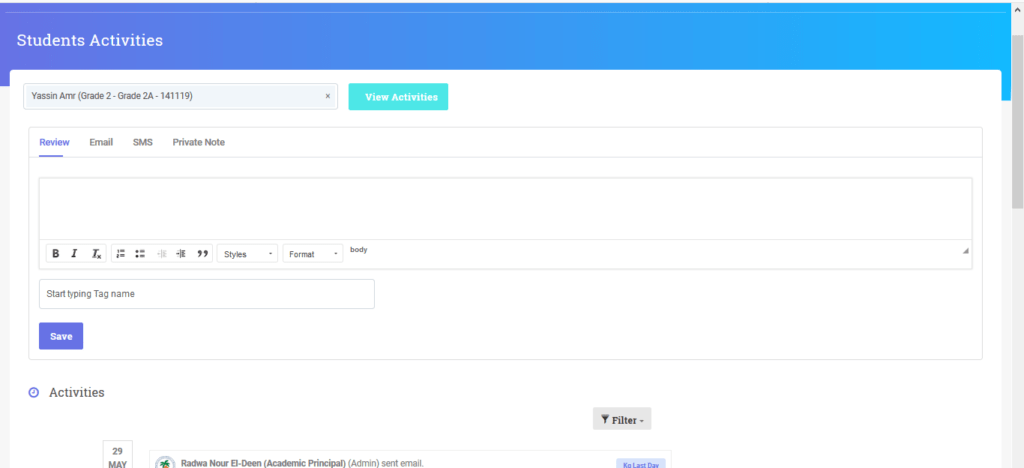
1-Module----Academics&Learning ---- Students Activities.

2-Write The Student Name Then Click View Activities.
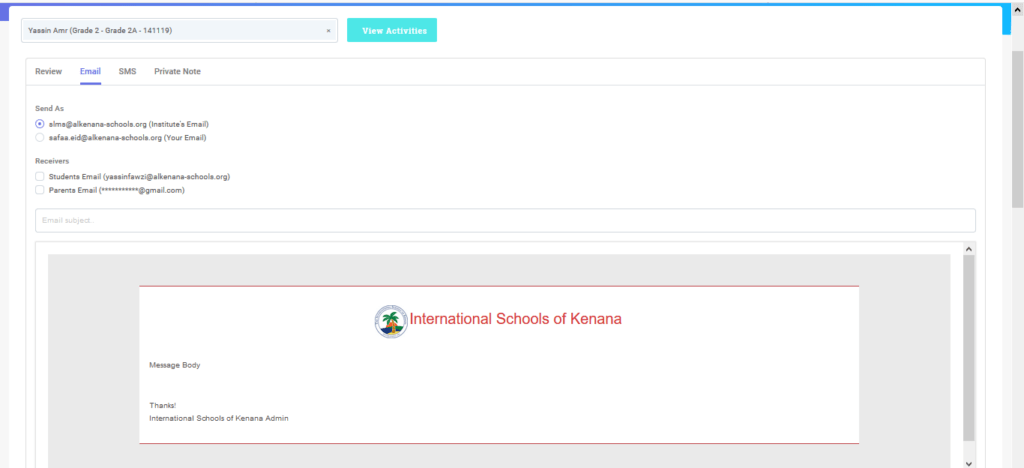
3-Select the receivers of the mail (Parent/student) Then Write your Message Then Click Send .
- 10. How to send private message to students Via e-Kenana SLMS?04.03.20
-Open your account on eKenana slms.
-Module---Academics&Learning---Learning Management System.
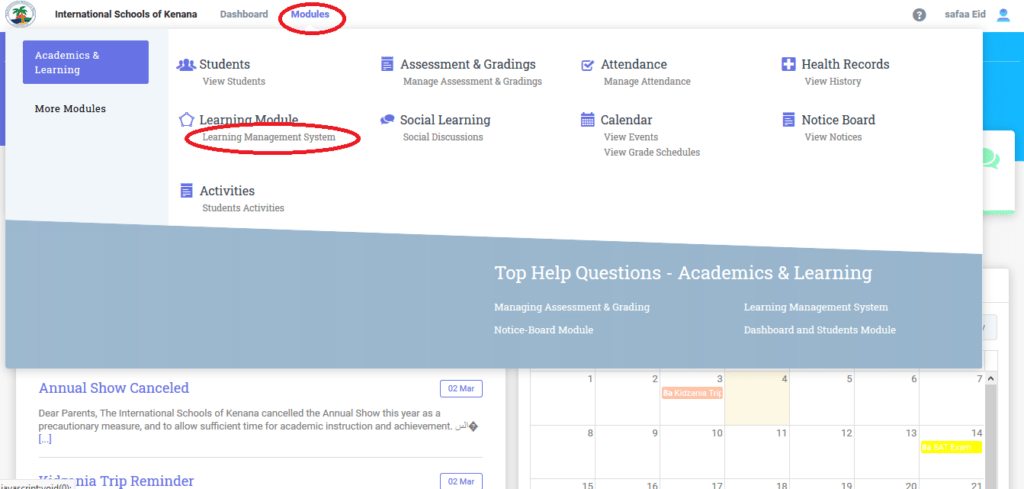
-Select Grade & Class.
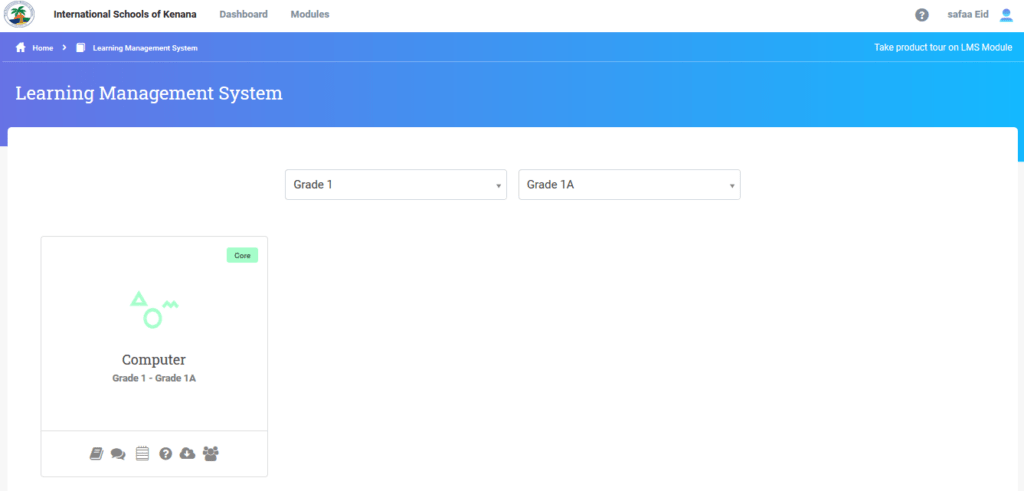
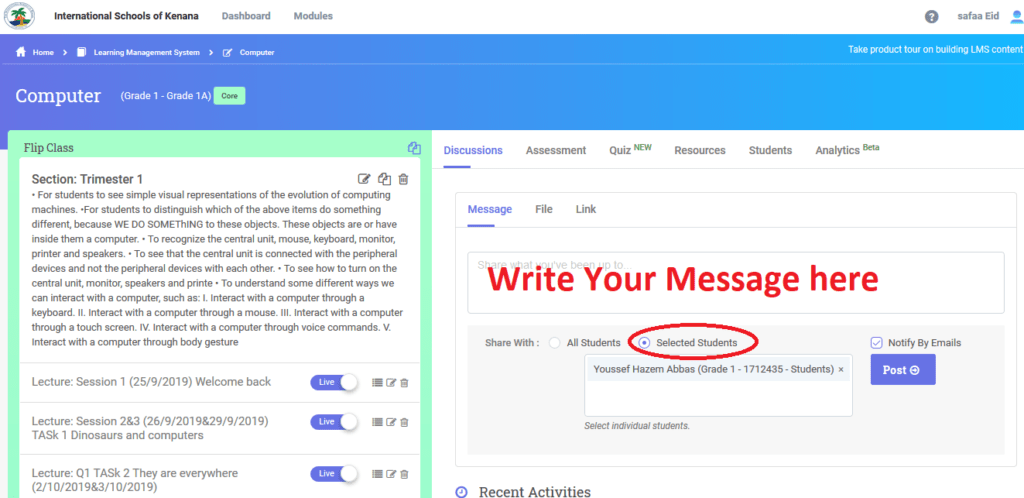
-Follow The Steps:
-Write Your Message Or attach file ---Select Students (The Specific student) ---Make Sure You Click Notify By Mails---Click Post.
- 11. How To Use Zoom.US ?12.03.20
1-Using PC.
-Go to https://zoom.us/
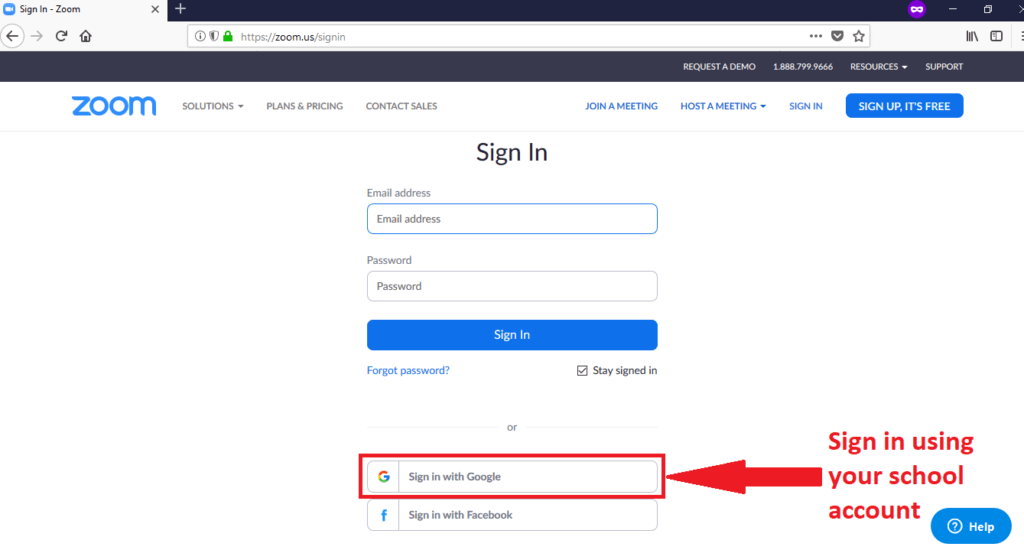
-Click on "SIGN IN".
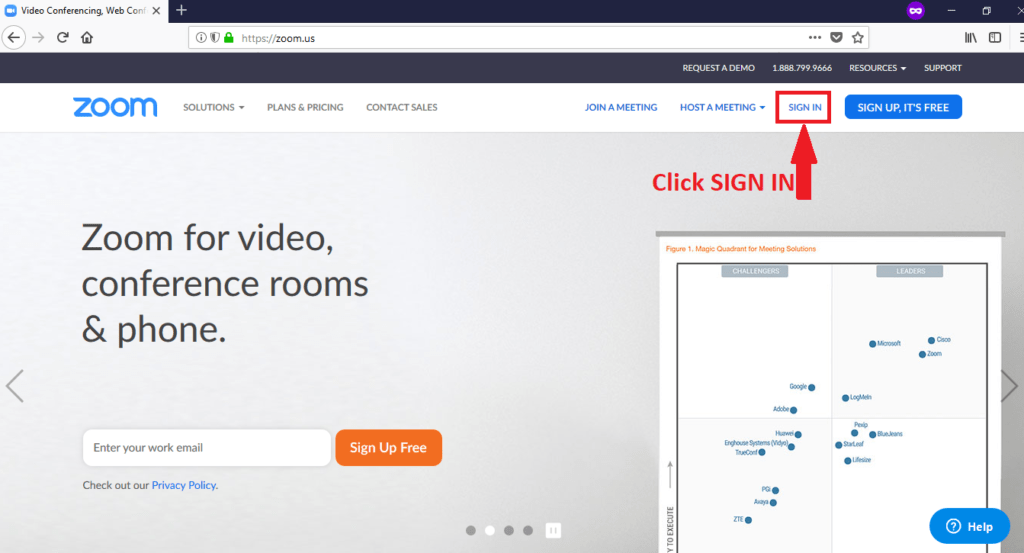
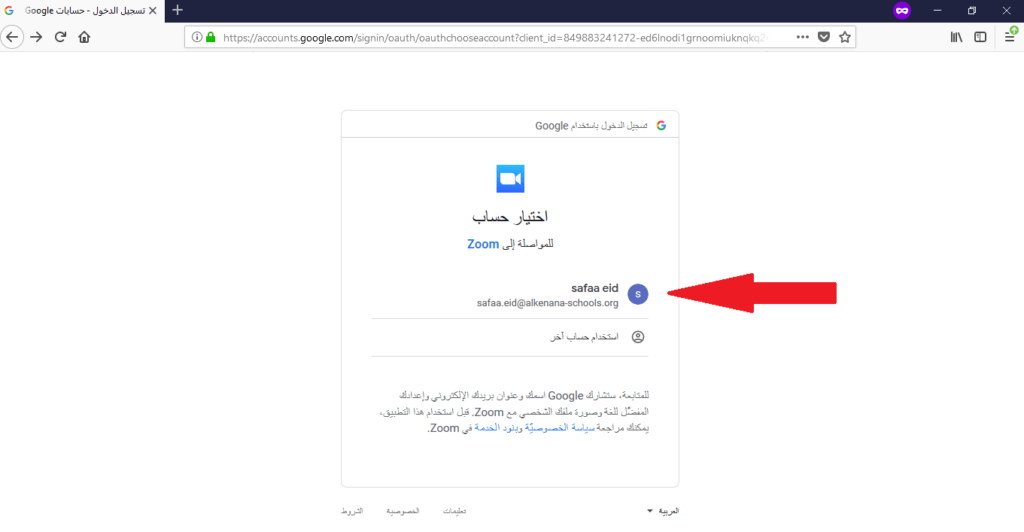
-Make sure that you open on your browser with your school mail " @alkenana-schools.org".
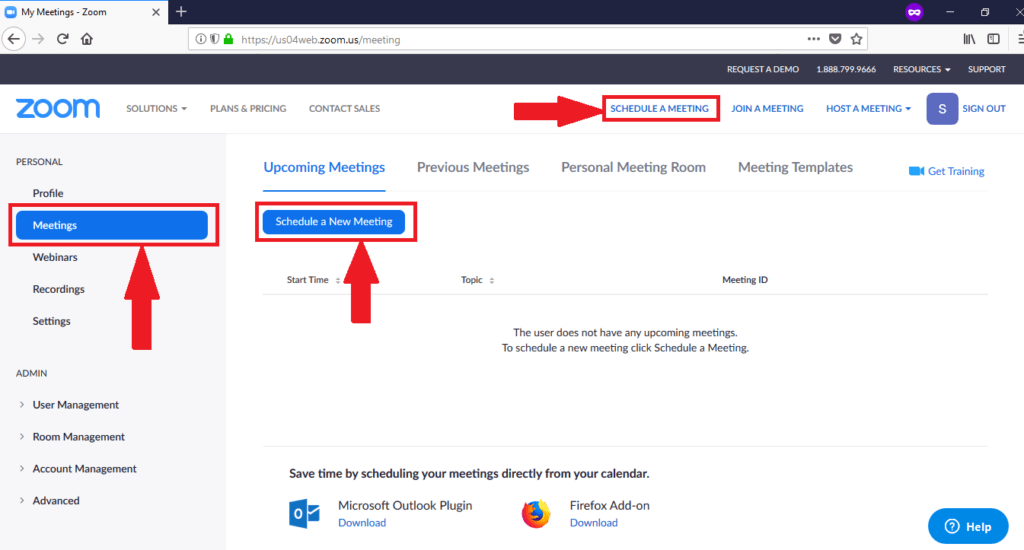
-Click on " Schedule Meeting".
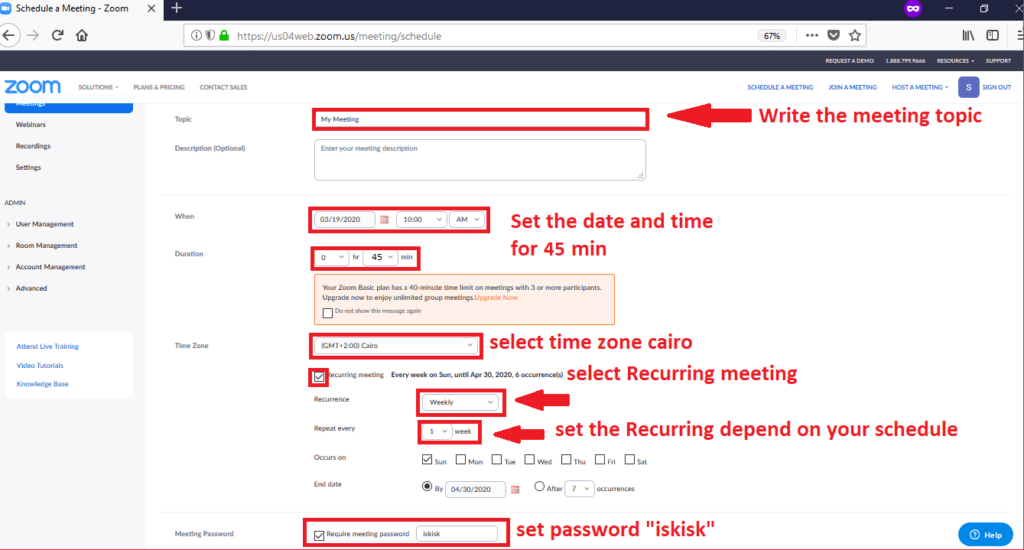
-Fill the topic name, the date and the duration of the meeting..... ----Follow the steps.
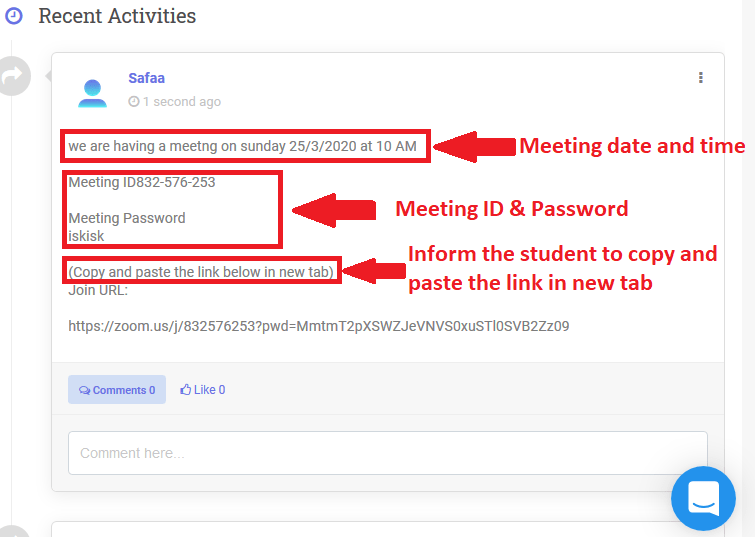
-Copy the "meeting ID ,Meeting Password ,Join URL" and paste it on SLMS in your own subject Then Click on "start this meeting".
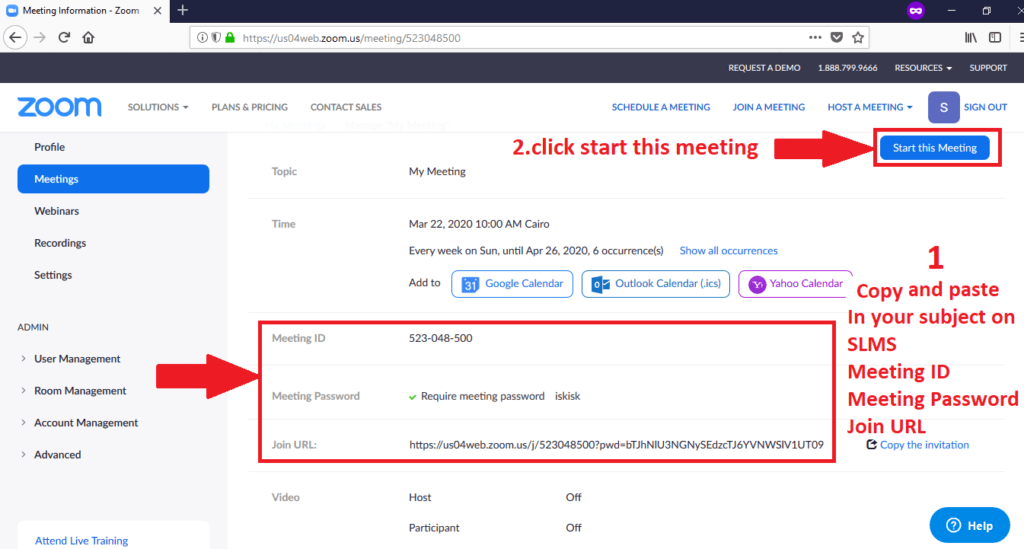
-Do not forget to mention the meeting( date and time) for the students on discussion.
- and inform your students if they will use the join link that the Join URL is not clickable they have to "copy the link and paste it in new tab".
-The browser will ask to download zoom file download it ,then click it to set it up.

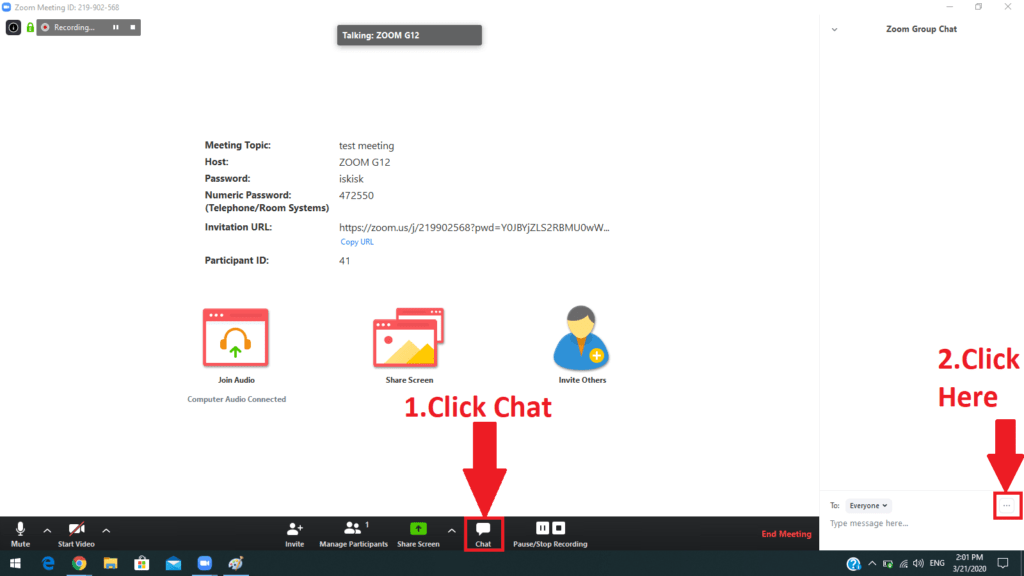
-Once zoom is opened you will see this
-Follow the steps.
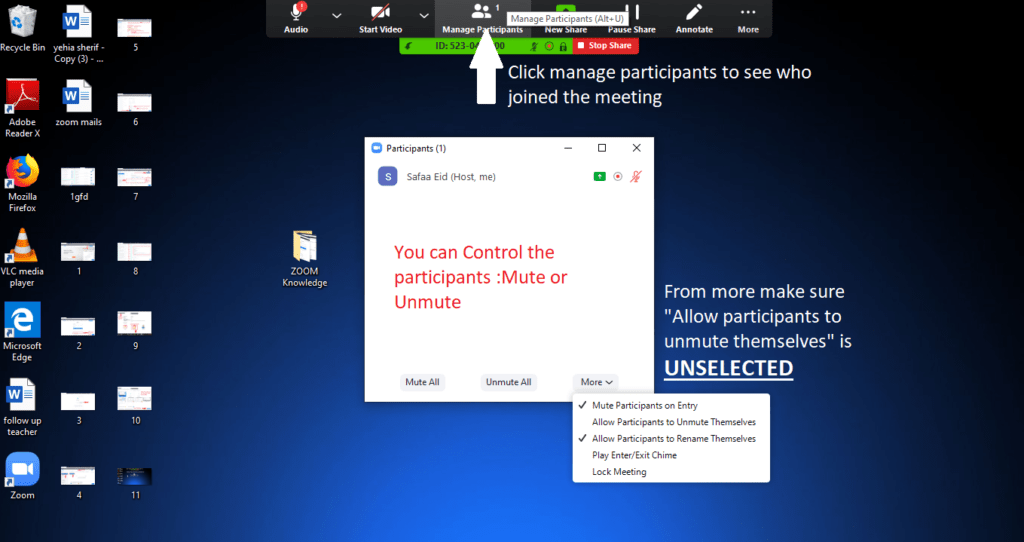
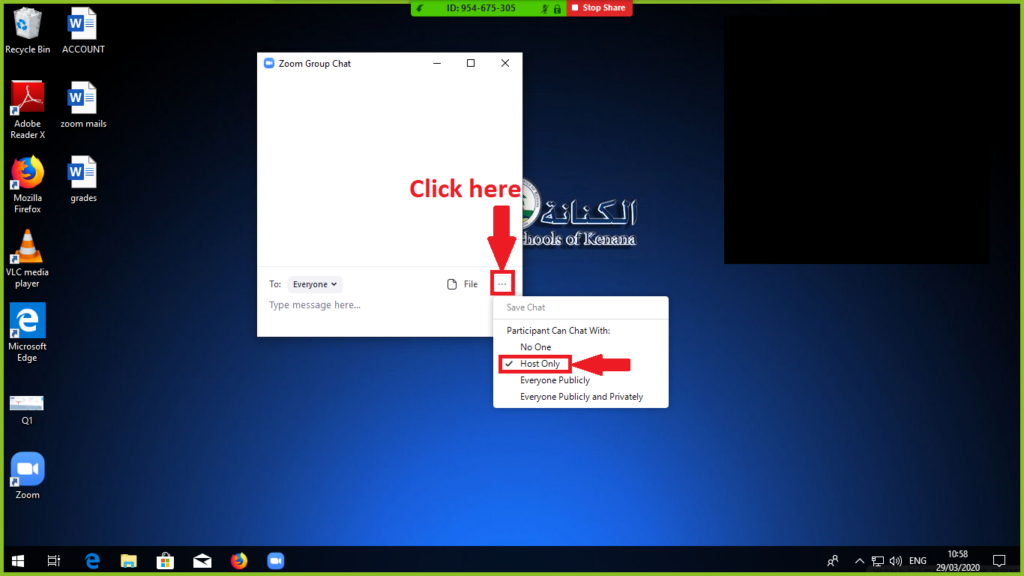
-You can prevent the students from chatting with each other and chat only with you.
-The upper menu is opened all the time as you can use it.

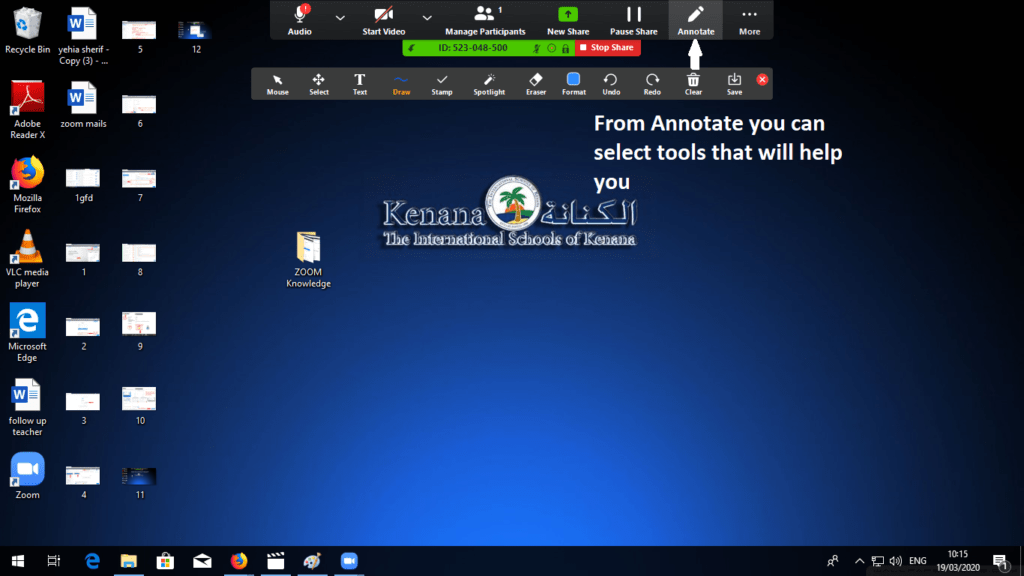
-Click annotate to have a lot of tools that will help you in your lecture....arrows,text,eraser.....
-To stop the students from drawing on your screen.
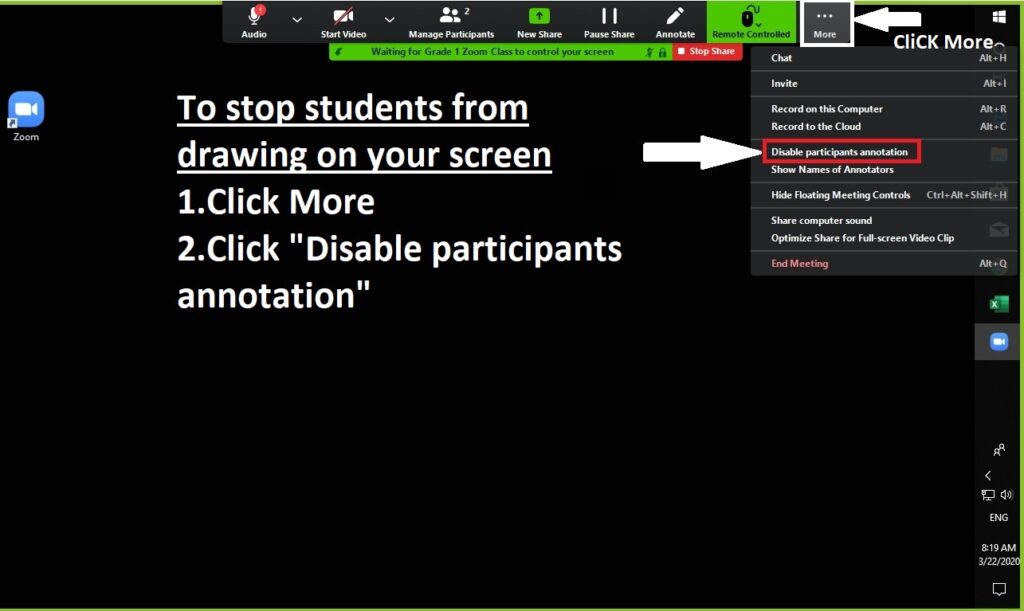
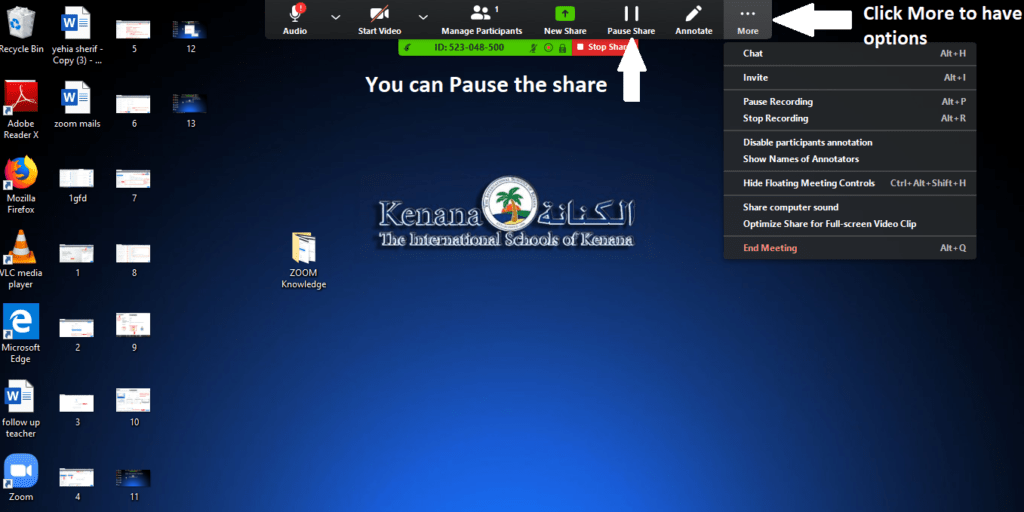
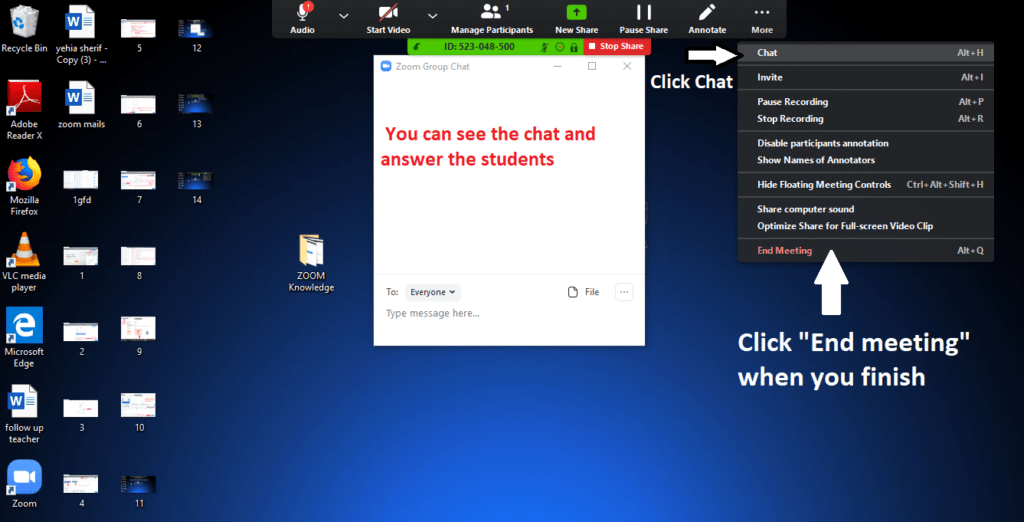
-From more you can have a lot of options you can use---record ,invite,chat,end meeting.
-Pick a file that will help you in your lecture,and you can start your session.
-Once you clicked "End Meeting", zoom program will convert the video and you will find it on document folder.
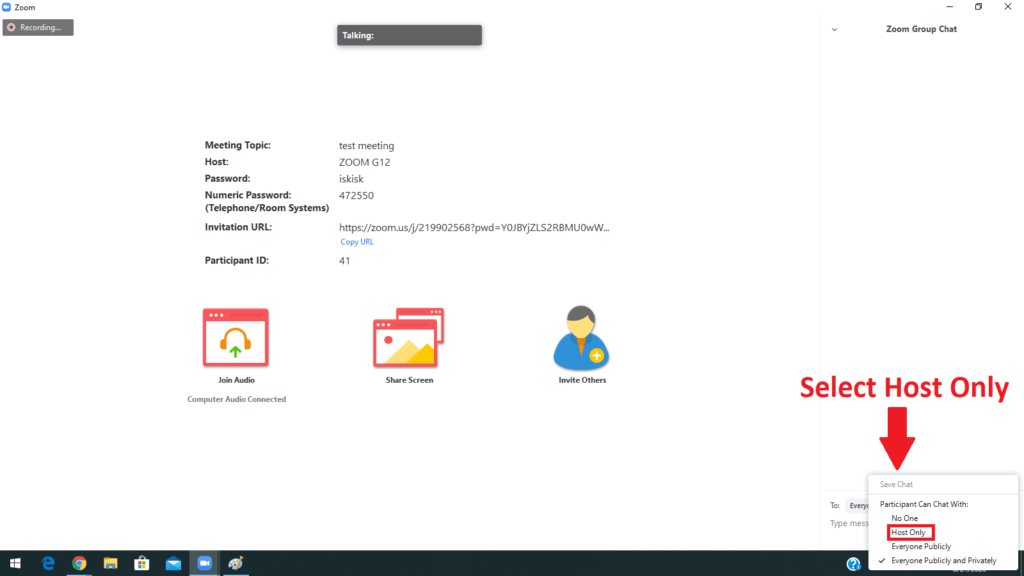
-To stop the students from chatting with each other and to chat with you only ,open the chat and follow the steps.
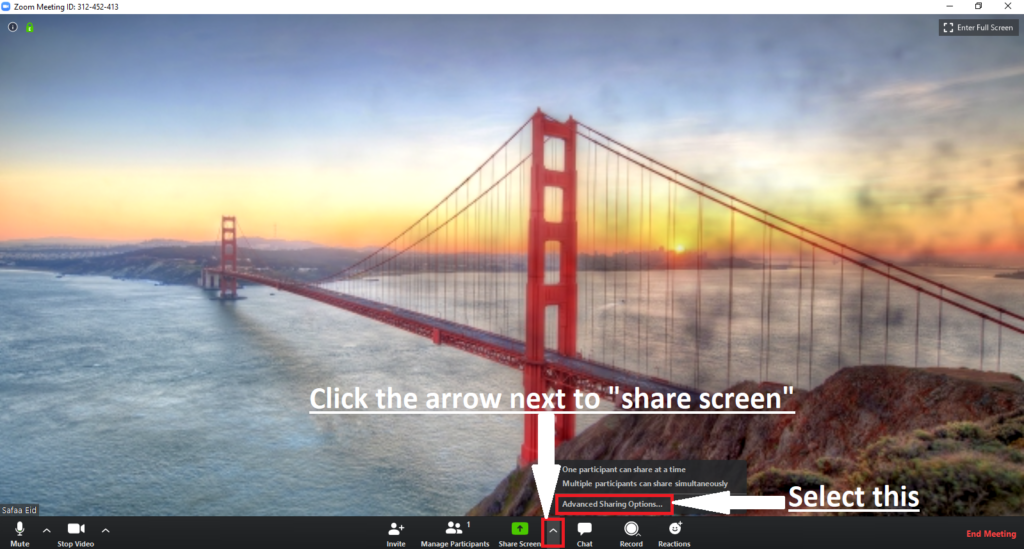
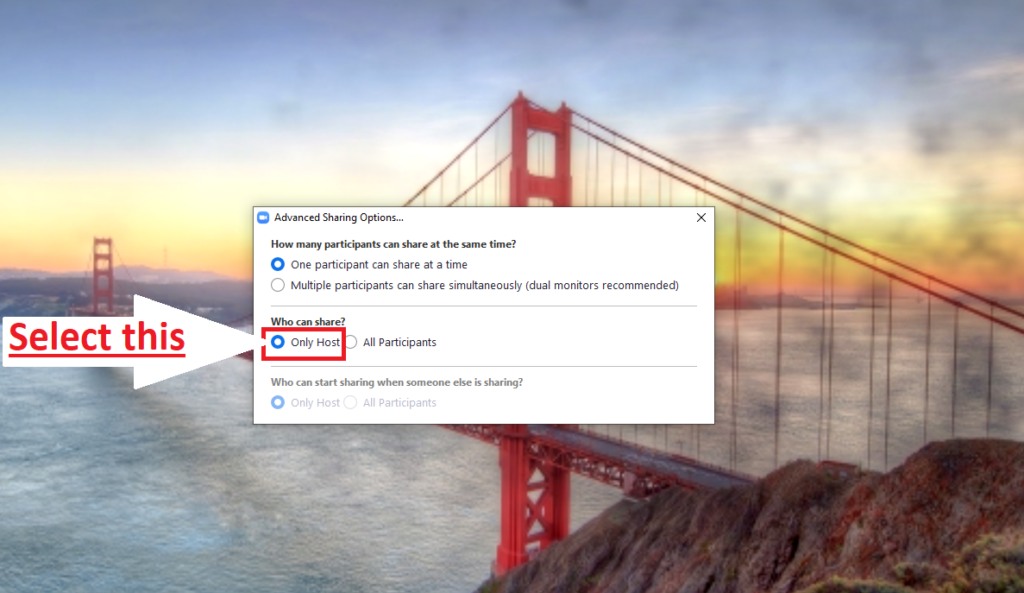
-To stop the students from sharing their screen do the following
-In the latest version of zoom a new security icon has been added for host (teacher) only.
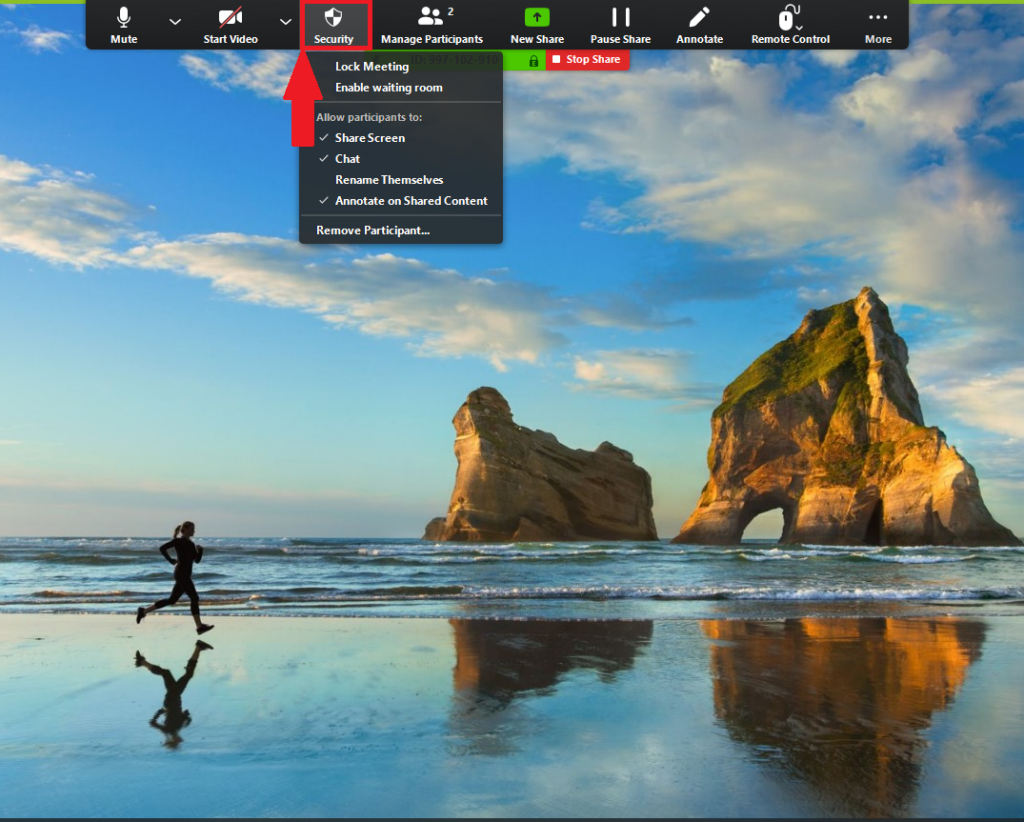
By clicking the Security icon, hosts and co-hosts have an all-in-one place to quickly:
- Lock Meeting: Locks the meeting, keeping new participants from joining the meeting.
- Enable Waiting Room: Enables Waiting Room for incoming new participants or to move current participants into the Waiting Room.
- Allow participants to:
- Share Screen: Allows participants to start Screen Shares
- Chat: Allows participants to use the chat function.
- Rename Themselves: Allows participants to rename themselves from the Participants panel.
- Annotate on Shared Content: Allows participants to annotate over content shared during the meeting. The host can enable or disable annotation when the host is sharing.
- Remove Participant: Allows the removal of a participant from a meeting. The participant can not re-join unless Allow removed participants to rejoin is enabled in Meeting settings.
-To avoid the CONVERSION time between session follow this steps:
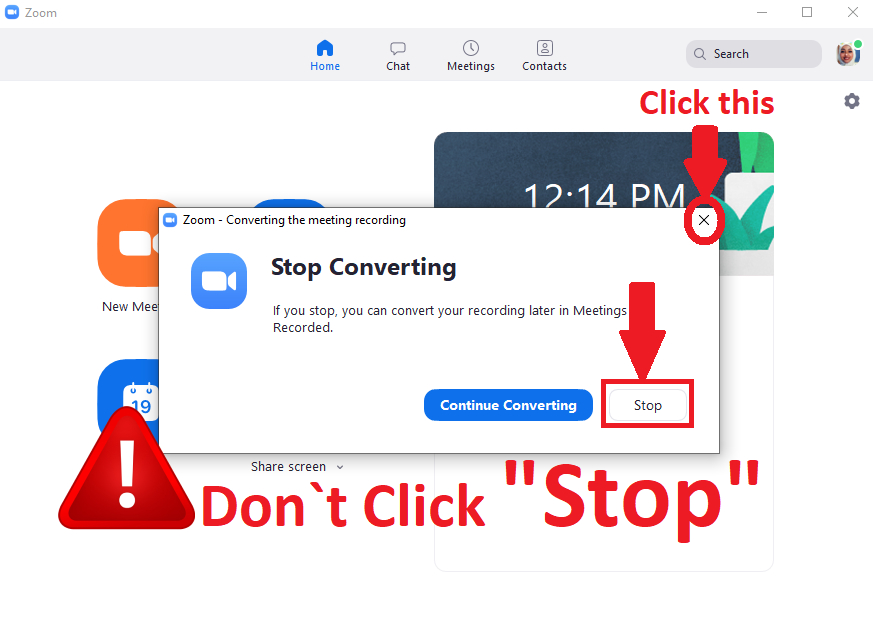
-After you end your meeting zoom program will convert the recorded session as usual ,Click "Stop Converting" the first time only and close the window ...go to the next class and do your live session.

-P.S don`t click stop that appear in the next window just close it.
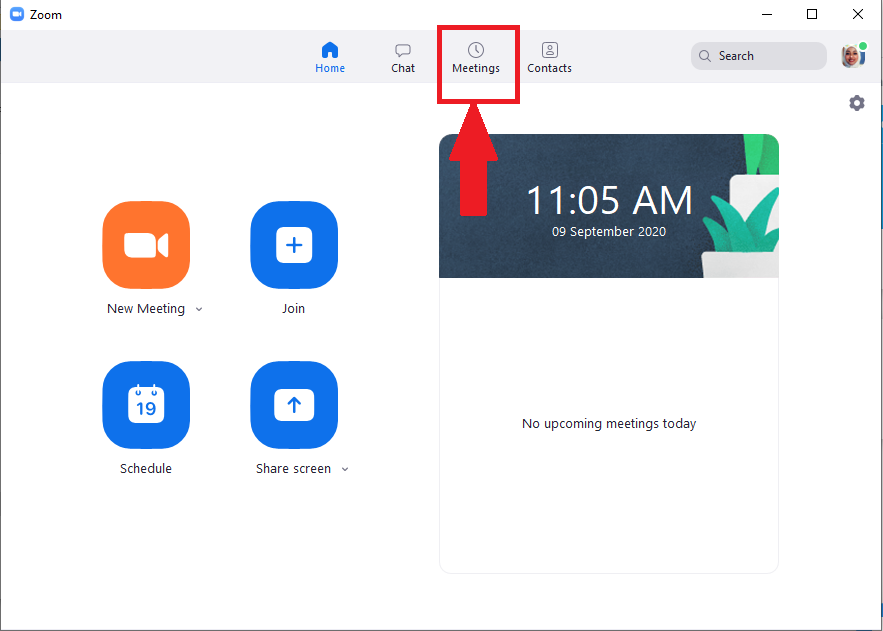
-To get your the session that you stopped converting it , open the program and click "Meeting".
-Go to "Recorded".
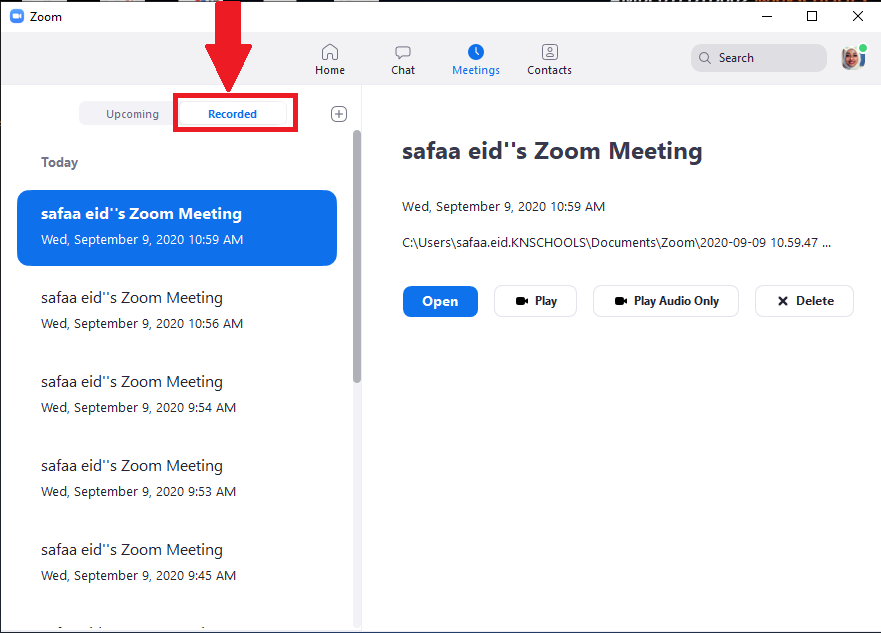
-Select the session that you stopped converting it,then click "Convert".
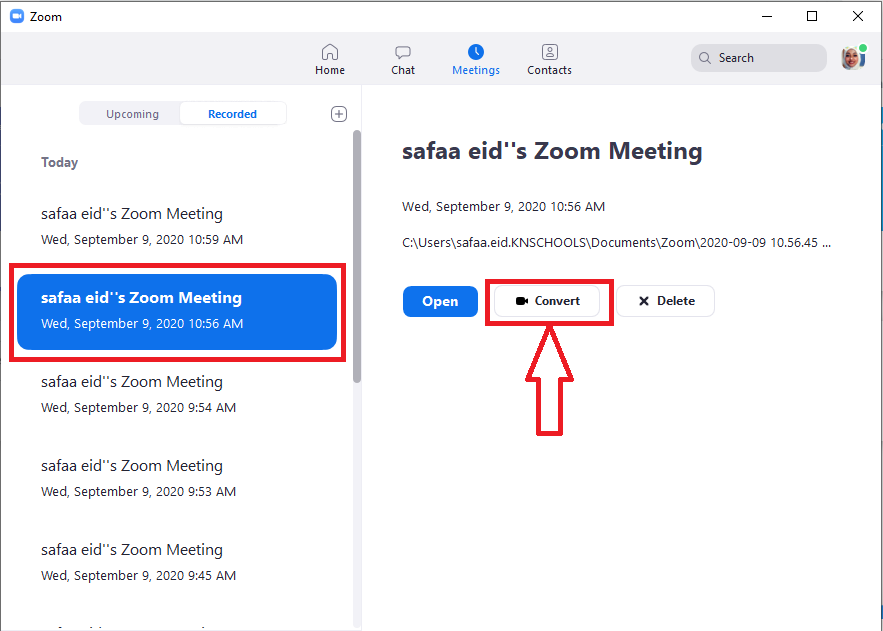
-The session will convert as usual.

-For more clarification please check the links below.
https://support.zoom.us/hc/en-us/articles/360041848151-In-meeting-security-options
https://blog.zoom.us/wordpress/2020/02/14/secure-your-meetings-zoom-waiting-rooms/
https://support.zoom.us/hc/en-us/articles/115005706806?zcid=1231
https://support.zoom.us/hc/en-us/articles/201362603-Host-and-Co-Host-Controls-in-a-Meeting?zcid=1231
https://support.zoom.us/hc/en-us
How to share the video ?
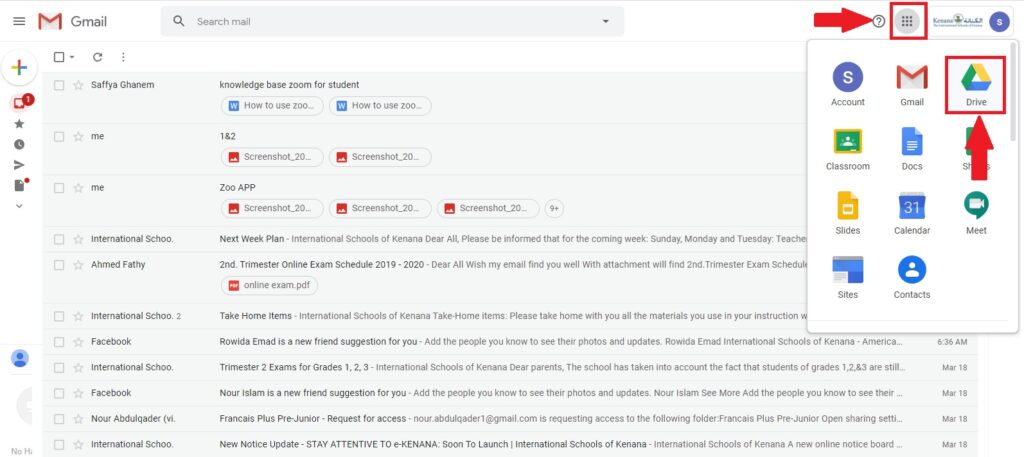
-Open Your mail and Click on the drive icon.
-Go to google drive folder (HOD should inform teachers where to put the recorded video in the google drive).
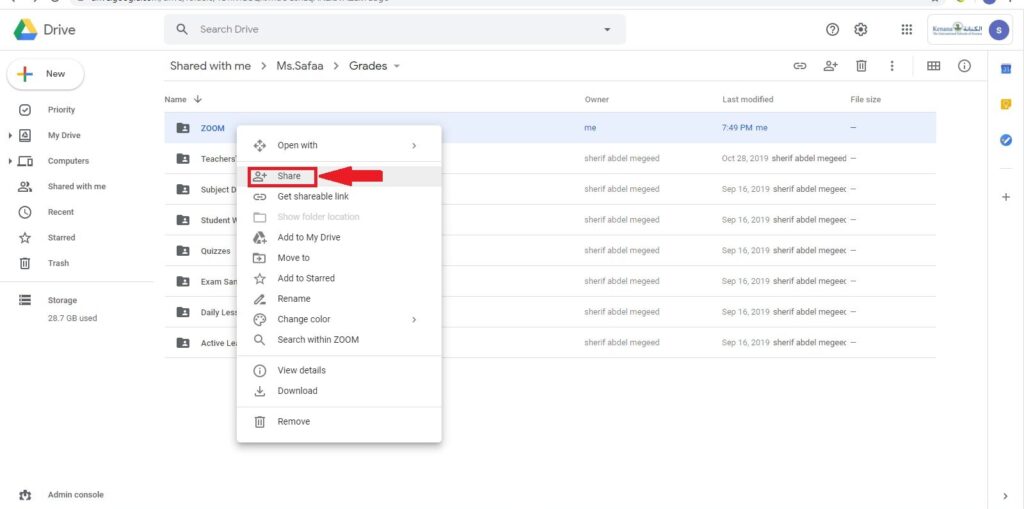
-Inside that folder make a folder for each grade (Upload the videos inside it) and share that folder with that specific grade .
-Right click on the folder and follow the steps to share !.
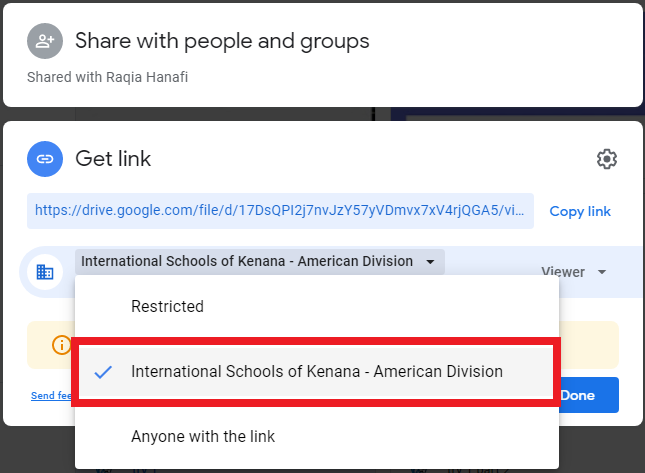
-Click "Change".
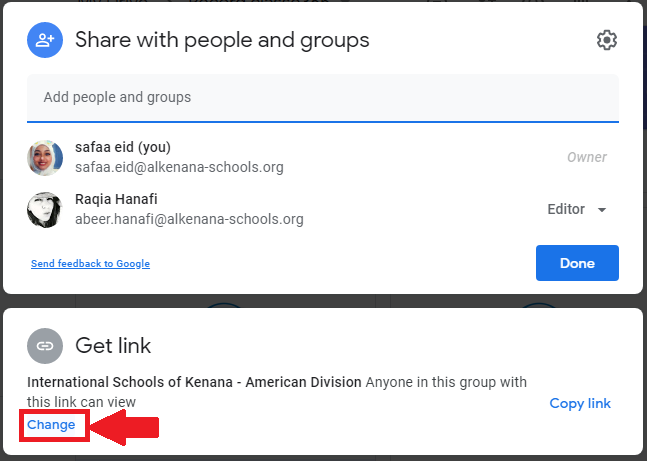
-Change it to "International Schools of Kenana - American Division" .
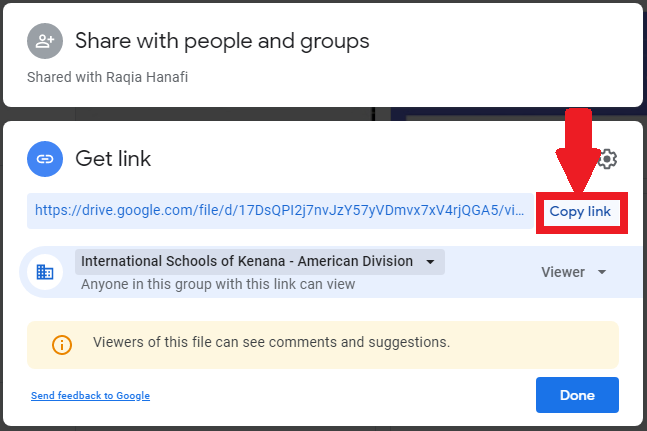
-Paste the copied link in discussion on SLMS,don`t forget to click "Done".
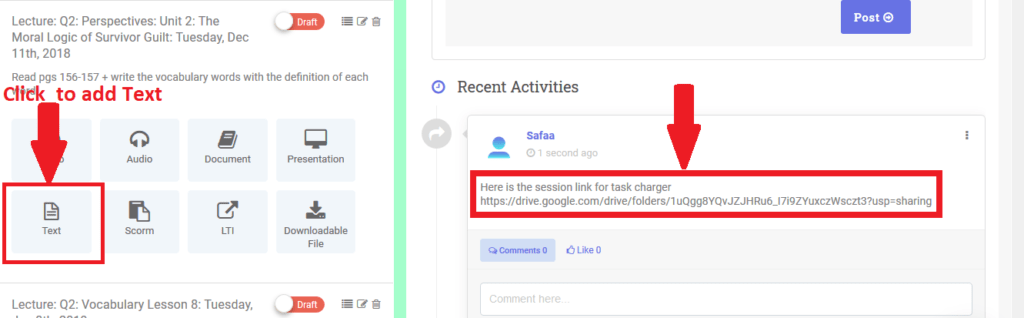
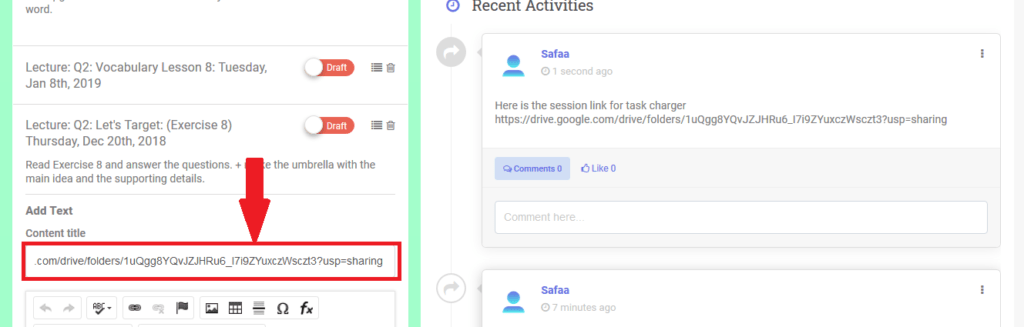
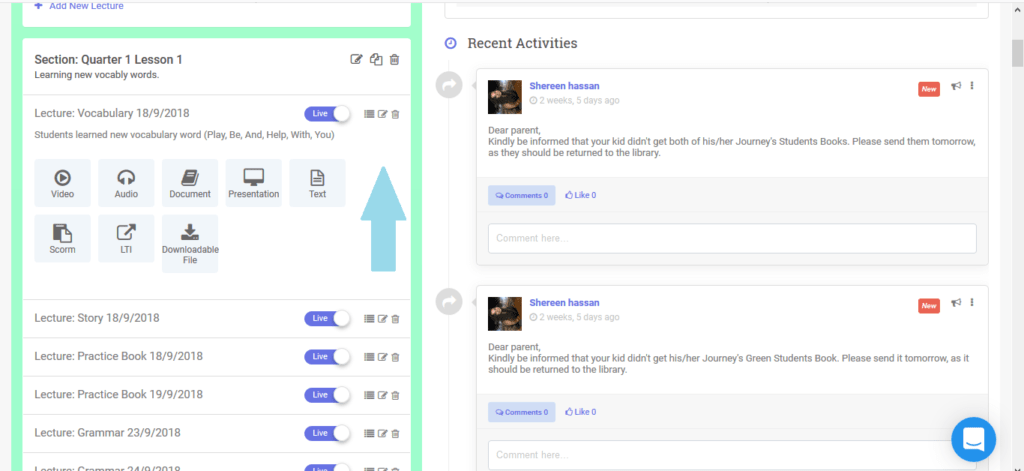
-Go to SLMS on your subject and share the link of your recorded video on discussion and in flip class in the same task that the video recorded for
and click add text and paste the link in it.
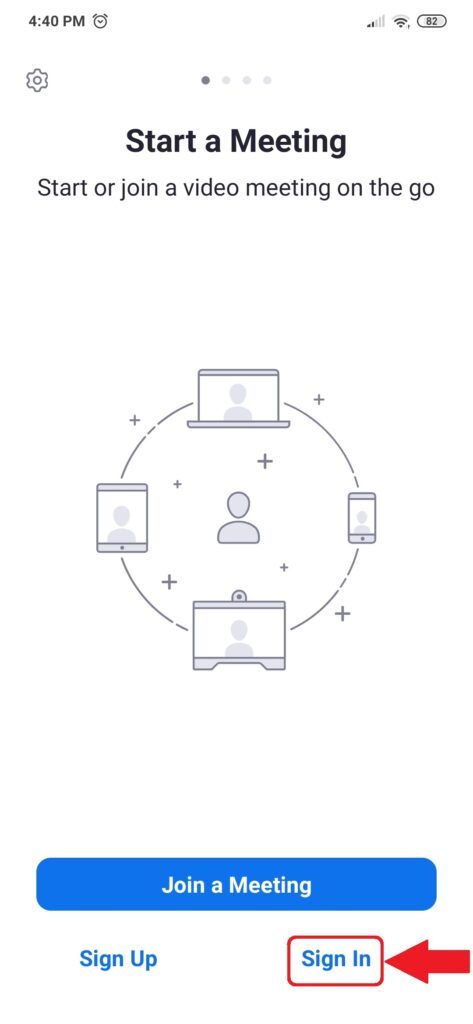
2-Using the "ZOOM APP".
Download the App from


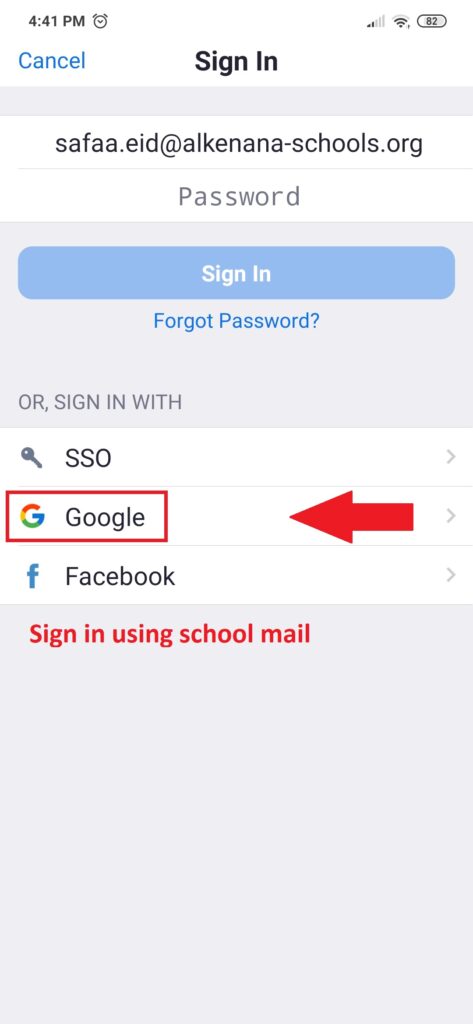
-Click "Sign in"
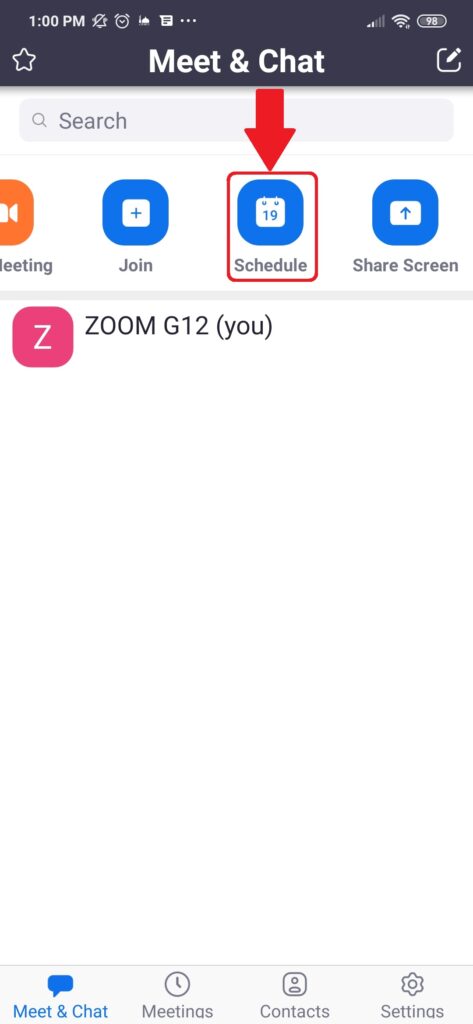
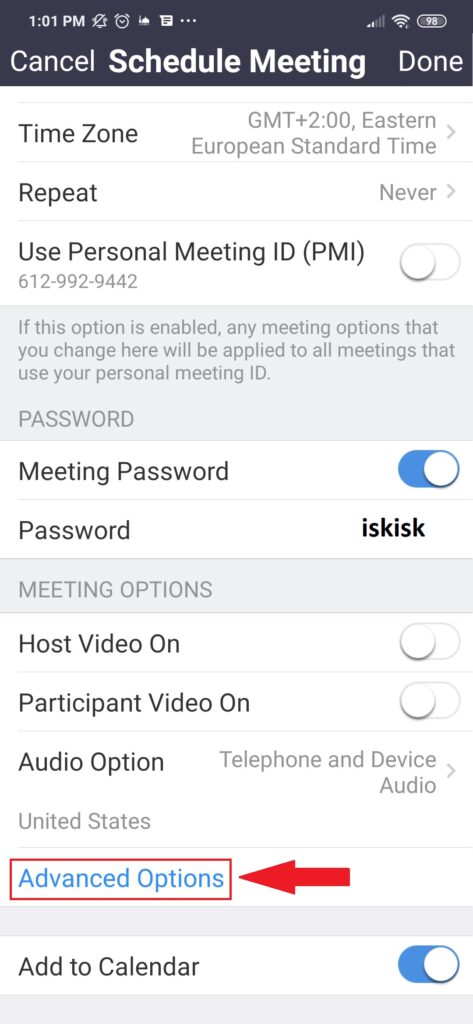
-Click on "Schedule".
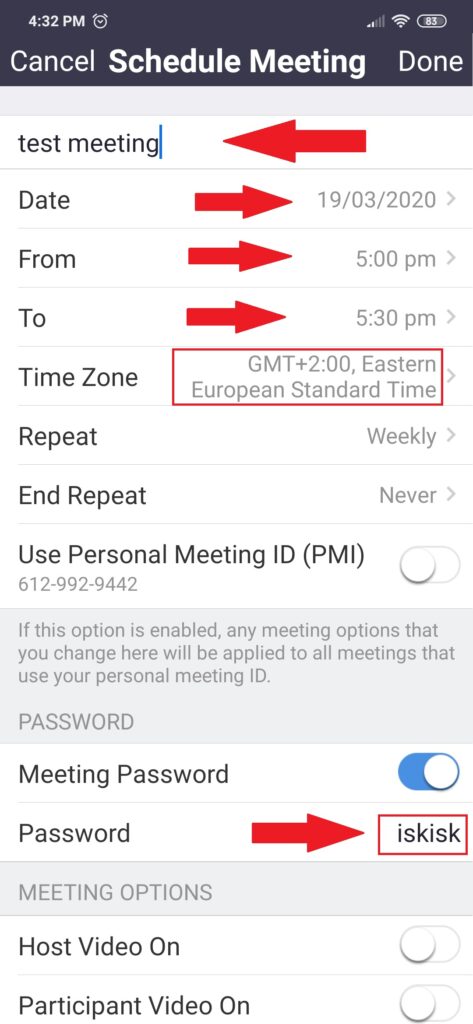
-Set the topic name, the date and the duration of the meeting and make sure to pick time zone"+2 Cairo" .
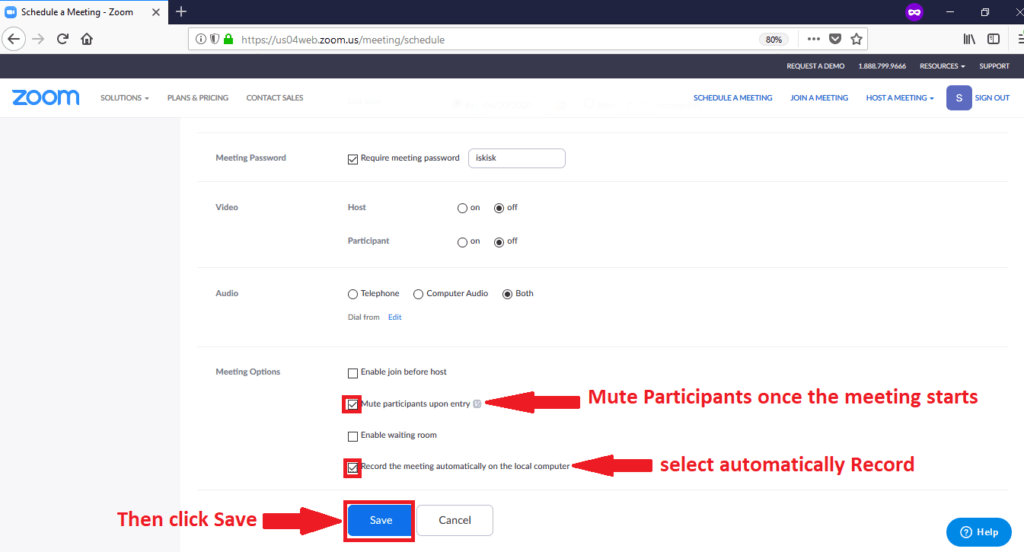
-Set the password "iskisk" .
-Click on "advanced options".
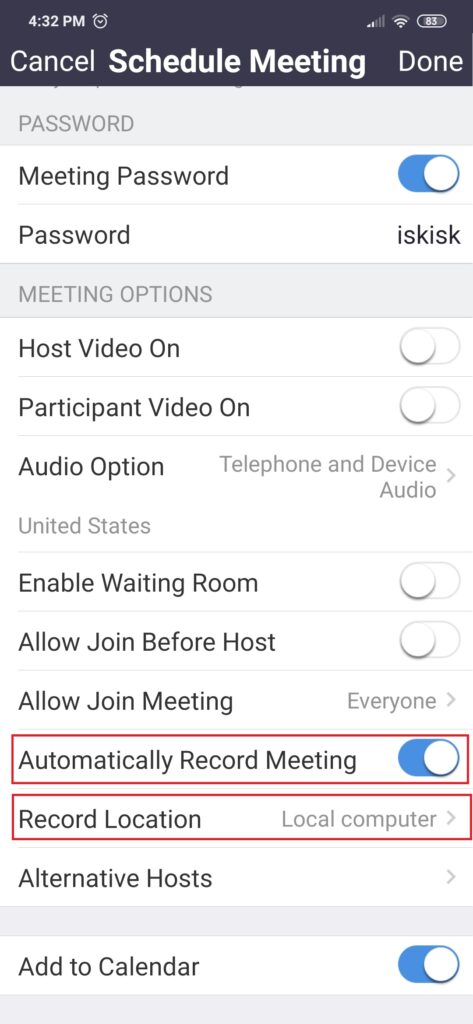
Set the "Automatically Record the Meeting" & Pick "Record Location" Local Computer.
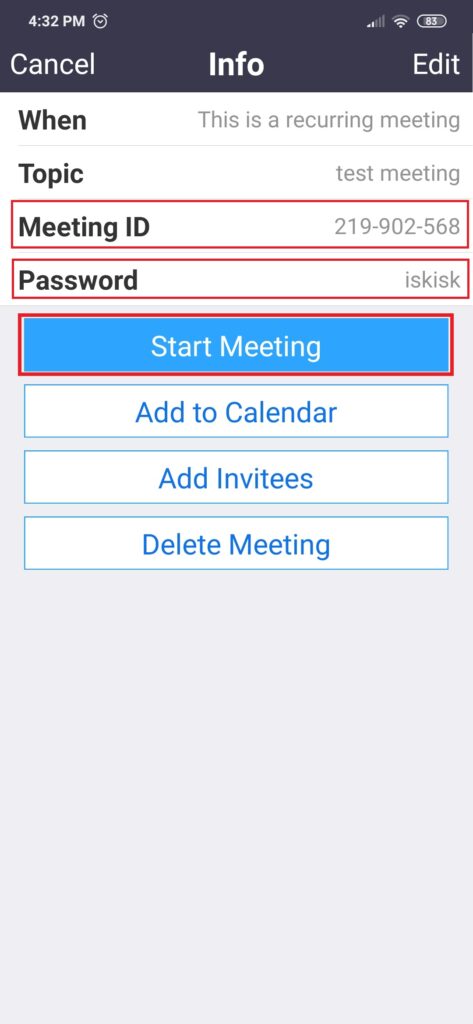
-Copy the "meeting ID ,Meeting Password " and paste it on SLMS in your own subject Then Click on "Start Meeting".
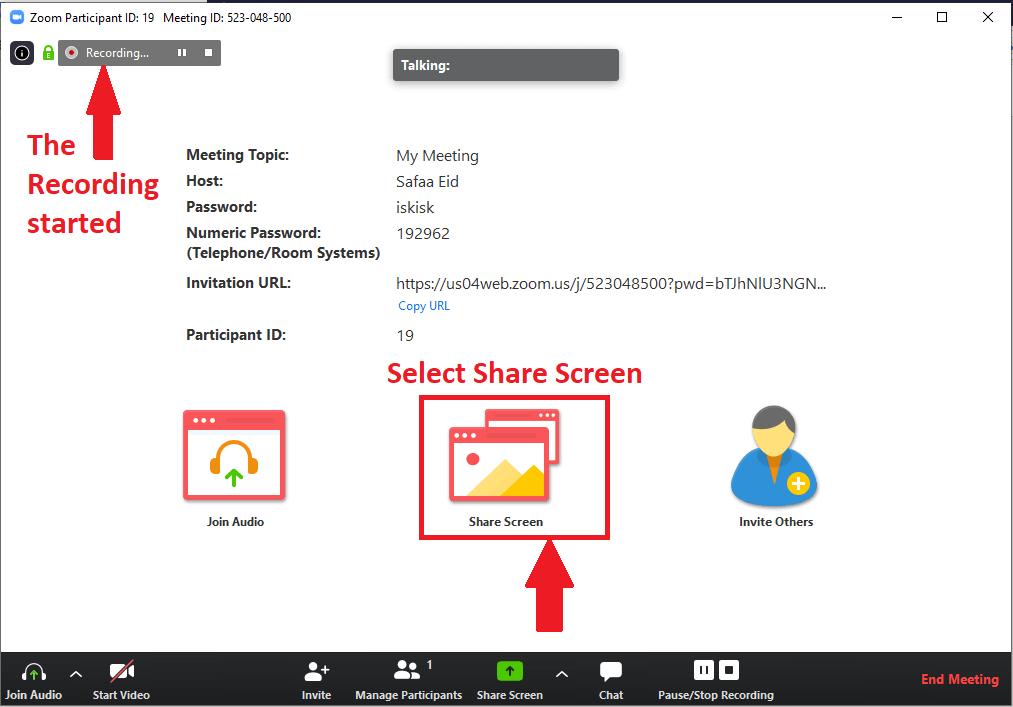
-Click on "Record" to start recording the session.
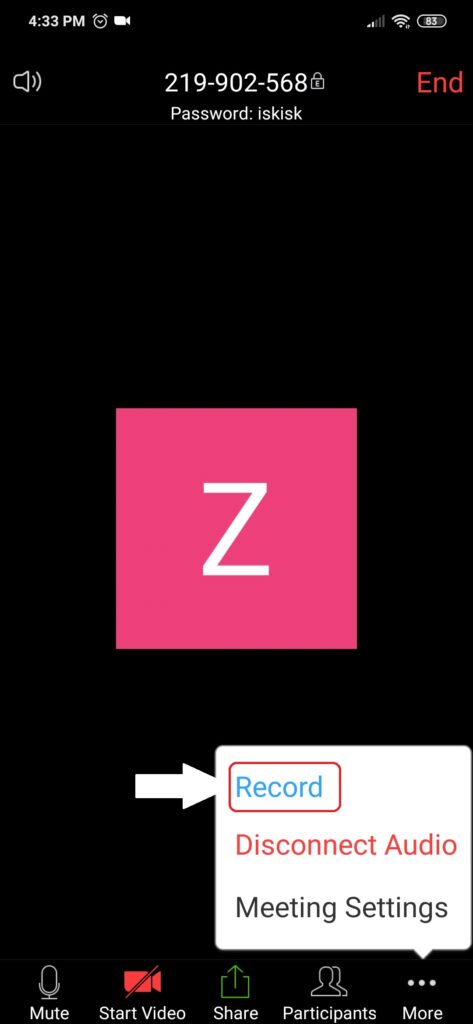
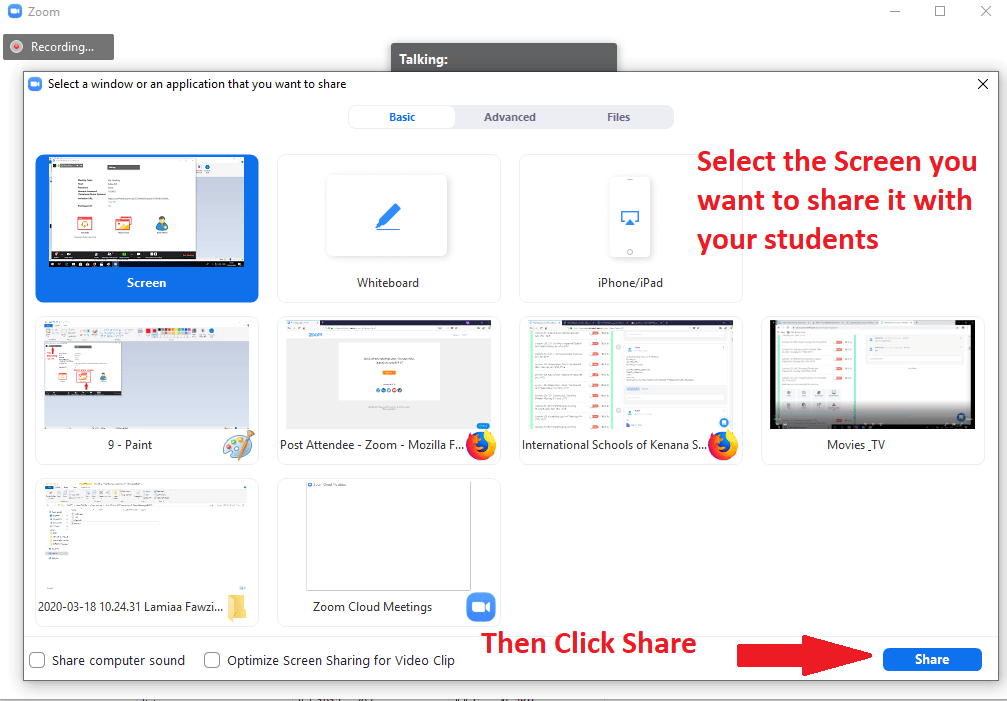
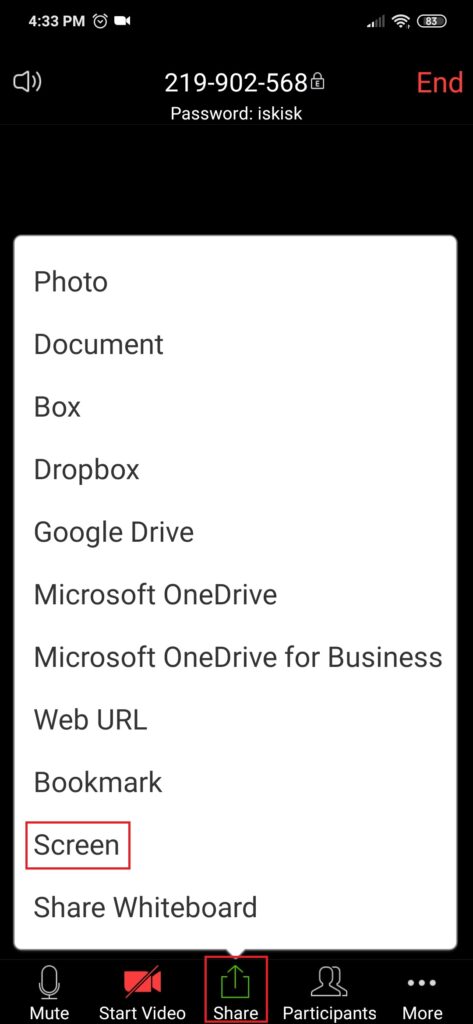
-Click on Share and Select "Screen".
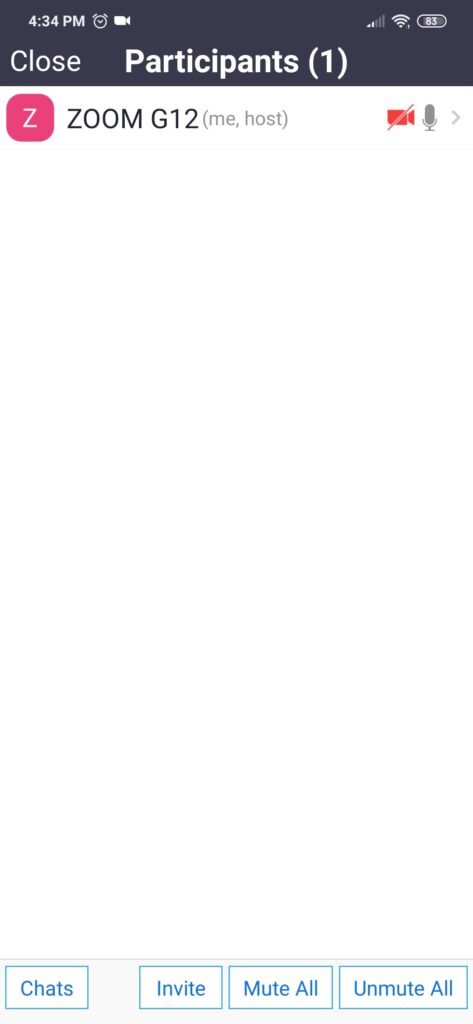
-Click on "Participants" to control them (Mute or Unmute).
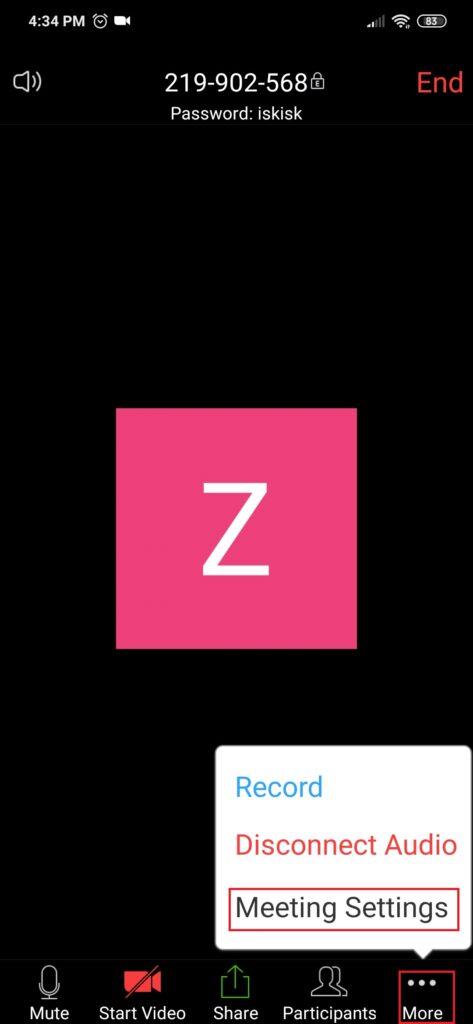
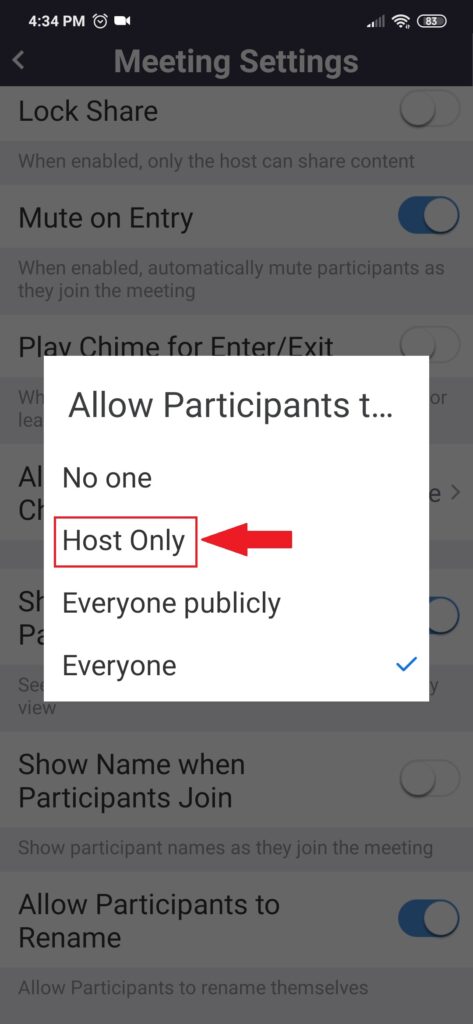
-Click on "Meeting Settings" to get more options.
-Set the Meetings Settings as shown and click on "Allow Participants to chat with---Everyone to change it".
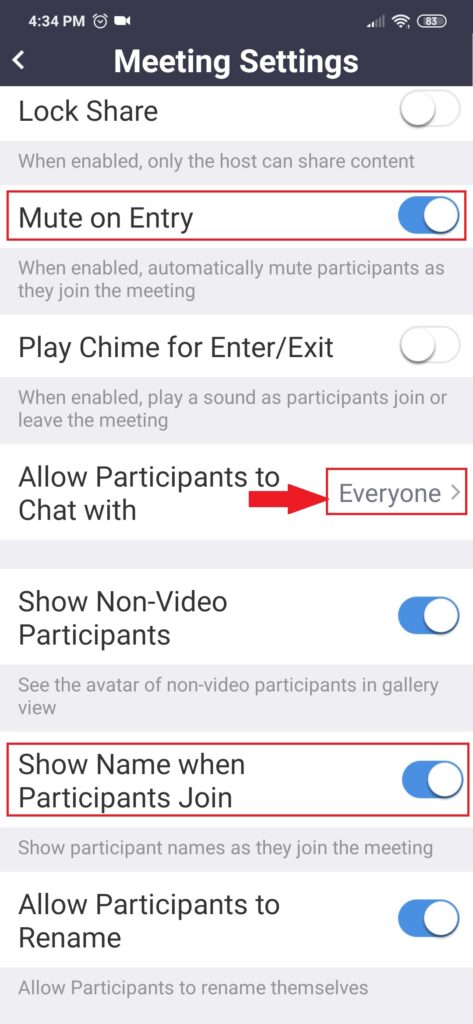
-Select "Host only" so the teacher on can chat with the students and they do not chat with each other.
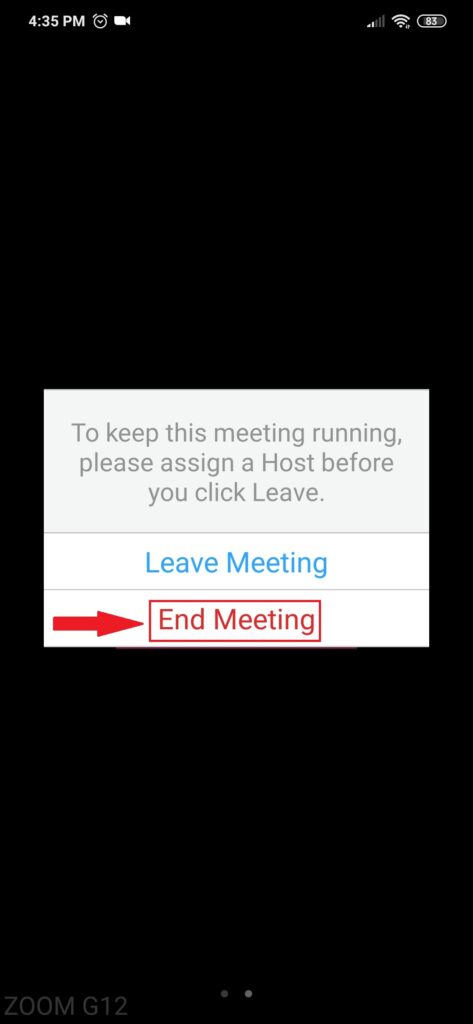
-After you finish your session click on "End".
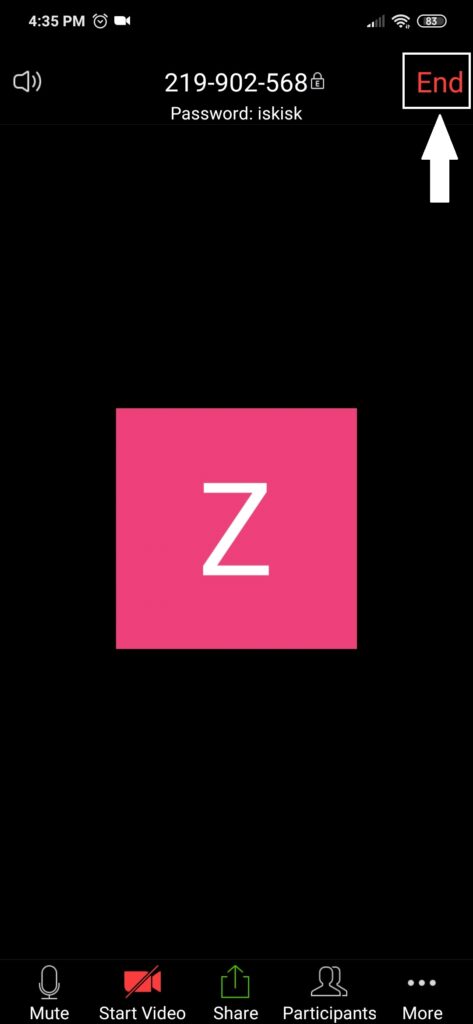
-Select "End Meeting"
- 12. How to Create an Assessment with attachment ?25.03.20
-Open your account on SLMS.
Follow the steps:
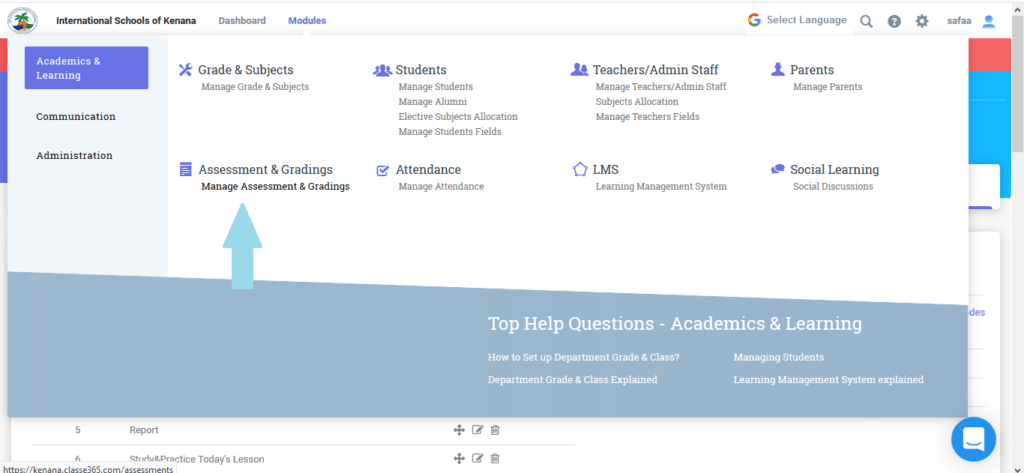
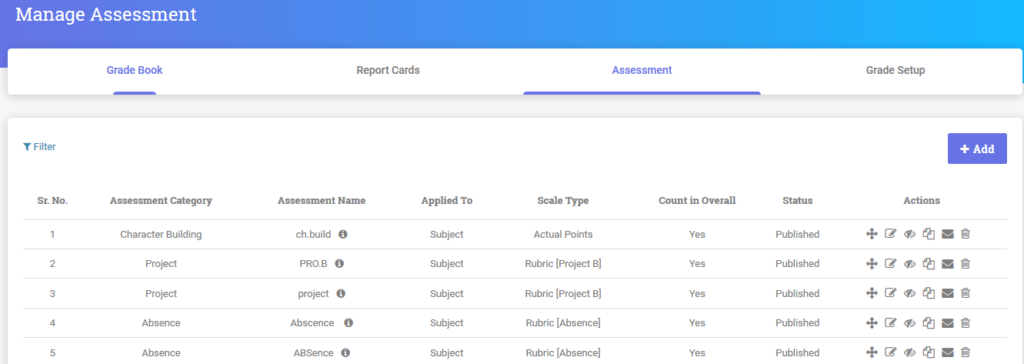
-Go to Academics & learning THEN Manage Assessment & Gradings.

-Go to Assessment --THEN Click "Add".
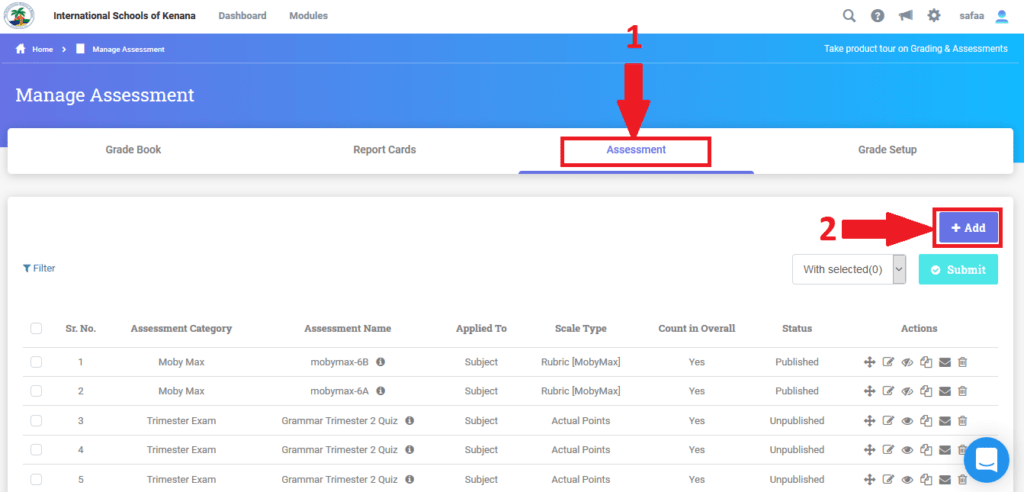
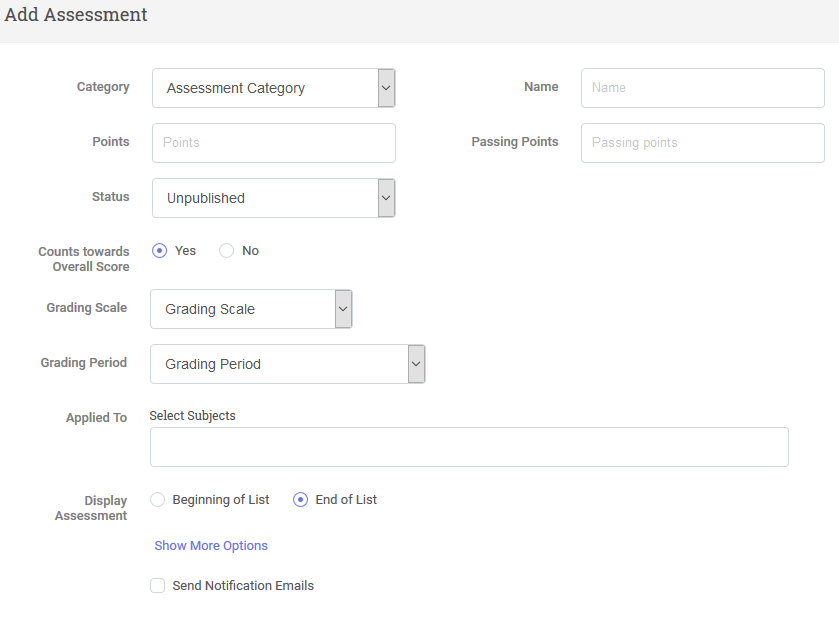
-Set the assessment (Category,name,Status,Grading period,....).
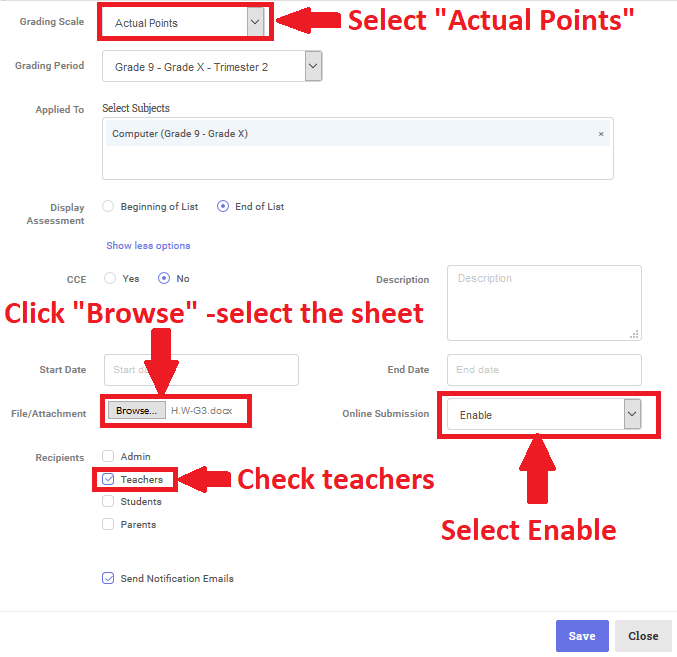
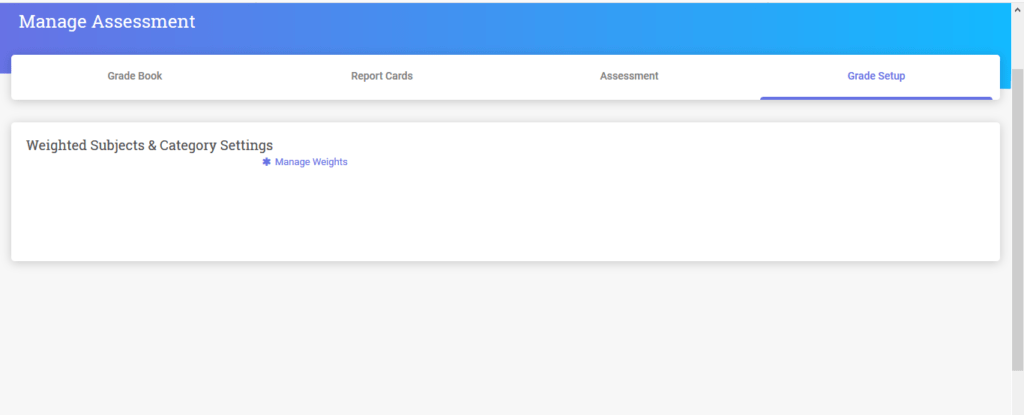
-Make sure to make Grading Scale "Actual Points " then click "SHOW more OPTIONS"
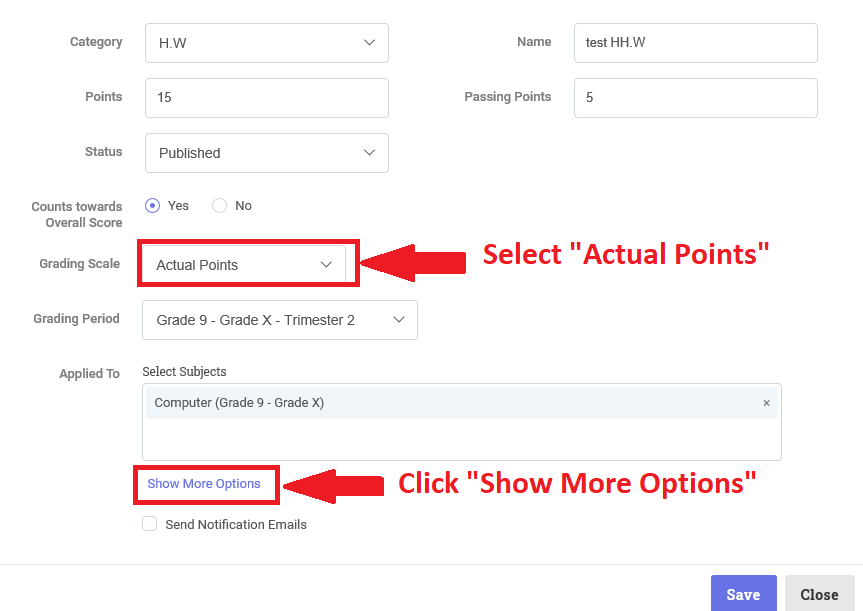
-Click browse to select your sheet.
-Make the Online Submission "Enable".
-CHECK TEACHERS (TO GET NOTIFIED BY MAIL WHEN STUDENT SUBMIT A H.W).
-MAKE Online Submission "Enable" THEN CLICK "SAVE".
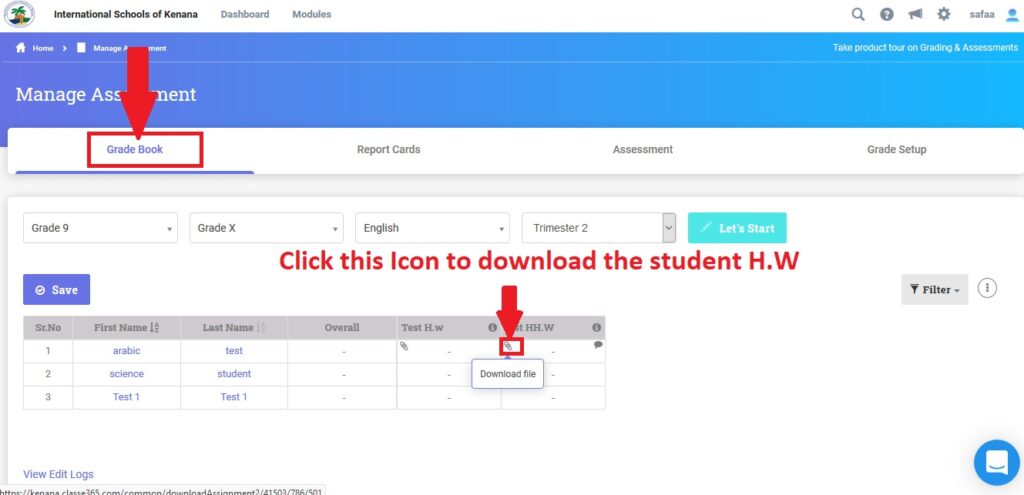
-HOW TO correct the sheet?
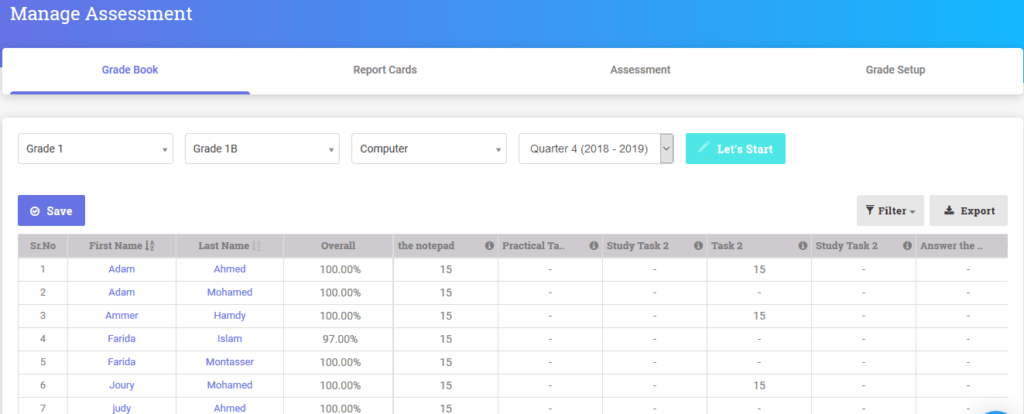
-Go to Academics & leaning THEN Manage Assessment & Gradings THEN "GRADE BOOK".
-DOWNLOAD THE STUDENTS H.W ---CORRECT IT THEN PUT THE GRADE.
- 13. How To Record Zoom Attendance On SLMS?02.04.20
-During your Zoom Meeting ---- Click on "Participants" to record the attendance.
-P.S--- the participants (students) from class "A" & "B"

You can record the attendance using:
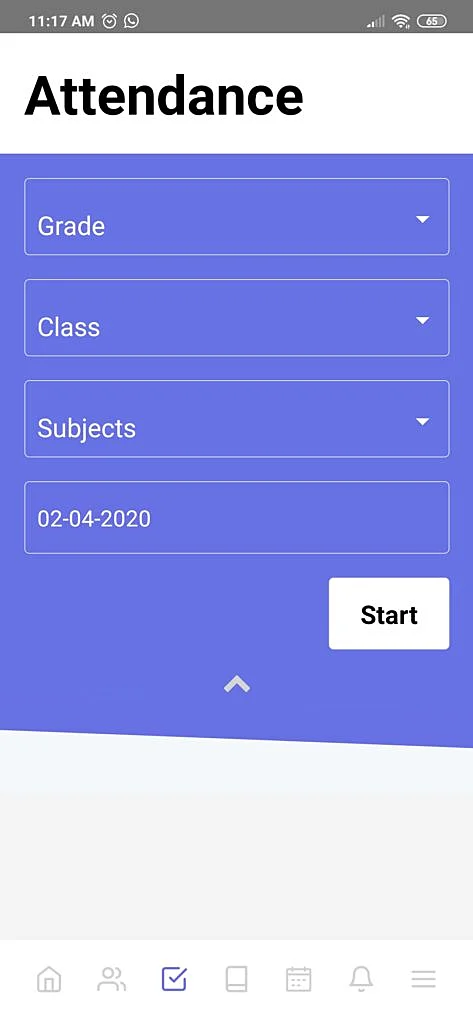
1-Classe365 APPLICATION
-Open the application and follow the steps
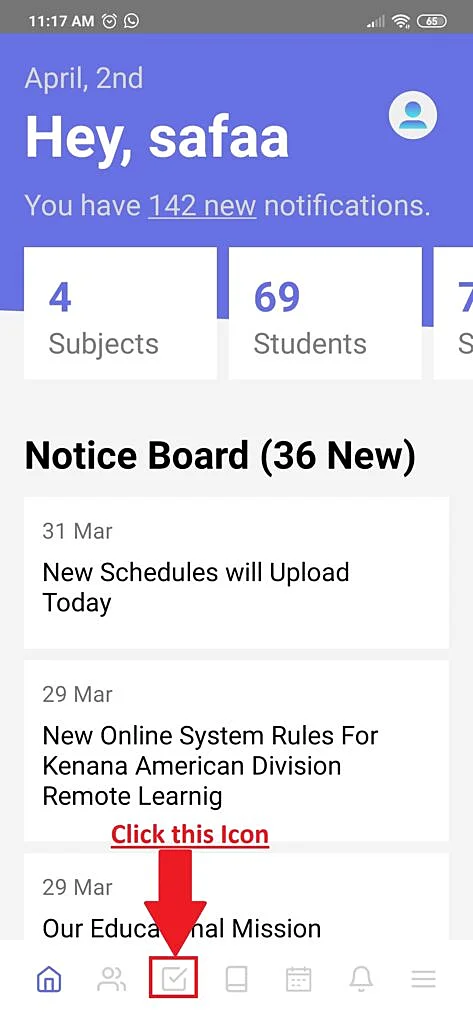
-Select grade,class,subject,date ----then click "Start".
-P.S --you will repeat the steps for the other class.
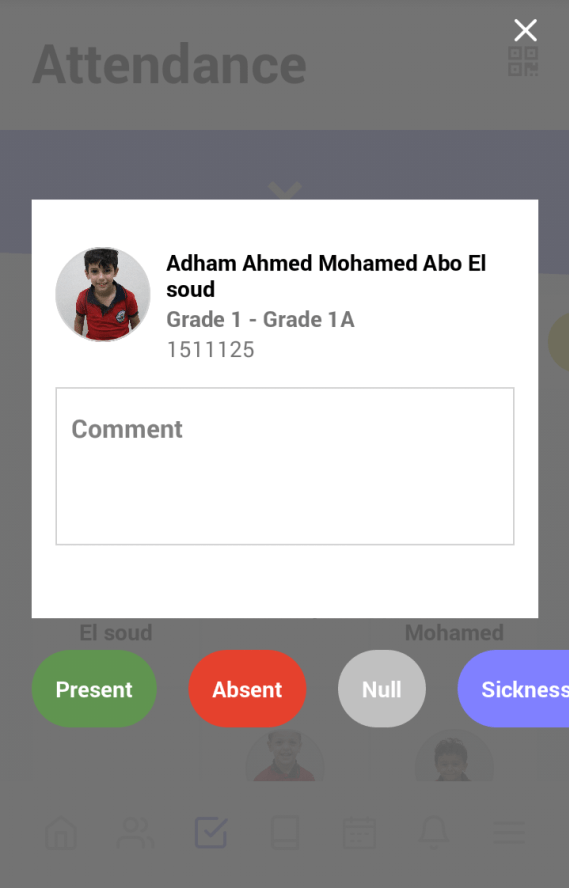
-After you mark all the students "P" for present OR "A" for absent and finished recording the attendance---click the icon shown below in the screenshot .
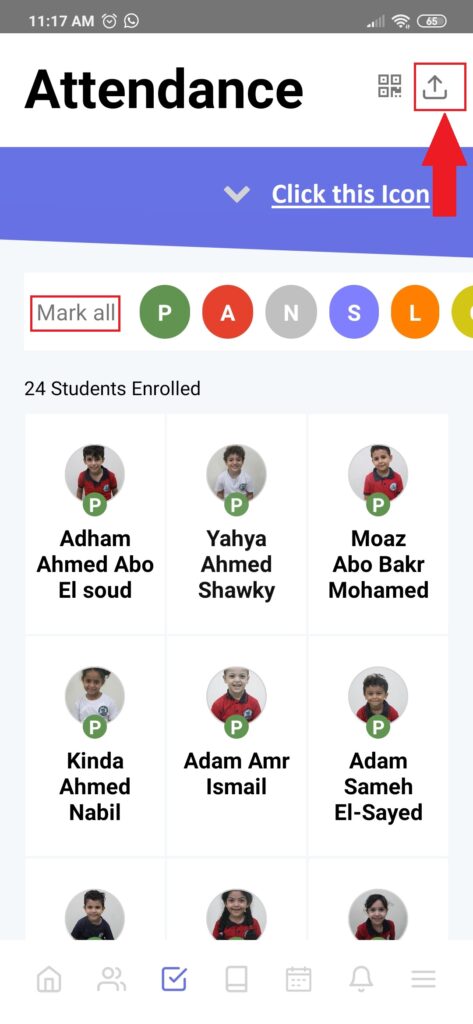
-Select "Students" "Parents" "Email" then click "Submit".
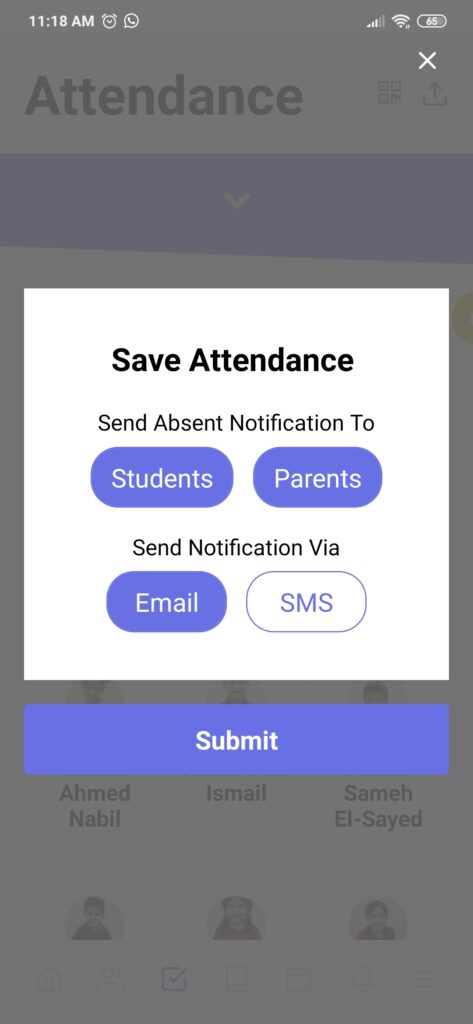
-Don`t forget to repeat the steps for the other class.
2-SLMS
-Open your account on slms and follow the steps.
-Select grade,class,subject,date ----then click "Let`s Go".
-Mark all the students "P" for present OR "A" for absent .
-P.S --you will repeat the steps for the other class.
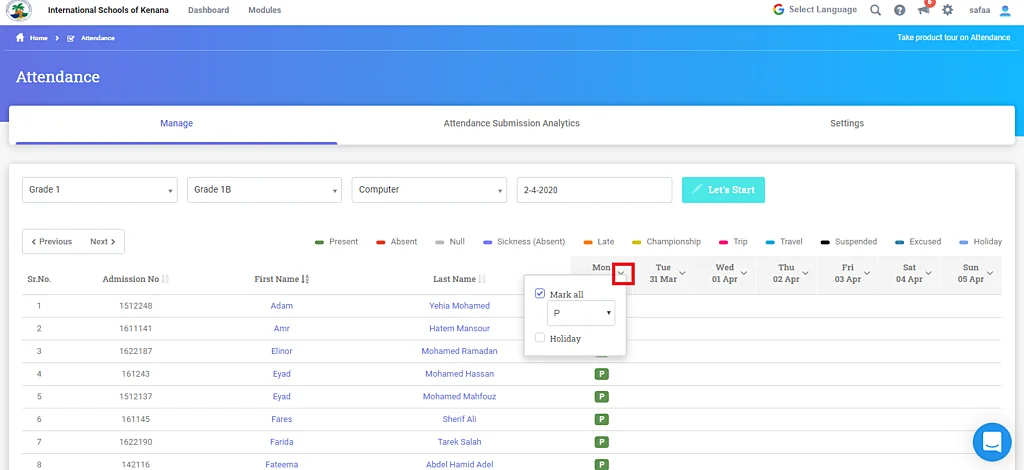
-Select "Students" "Parents" "Email" and the day then click Submit.
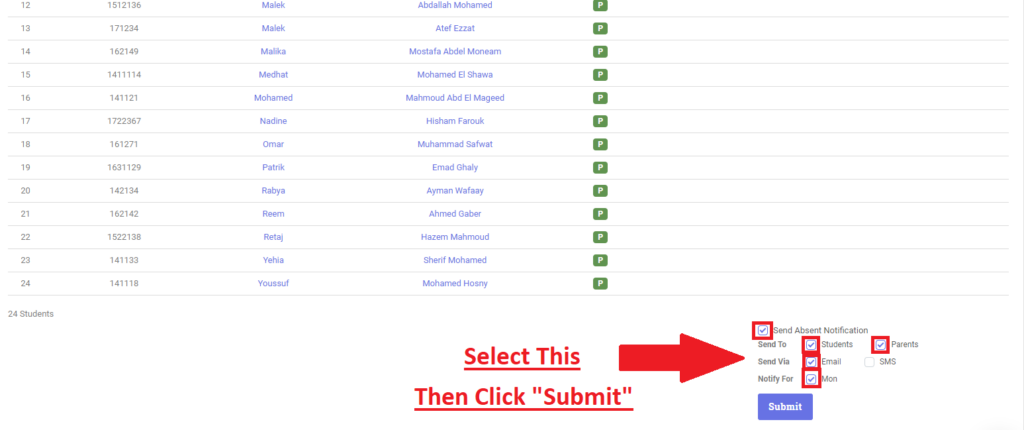
-Don`t forget to repeat the steps for the other class.
- 14. How To Deal With The New Update On Discussion?08.04.20
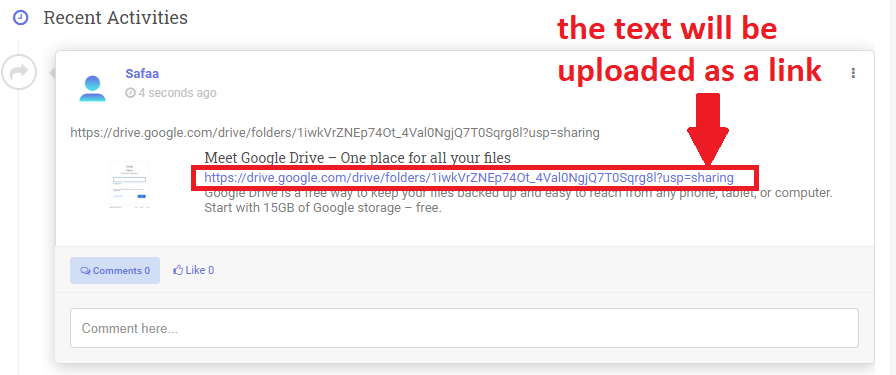
-Dear teachers ....copy the drive link (recorded zoom session) and paste it on discussion , it will be uploaded as a hyperlink !
-check the pictures below for more clarification.
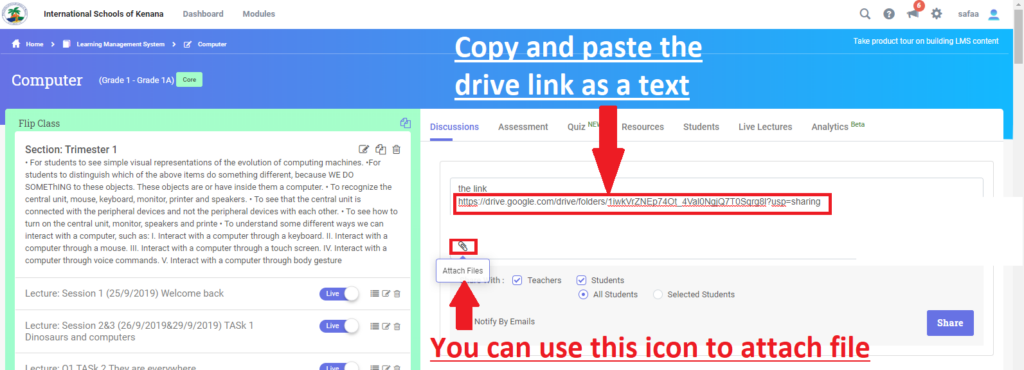
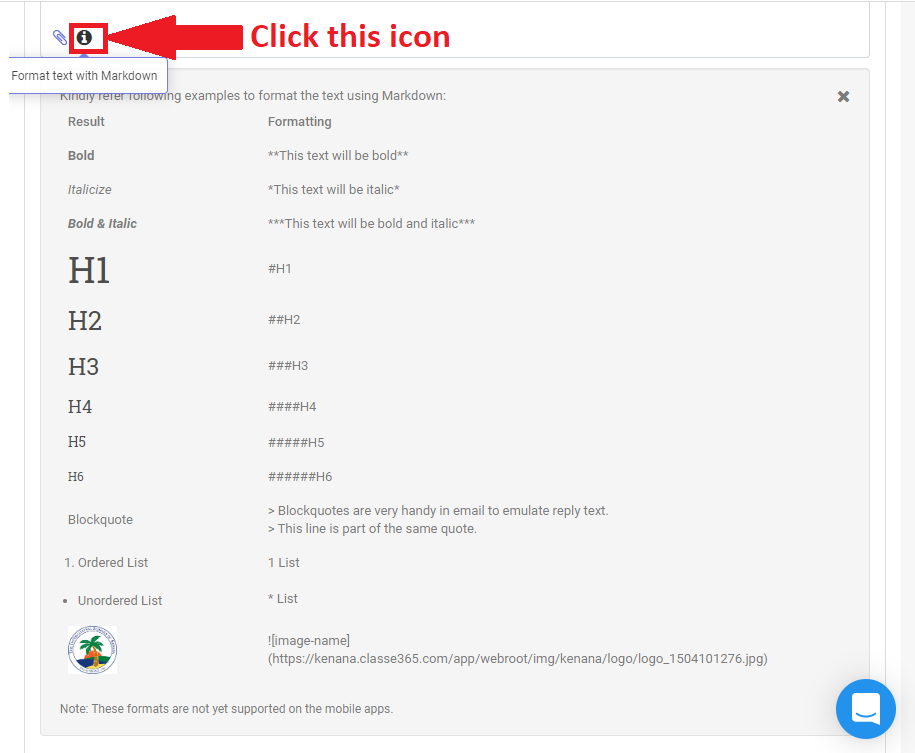
-Now you can format your text , follow the directions.
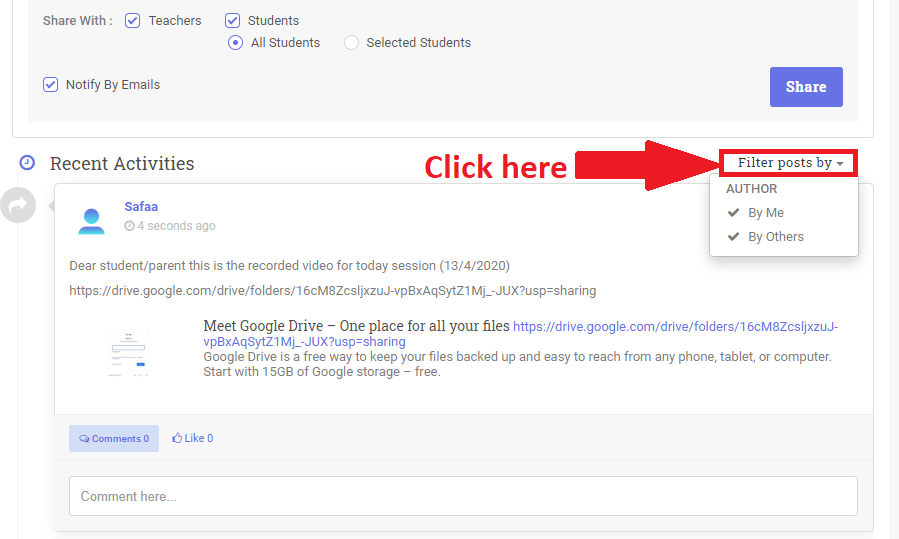
-Now you can filter the posts by (By ME---Teacher) Or by (By Others----students).
- 16. How To Make Quiz?08.05.20
STEP -1: Create Quiz
To create a Quiz, Go to Modules > LMS > Select Class > Select Subject > Quiz > Add New Quiz
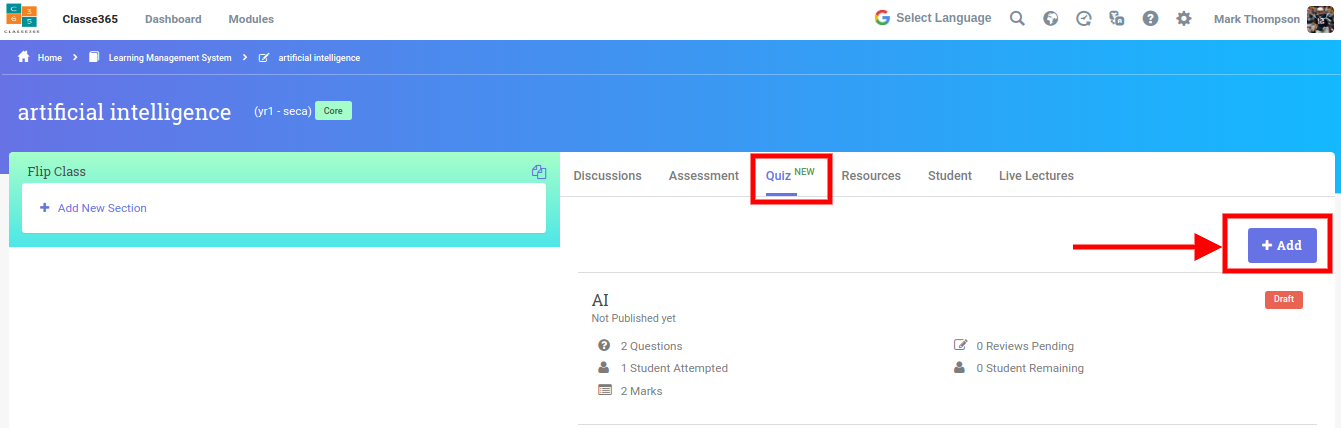
This leads the user to the new quiz section where we can setup quiz related settings, questions and much more.
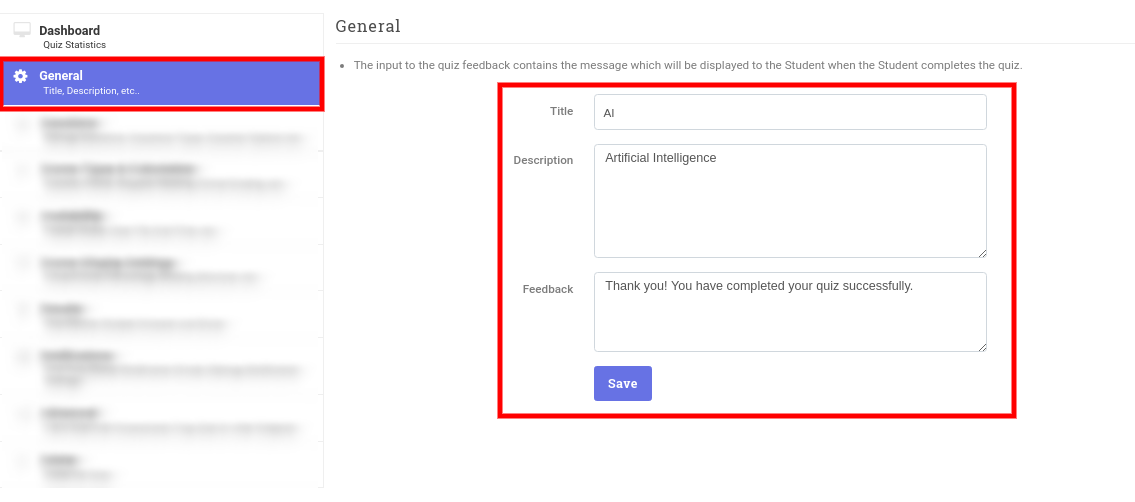
Now, under "General" side menu, we'll have three fields as below:
- Quiz Title - This is the title/name of the quiz
- Description - The purpose or brief explanation of this quiz test.
- Feedback - This is the output notified to students when the quiz is completed by the students.
Until we complete the General information all the other menus will be disabled.
Now that we've finished the first step in creating the quiz let us add some questions which is shown in next step.
STEP-2: Adding Questions
On the left side of the menu navigate to "Questions" to add the questions
There are 2 ways you can add questions:
- Bulk Import Questions - We can import the questions from a file.
- Adding Questions Manually - We can add the questions manually.
Let's take a closer look on adding questions:
Bulk Importing:
Bulk import comes in handy when there are large data of questions that needs to be uploaded. This option enables faster data upload and more importantly saves time.
Download the sample template file on the types of questions , adding a correct answer and much more.
To download sample file, click on the tab which reads "Download Sample File".
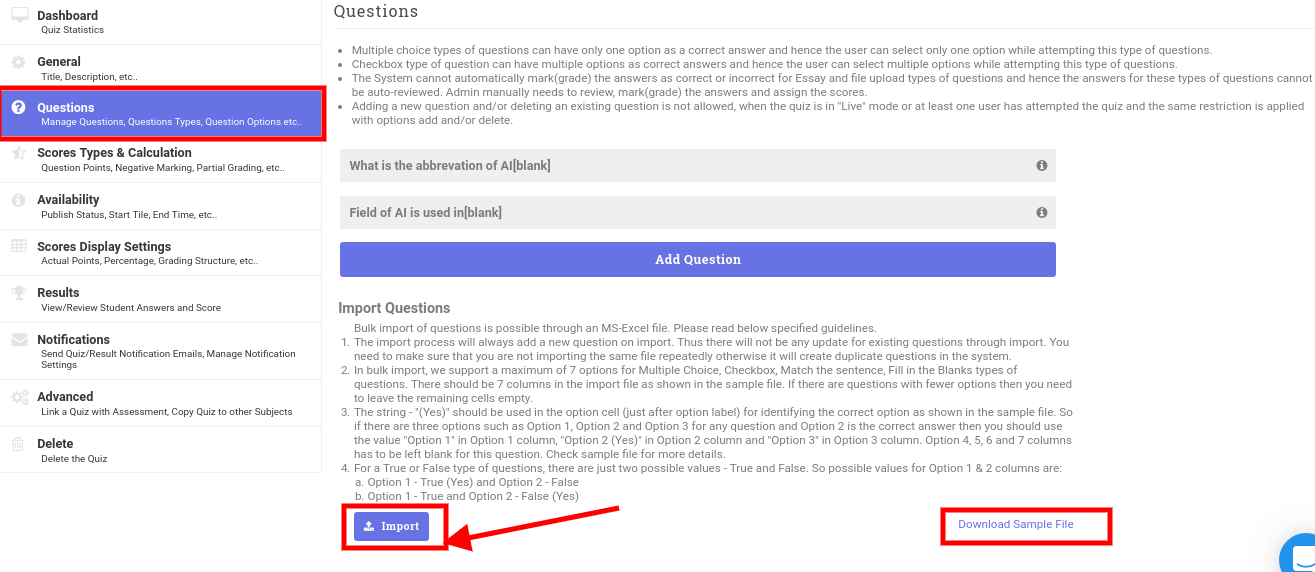
An example of the sample file is shown below;
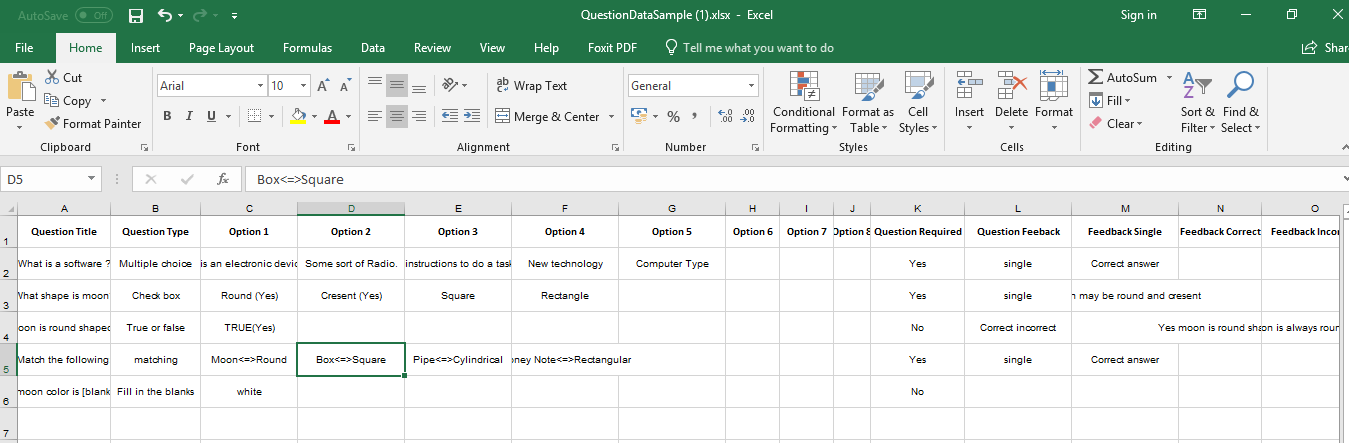
Let us see what are the required columns needed to upload the file.
- Question Title:
Question Title is the sentence worded or expressed so as to elicit information. - Question Type:
The type of question which student needs to answer, we support the following type of questions:
2 a. Multiple Choice - This type of question is normally used to select one answer out of many answers.
Example:
* Question title - Who is considered as the father of modern science?
* Options - Option-1 = Galileo, Option-2 = NewtonGalileo is the right answer and hence the user needs to add "Galileo (Yes)" in the option list to show that the correct answer is Galileo.
2 b. Checkbox - This type of question is usually used to select more than one answer out of multiple answers.
Example:
* Question title - What is the shape of the moon?
* Options - Option-1 = Round, Option-2 = Crescent, Option-3 = SquareNow that we know that the shape of the moon is "Round" & "Crescent", we need to add "Round(Yes)" and "Crescent(Yes)" in the option.
2 c. True or False - This type of question is used when a clause/sentence is either said to be true or false
Example 1:
* Question title - Moon is either Crescent or Gibbous or Round ?
* Options - Option-1 = TRUE, Option-2 = FalseNow that we know the shape of the moon is "Round" & "Crescent" or "Gibbous" we need to add "TRUE(Yes)" and leave the other options as blank.
Example 2:
* Question title - The shape of the moon is Square, Is the sentence correct?
* Options - Option-1 = TRUE, Option-2 = FalseNow that we know that the shape of the moon is not Square we need to add "FALSE(Yes)" and leave the other column blank.
2 d. Matching - This type of question is used to match the question with the right answer, in the template we use this symbol ("<=>") on right side to upload the correct answer.
Example:
* Question title - Match the following
* Options - Option-1 = Moon <=> Round, Option-2 = Book <=> Rectangle2 e. Fill in the Blanks - This type of question is used to complete a sentence with the correct answer
Example:
* Question title - The shape of the moon is either [blank] or [blank]
* Options - Option-1 = Round, Option-2 = Crescent,
We know that moon is either Round or Crescent hence we have them in the options, when the student fills in the blank and if the answer matches the answer than the answer is chosen as correct otherwise it is incorrect.
2 f. Essay - This type of question is used to compose a essay on a topic chosen.
Example:
* Question title - Write few lines about Moon.
* Options - Not applicable
Here options are not applicable but you can define the Max Characters and number of Rows visible in description box(text-area).2 g. File Upload - This type of question is used to submit any typed-in files in three formats i.e., PDF, Word and CSV.
The user can define Max File Size and File Format.
- Option 1 to Option 8
These options are used as responses for question types Multiple Choice, Checkbox and Matching.
Note:
* Correct answers will be marked as "Yes" enclosed within parenthesis in Multiple Choice and Checkbox
* Correct answers are tied within "<=>" separator in Matching.
* If out of 8 you only have 5 choices then the rest should be blank. - Question Required
This field is used to validate the question if we want a question to be mandatory then we need to use "Yes" in the file, else use "No". - Question Feedback
Question Feedback is used to provide feedback to the students. We have two options in Question Feedback they are Single Feedback, and Correct/Incorrect Feedback.
- Single Feedback - is used when you want to update student about the answer.
- Correct/Incorrect Feedback - is used when you want to show why the answer is correct and why the other option is not correct using Feedback Correct and Feedback Incorrect fields respectively.
- Maximum Characters - This column is used to provide total number of characters in numerical values to question type Essay.
- Display Line - This field provides the height of the text-area for Essay type question.
- Maximum File size - This field specifies the file size in Megabytes for question type File Upload
- File Types - This field is used to allow the file format to upload in File Upload type question, the allowed file type is PDF, Word and CSV.
Adding Questions Manually:
We can also add questions manually, Click on Add Question
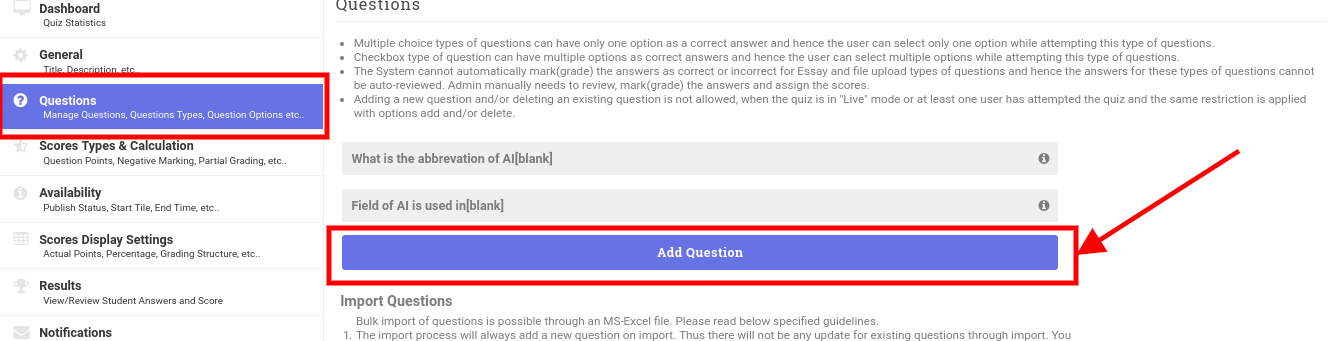
Add the Question Title as per discretion, select the Question Types, Fill in the Options and don't forget to mark the correct answer, validate the question if required and save the question.
- Question Type - Fill In the Blanks you need to use [blank] to insert the blanks.
- Question Type - Matching has the responses on the left with correct matching values entered on the right, student selects the matching value.
- Question Type - Essay has two parameters to input, one is Maximum Characters and the other is the Display Settings that is in the number of rows visible to type in contents.
- Question Type - File Upload also has two parameters to input one is File Size in Megabytes and the other is File Type you can specify more than one file type.
You can change the order of question anytime by dragging and dropping between questions using the below icon
Great! Now that we've added questions lets proceed to setting up our quiz.
STEP-3: Score Types and Calculation
Score type is used to provide information about the assessment of the quiz.
- Score Based - This option enables the quiz to be evaluated with scores.
- Points For Each Question
Equal - If the points are equal across all the questions then this option needs to be selected.
Different - this is selected when the questions have different points.
* Equally Distributed - the admin specifies the Question Scores inside the text box which will be equally shared among the options, say example we have 4 options and the point to this question is 1, then each option gets 0.25 points.
* Custom - when custom is enabled admin sets the points to each options when student selects the option the input points are counted. - Negative Marking - This option is enabled when Points for Each Question is Equal and Negative Points for each question is set with equal value.
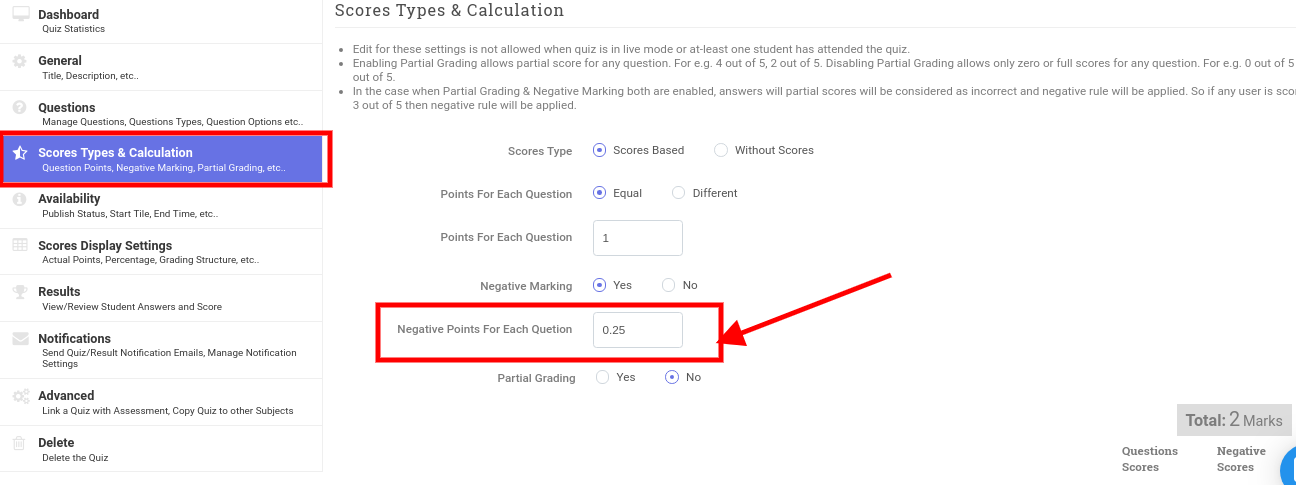
The Below is an example of negative marking when Points for Each Question is Different and Negative marking is enabled.
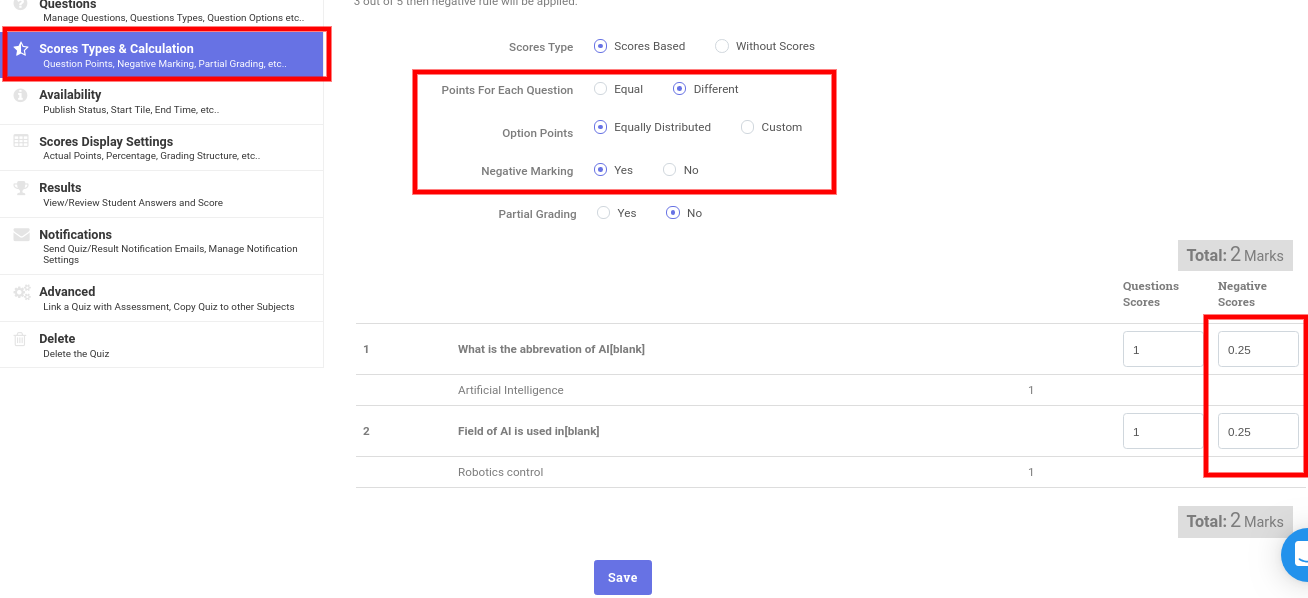
- Partial Grading - It is used when the admin wants to grade the answers partially.
Example: If Partial Grading is enabled then for a question of 5 grades, it can be partially graded like 3/5(3 out of 5 points). If partial grading is disabled then admin can either grant full points or no-points(zero) like 5/5(5 out of 5) or 0/5(0 out of 5).
Now that we have finished step-3 lets make the quiz LIVE in the next step.
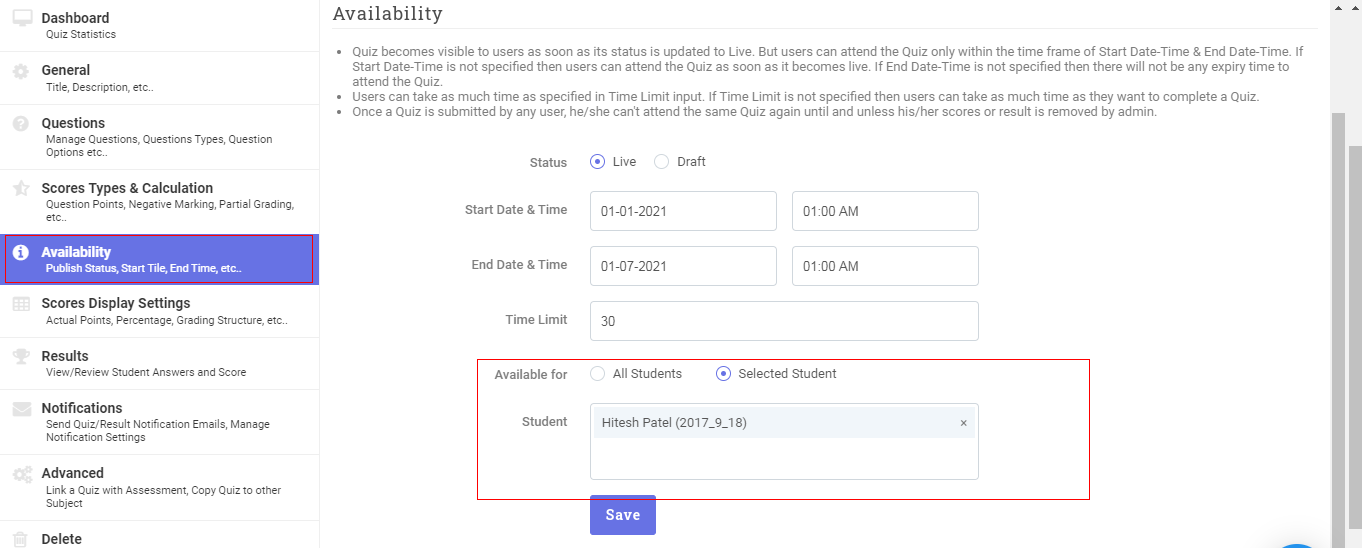
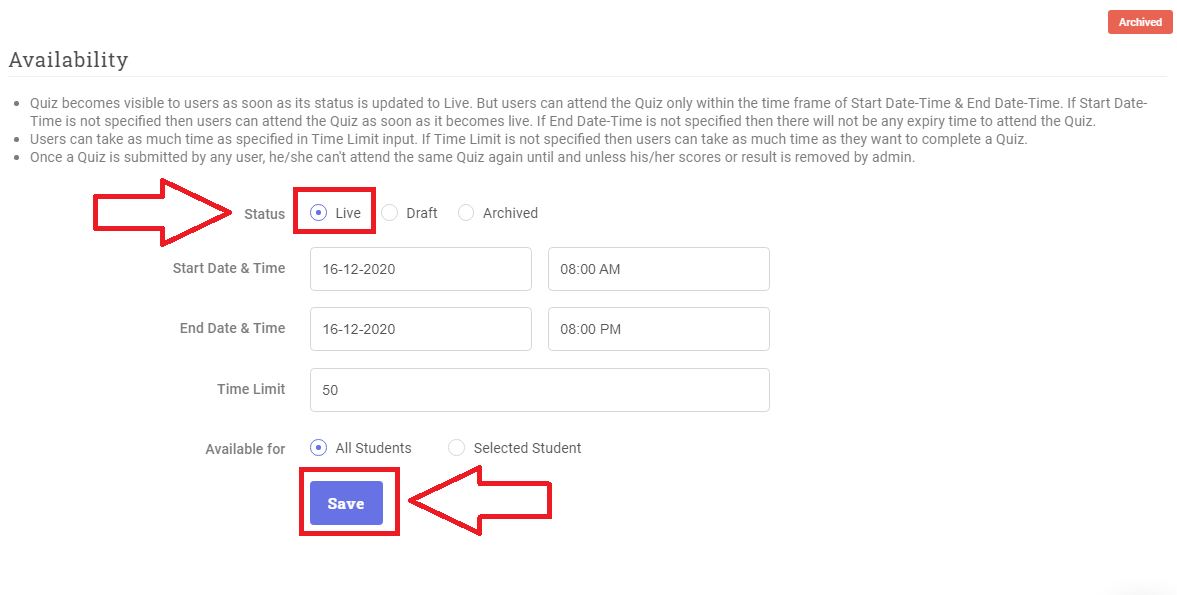
STEP-4: Availability
To publish the quiz and make the quiz visible to the students, The user needs to switch from Draft to Live.
The draft status helps the admin to add few questions at a time and add some later.
The following fields are used in Availability:- Status - Live is used to make quiz available on student portal, Draft is used to disable/hide quiz from student portal.
- Start Date & Time: Here we specify the start date and time for the quiz.
- End Date & Time: Here we specify when the end date and time for the quiz.
- Time Limit - Time limit is a numerical value, here we specify the quiz time in minutes, once the student starts the quiz the time starts till the time limit is reached and this is when the quiz terminates.
Note:
- If start/End date is not specified then students can attempt quiz anytime with in the given time limit.
- If Time Limit is not specified then students can take as much time as they need to finish the quiz.
Now that we've added questions, changed the status let setup score display settings in the next step.
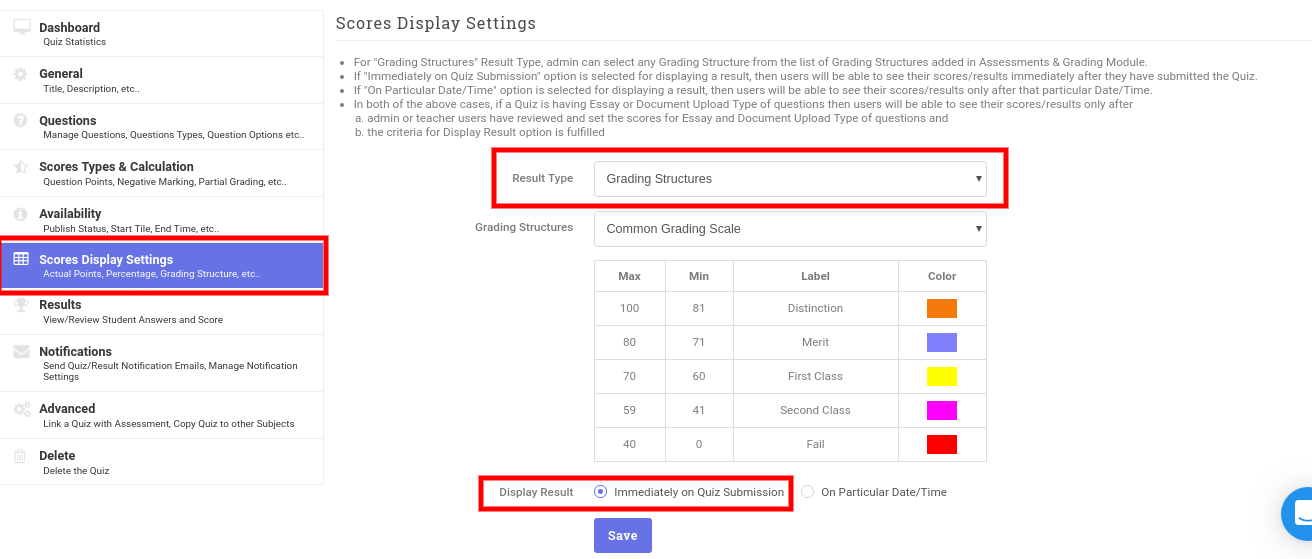
STEP-5: Scores Display Settings
Admin can set the result display settings using score display settings side menu, we have the following settings:
- Result Type
* Actual Points - is used when the admin needs to display the actual points which was set in step-3.
* Percentage - is used when the admin wants to display the result in percentage based on Total Points v/s Obtained Points.
* Grading Structure - when the admin needs to show result in different grades as per the grading scale, then grading structure is used, if we don't have a grading scale a default scale will be used. We can add new grading scale under Modules > Manage Assessment & Grading > Grade Setup > Grading Scale > Grades > Add.
- Display Result
* Immediately on Quiz Submission will display the result when students finish quiz and submit.
* On Particular Date/Time will display quiz on the specified date and time.
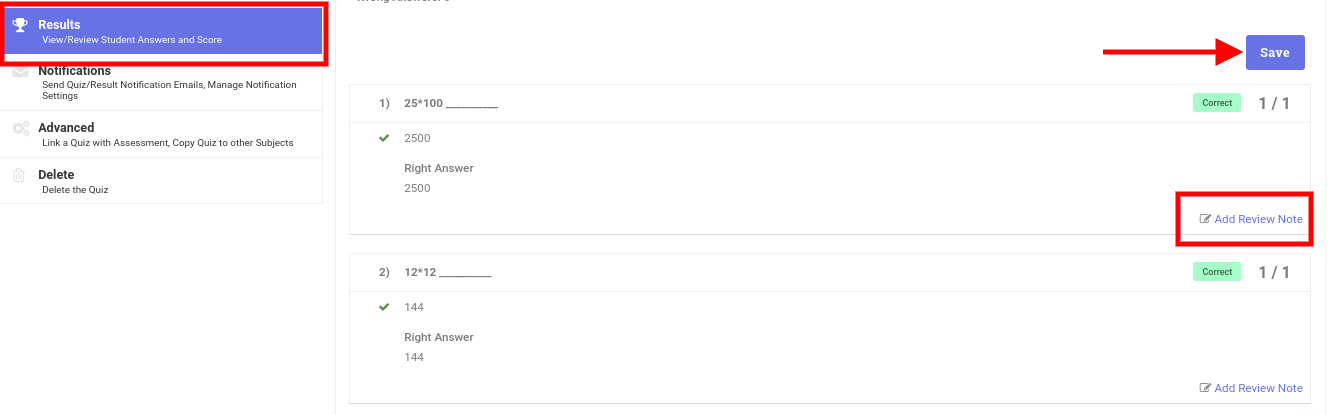
STEP-6: Results
Admin can view results using results side menu.
Note: the questions such as essay, file-upload needs to be assigned scores by admin by verifying the essay and file uploaded and save the scores.
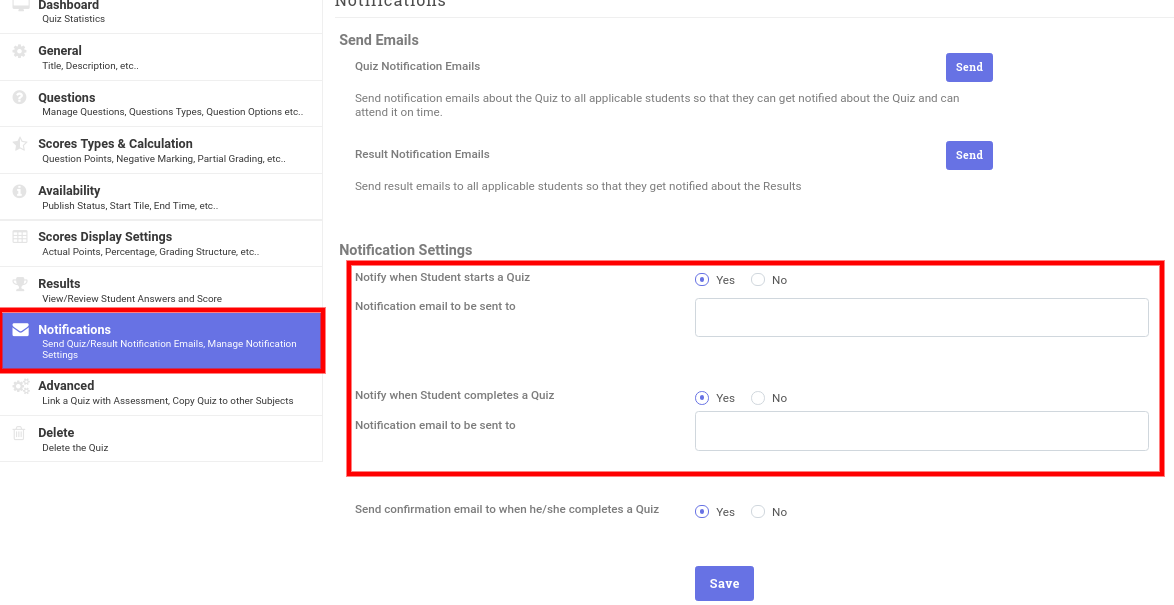
STEP-7: Notifications
Admin can send 2 types of notifications
- Quiz Notification Email - all students will be notified via email, we can also edit the email template for quiz notifications.
- Result Notification Email - can be sent to all students with result link quiz name and subject.
In addition to these we also have notifications to admins whenever student takes up the quiz, completes the quiz, and confirmation when the student completes the quiz.
Notification Settings:
- Notify When Student Starts a Quiz - enable this option if the admin should be notified when a student starts the quiz, we can also type in the receivers or sub-admins whom the notifications should be sent.
- Notify When Student Completes the Quiz - enable this option when the admin needs to be notified when the quiz is completed.
- Send confirmation email to when he/she completes a Quiz - confirmation of quiz completion notification will be sent if this is enabled.
Wondering how to link quiz to grading module? It's really simple follow next step.
STEP-8: Advanced
We can link the results of the quiz with Grade book, all you need to do is to create new assessment/link to assessment which is created already.
Note: You need to setup the assessment grade/points which is equal to quiz grade/points.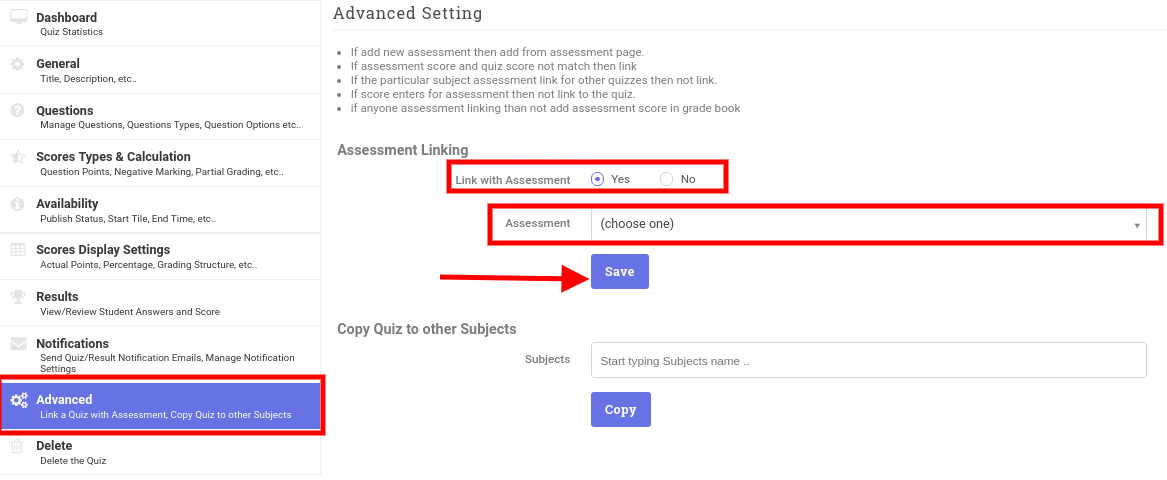
- 17. Pre Zoom Session Preparation (using Google Meet)23.08.20
-Using the browser.
-Go to : https://meet.google.com/
-Make sure to sign in using your school mail " @alkenana-schools.org".
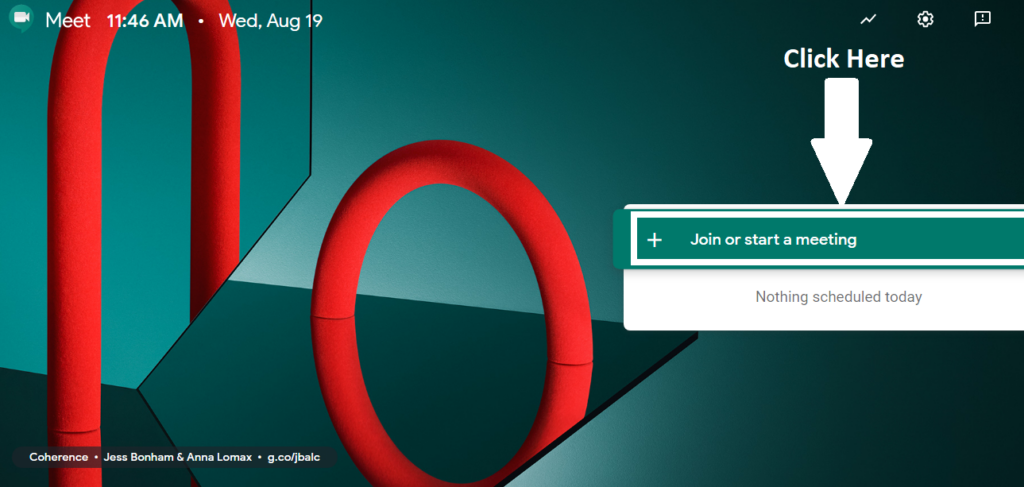
-Follow the steps:
-Click "Join or start a meeting".
-Click "Continue". 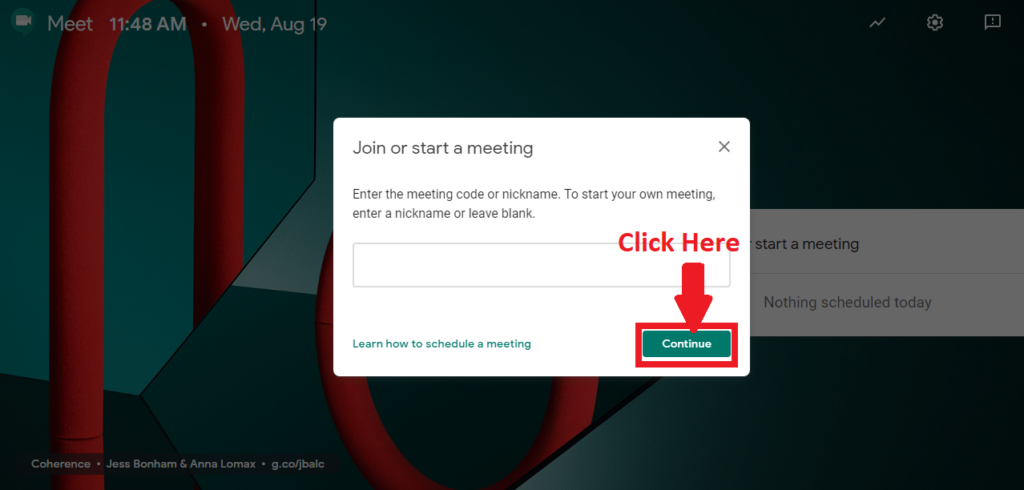
-Click "Join Now".
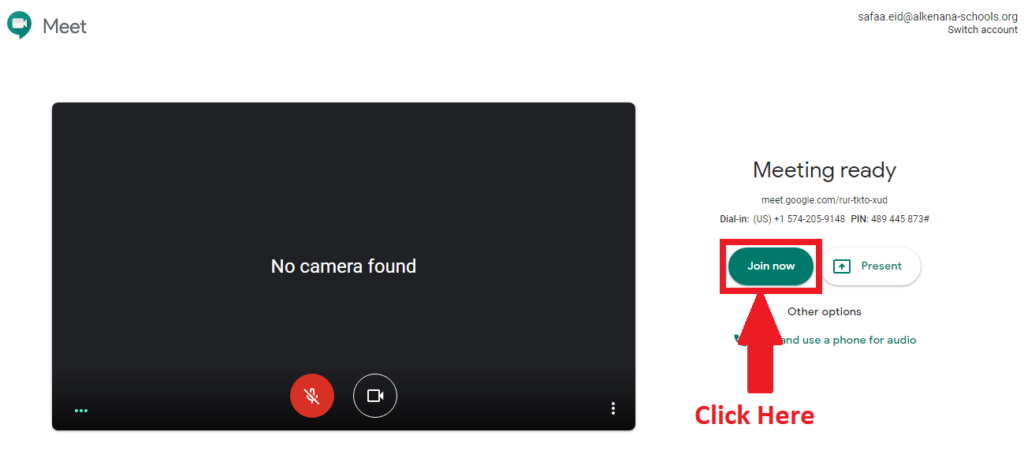
- Make sure you that the camera and microphone are working.
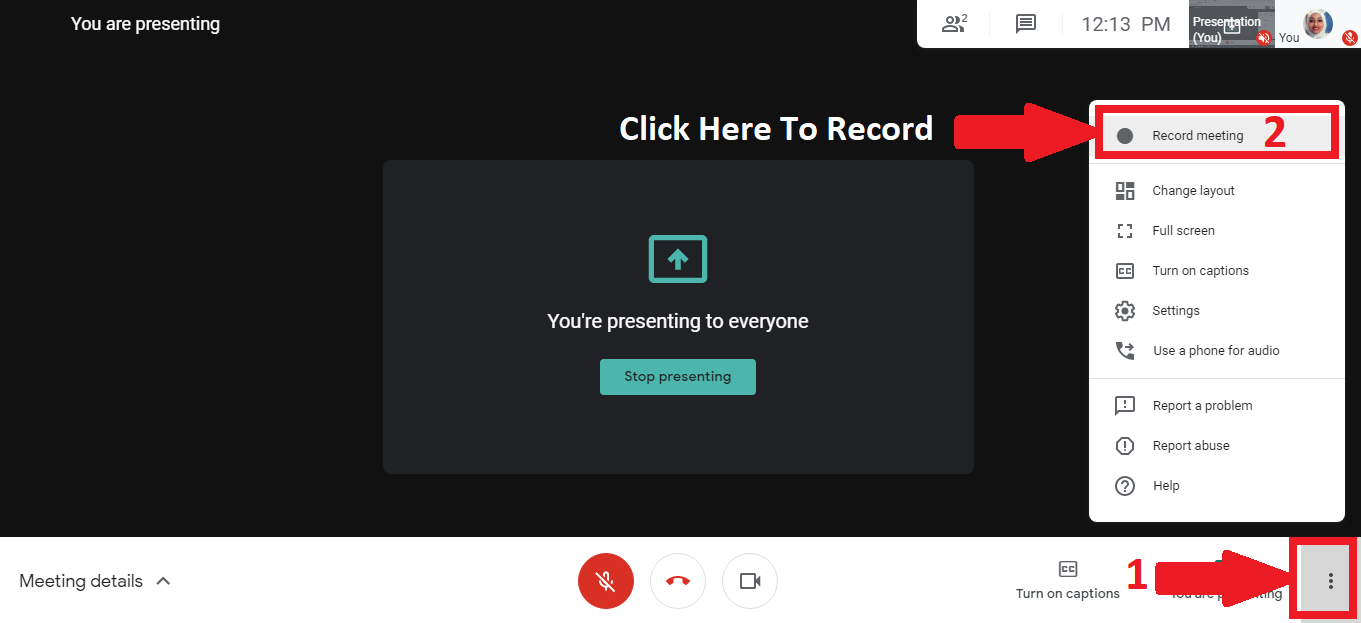
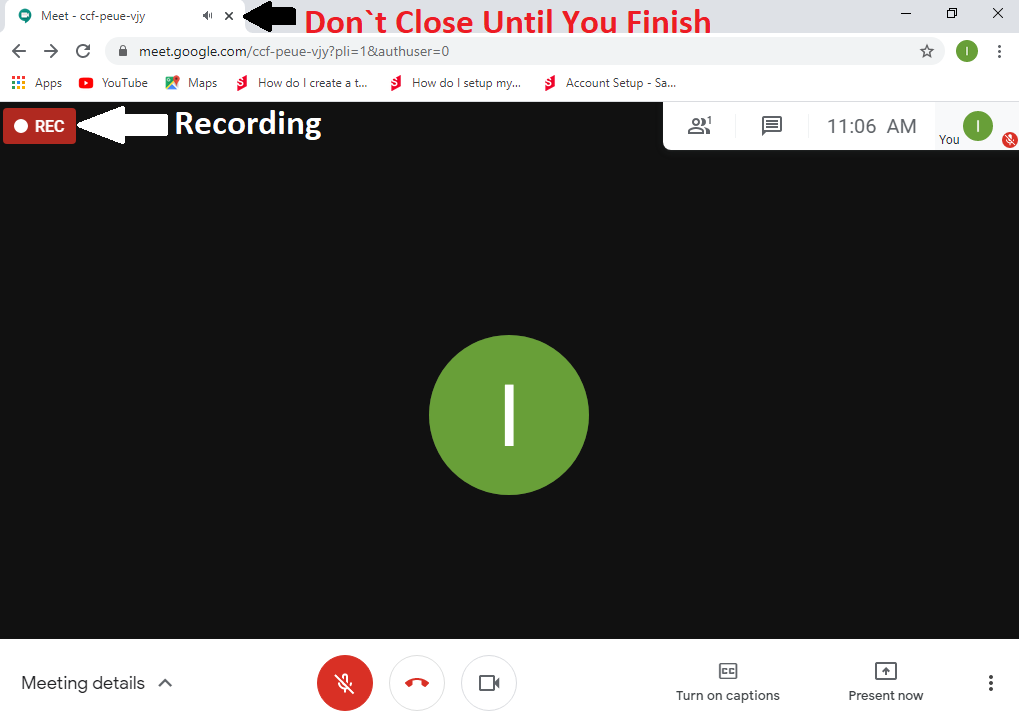
- Record the meeting as you can see from the following screenshot.
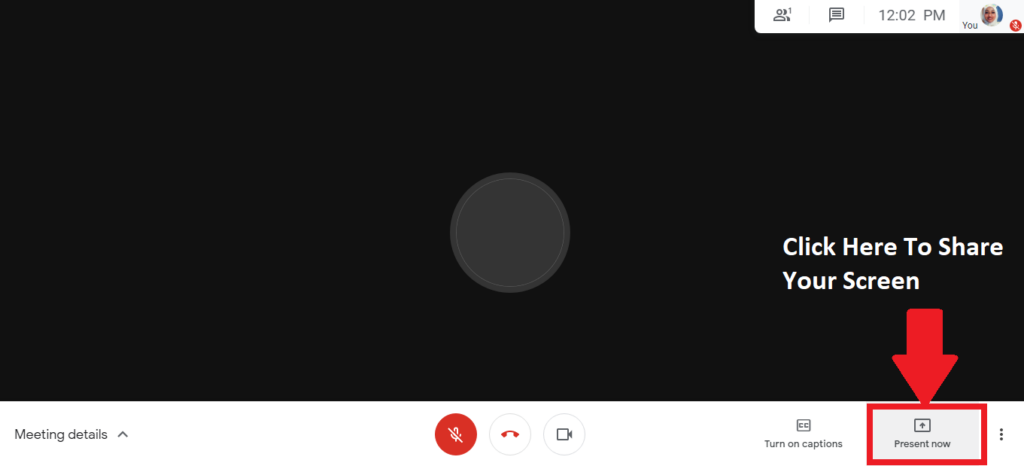
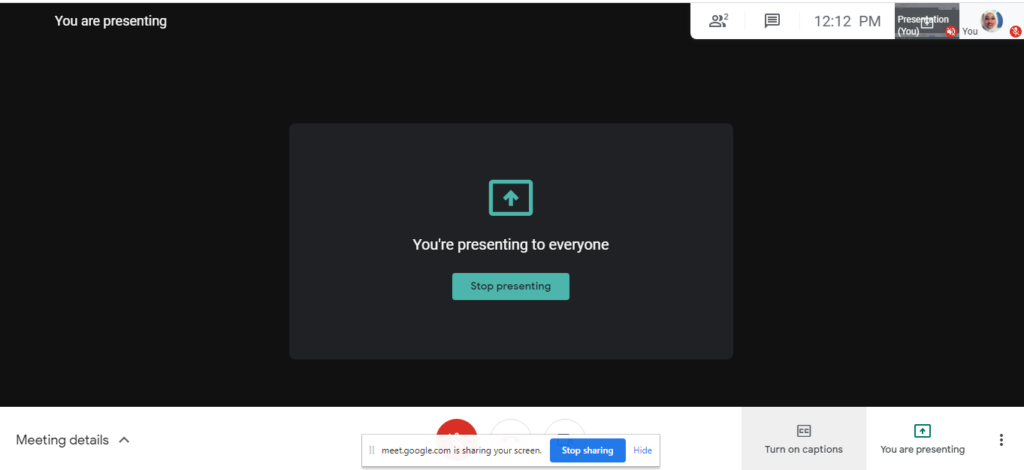
-Click "Present now" to share your screen.
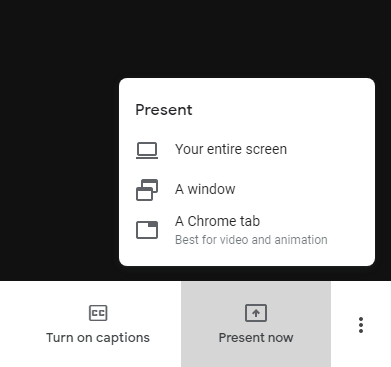
-Select "Your entire screen".
-Click "Share".
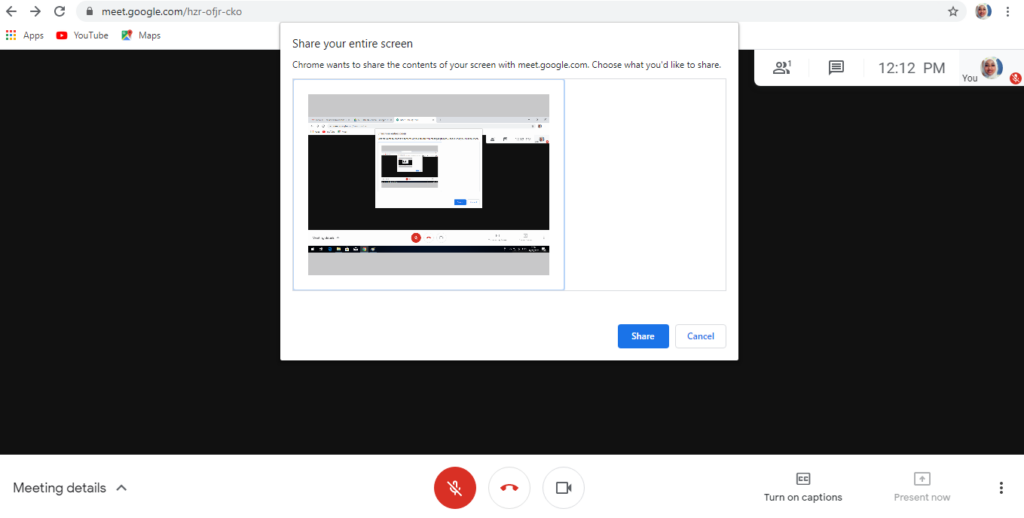
-Now you are sharing.
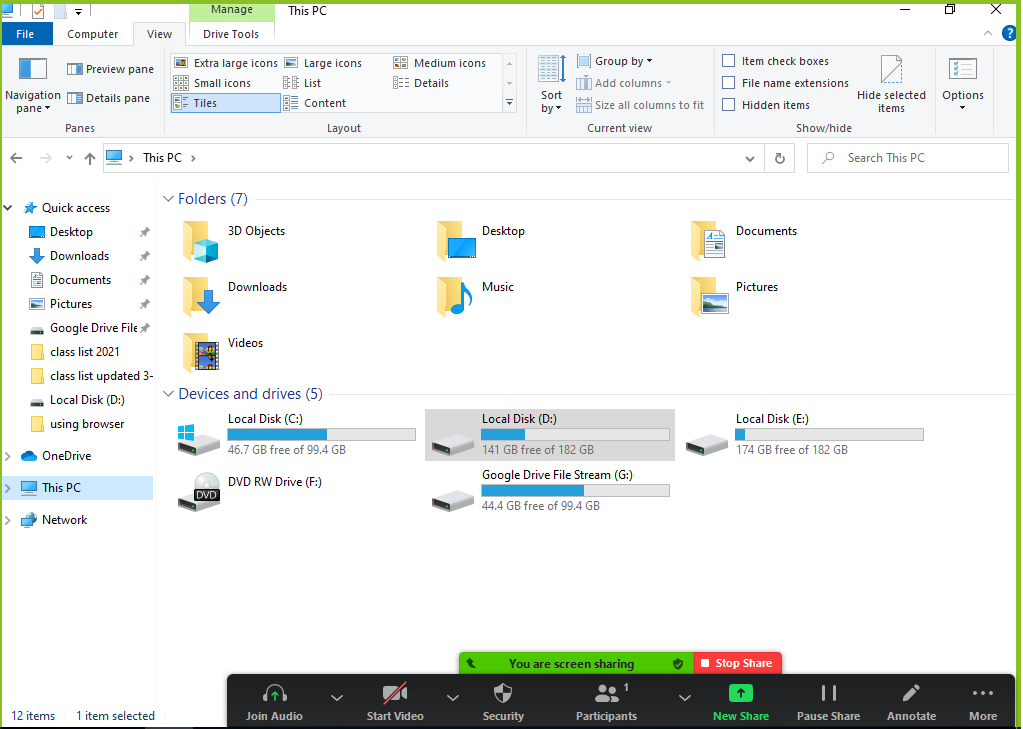
-Open the zoom and start your session and google meet will still recording your zoom screen.
-When you finish your meeting ,click "Stop recording" and close google meet tabe.
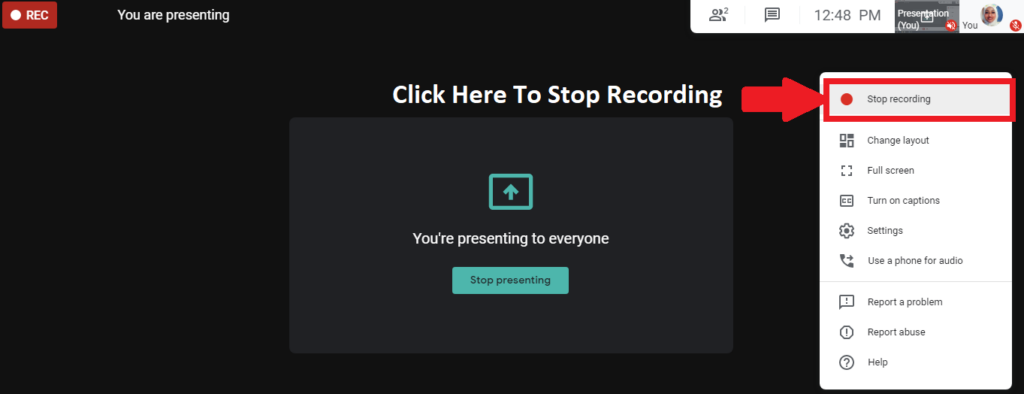
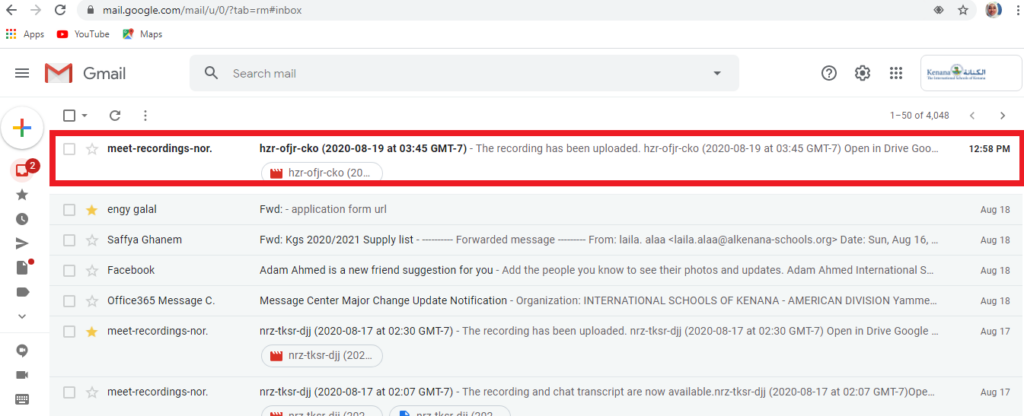
-When you stop recording a mail will be sent to you with video location on your drive.
-P.S google meet is working on browser so make sure you don`t accidentally close google meet tab otherwise you are ending the recording.
- 18. Drive Sharing Settings Updates12.09.20
-Open Your mail and Click on the drive icon.
-Right click on the folder and follow the steps to share !.
-Click "Change".
-Change it to "International Schools of Kenana - American Division" .
-Paste the copied link in discussion on SLMS,don`t forget to click "Done".
- 19. How To Stream Cordlessly In The Class?27.09.20
-First Download "EZMira" Program via the link below.
-Then install the program and follow the next steps:
-Frist adjust the projector to be set on "HDMI" by doing the following:
1-If you are using remote type1.

-Click the "Menu" button then "Source" then move with the arrows until you reach "HDMI" then press enter.
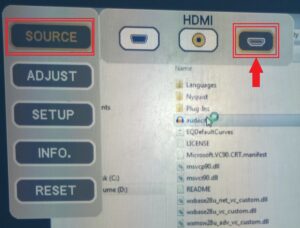
-After you finish your session readjust the projector to computer.
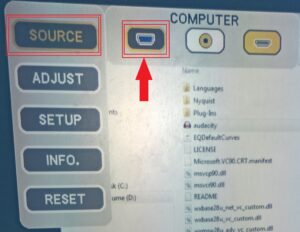
2-If you are using remote type 2, Just click "HDMI" button and when you finish your session click "Computer" button .

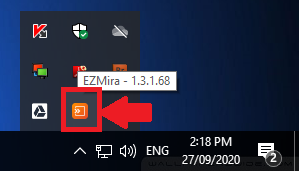
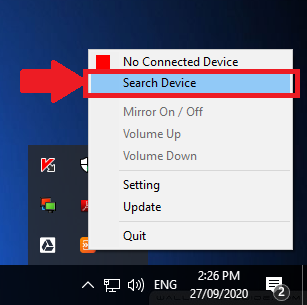
-After you install the program open the arrow near the clock, then click the icon shown below.
-Click "Search Device".
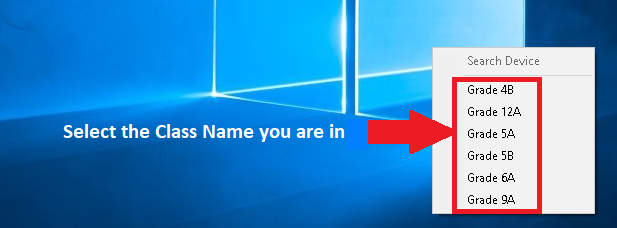
-Select the class WIFI name your are in.
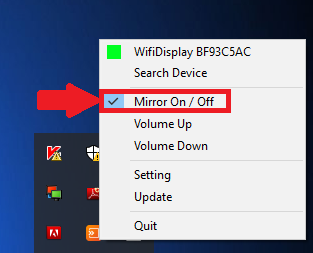
-When your finish your session in the class and about to move to another, Make sure to exit that class WIFI name by doing the following steps:
-Open the arrow near the clock, then click the "EZMira" icon ,Then Click "Mirror On / Off".
-When you go to the other class follow the same steps to connect to the class WIFI name.
P.S if you are using windows 7 and got black screen after adjusting the projector to "HDMI" adjust your device screen resolution to 1200*600.
- 21. Deleting Student's Submitted Attachment for Assessment15.10.20
-In case the student uploaded attachment for assessment and want to edit his answer ,the teacher first need to delete that particular submitted attachment ,so the student can upload it again.
Teachers can delete the assessments attached by particular students through LMS.
Go to Modules>LMS>select the class and section and subject, Then on the assessment tab their will be list of assessments submitted by the student, as you can see from the below screenshot.
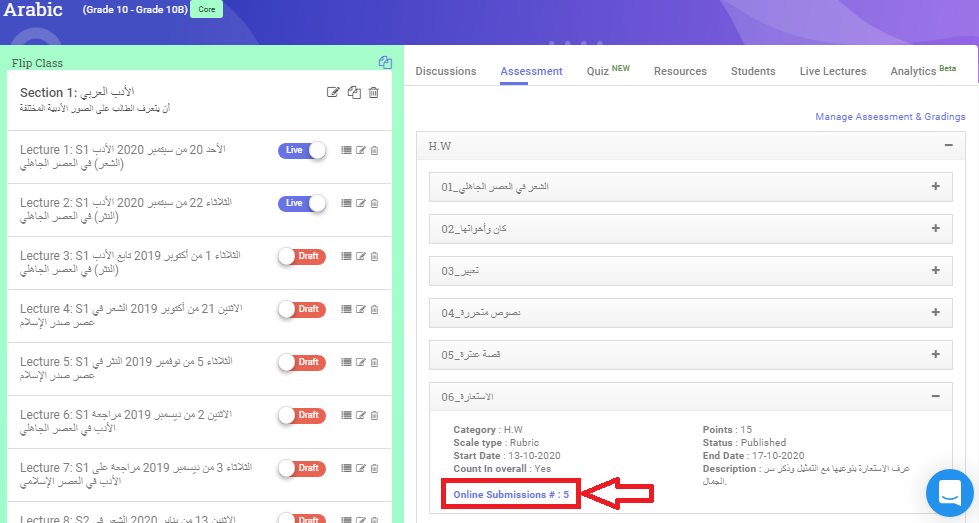
Click on the online submission, You will get the list of assessment submitted by the students, Click on the delete.
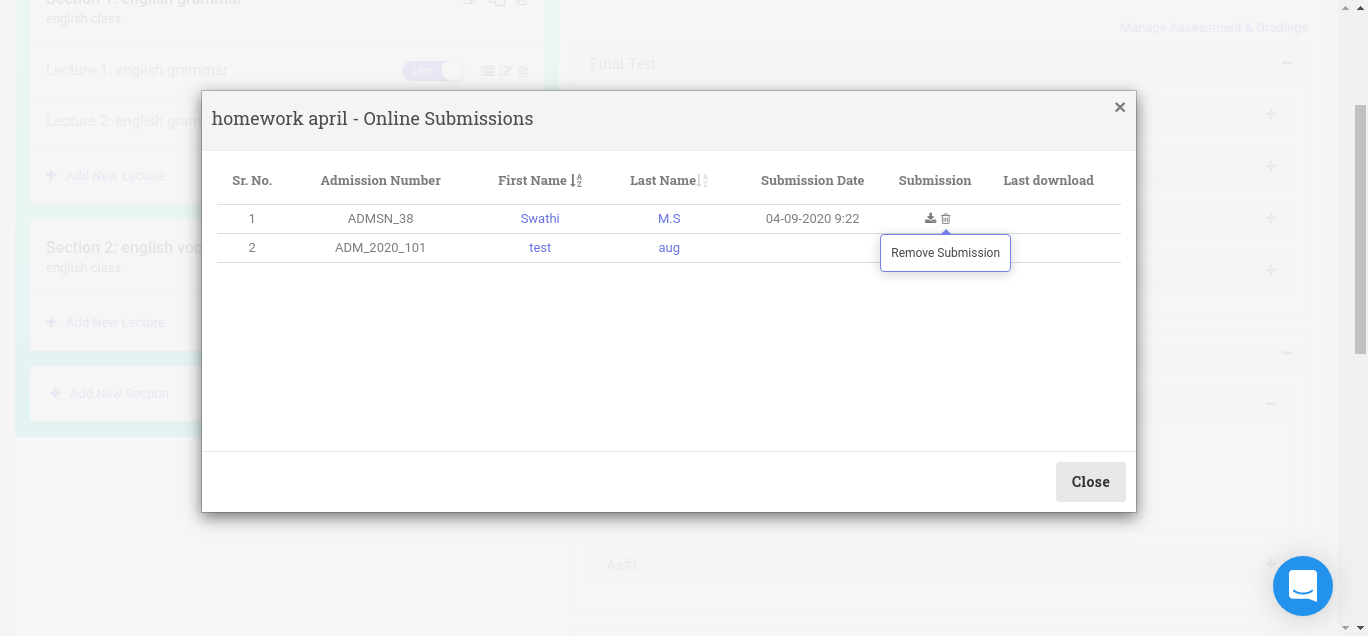
-And now the student can upload his updated answer attachment for the assessment.
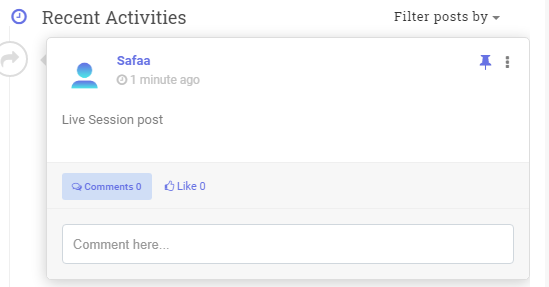
- 22. How To Pin Discussion Post?01.12.20
-Write your post on discussion , then click the icon shown below.
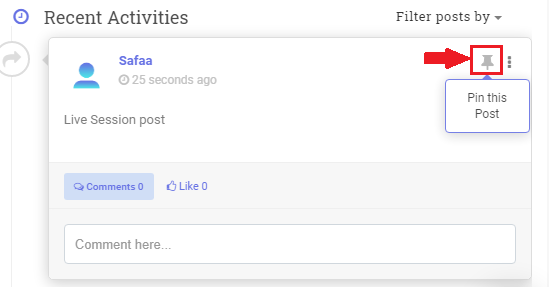
-Now your post is pined which mean this post will be shown on the top of discussion.
- 23. New Update Regarding The Availability of The Quiz26.01.21A new released update in the quiz section to publish the quiz for specific students.
- 24. How To Send Private Mail with Attachment To Selected Students?26.01.21
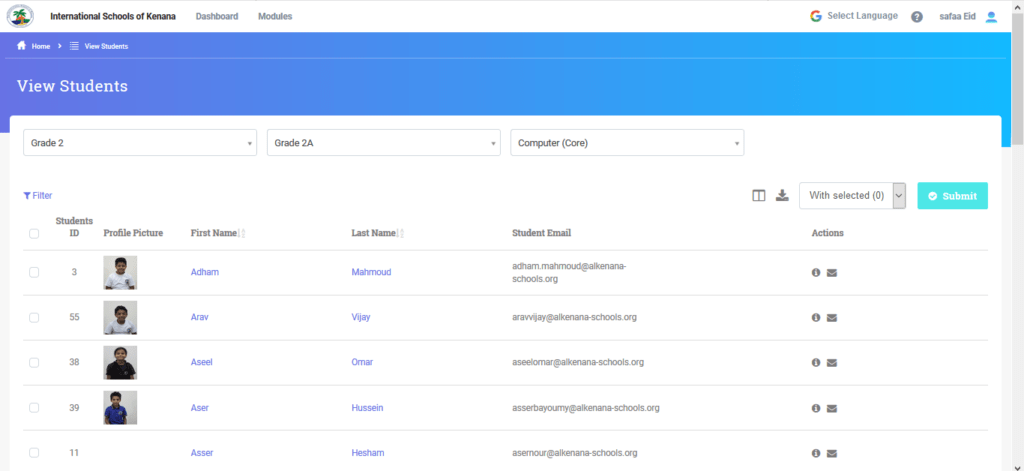
-Go to "Module" then click "Manage Students ".
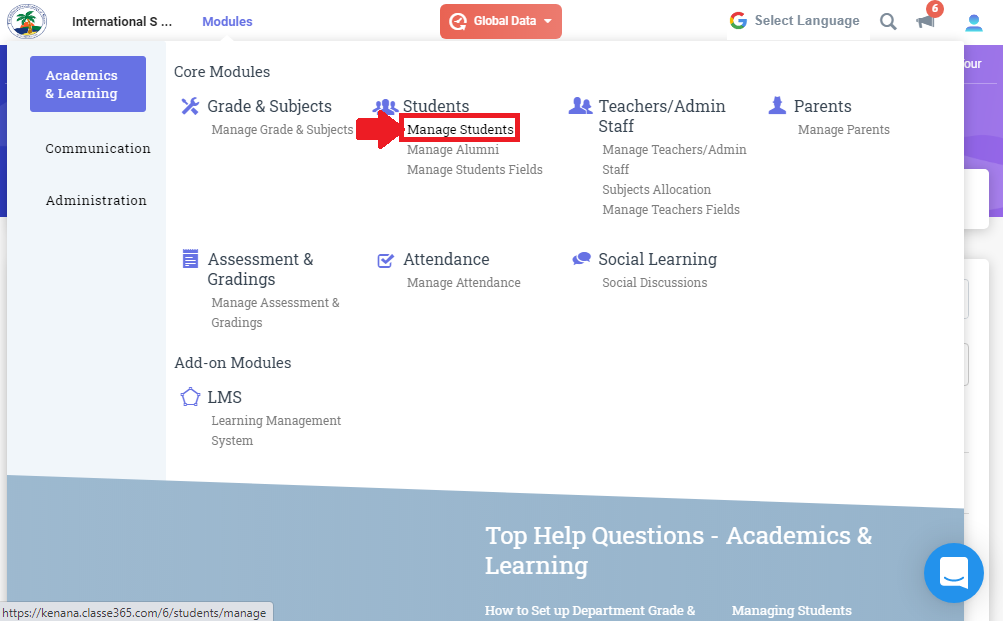
-Select the Grade & Class then the student and follow the steps.

-Write the "Subject" and "Message Body" then click "Choose file".
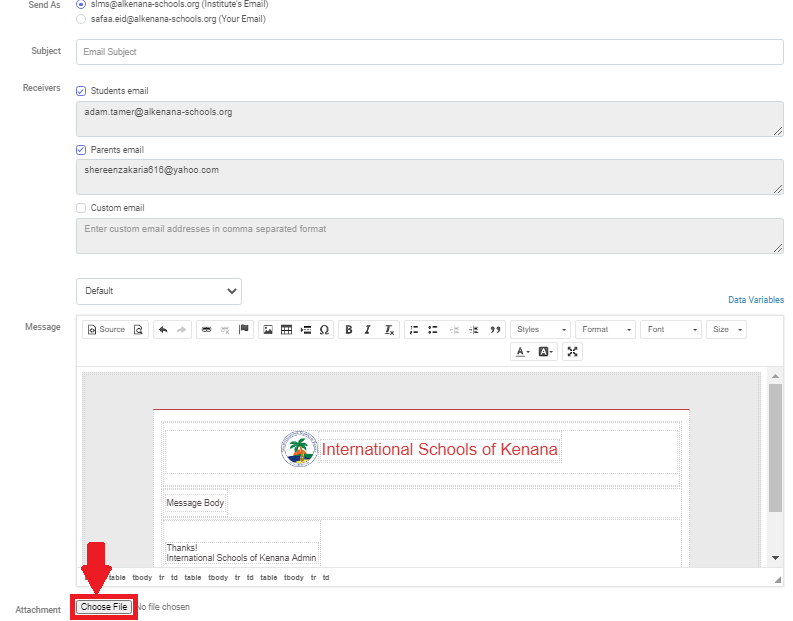
-Select file then click "Send".

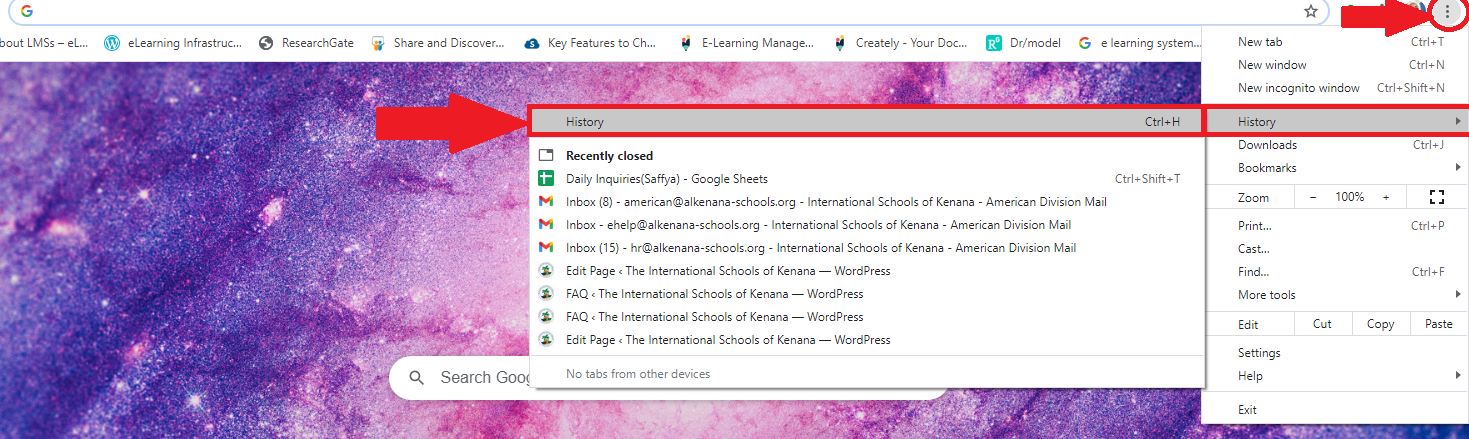
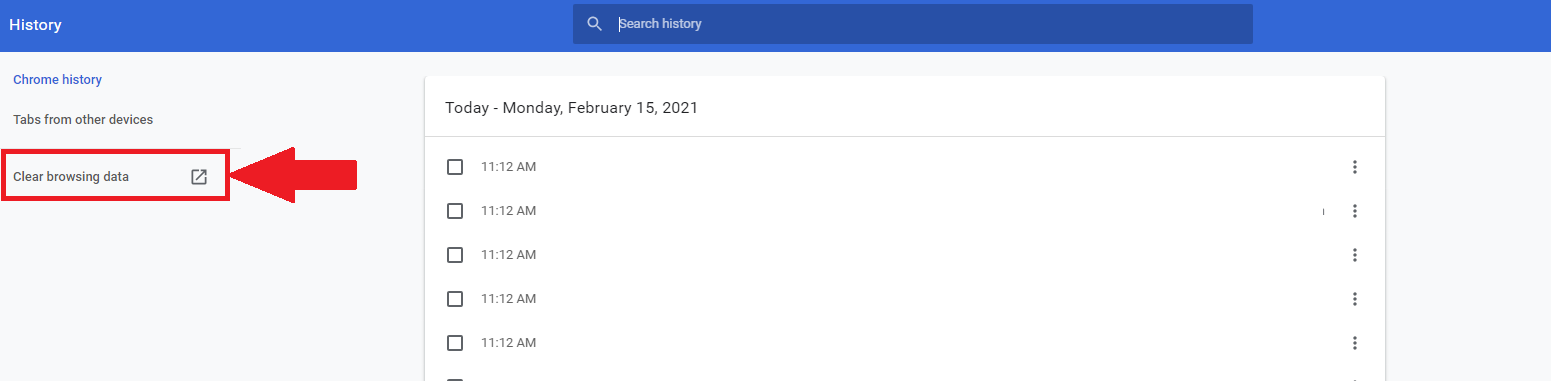
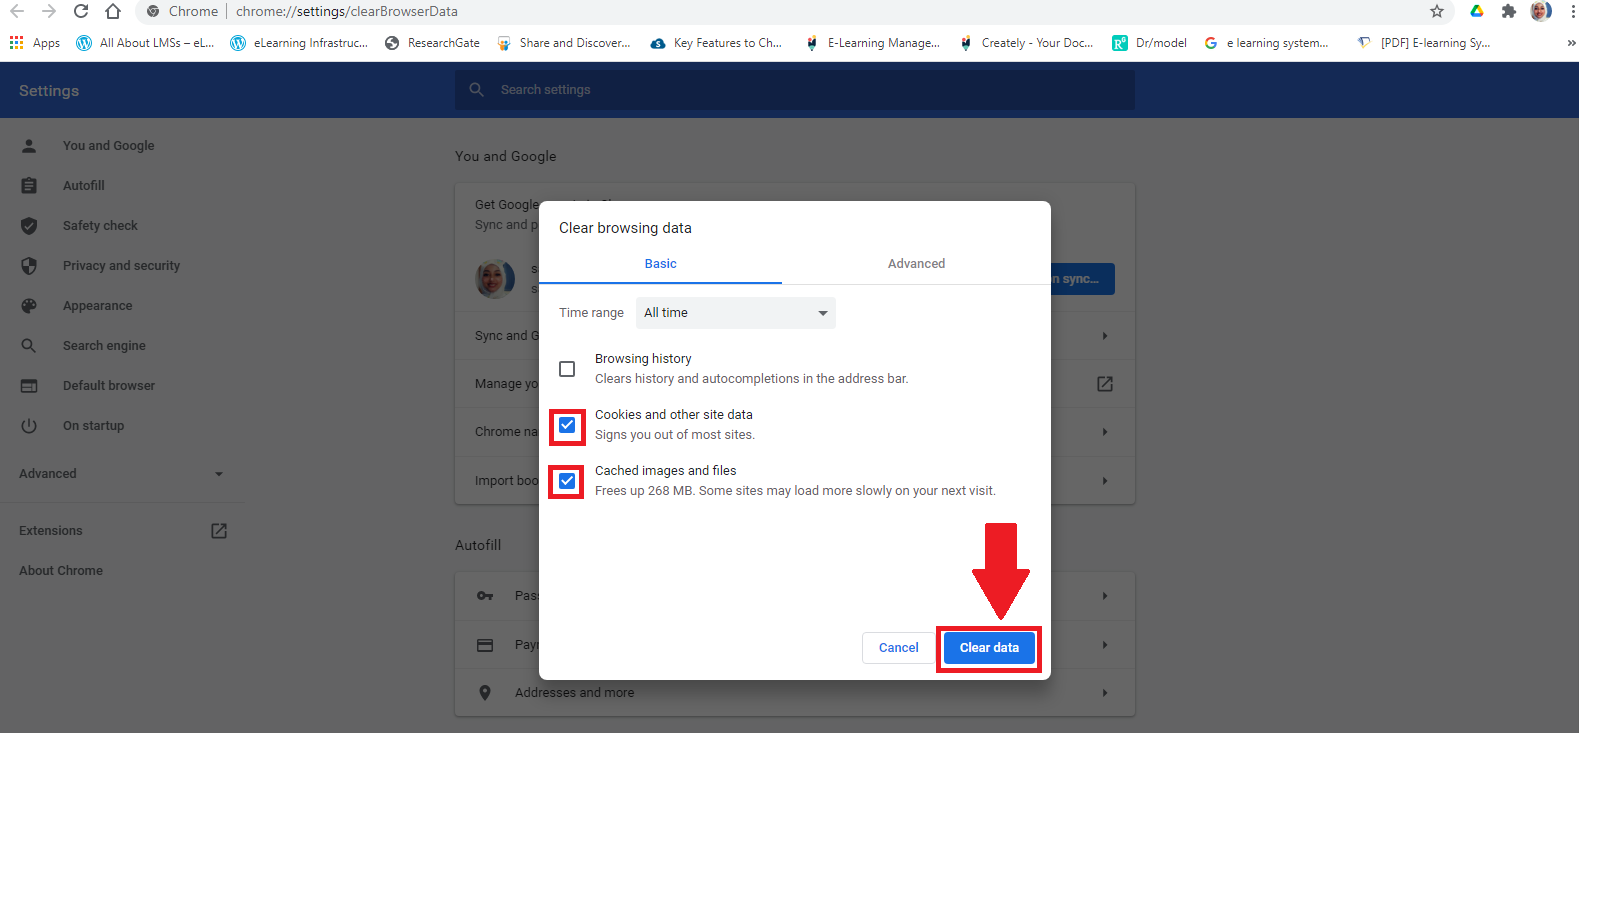
- 25. How To Clear Your Browser Cache?15.02.21
-Open your browser and follow the steps:
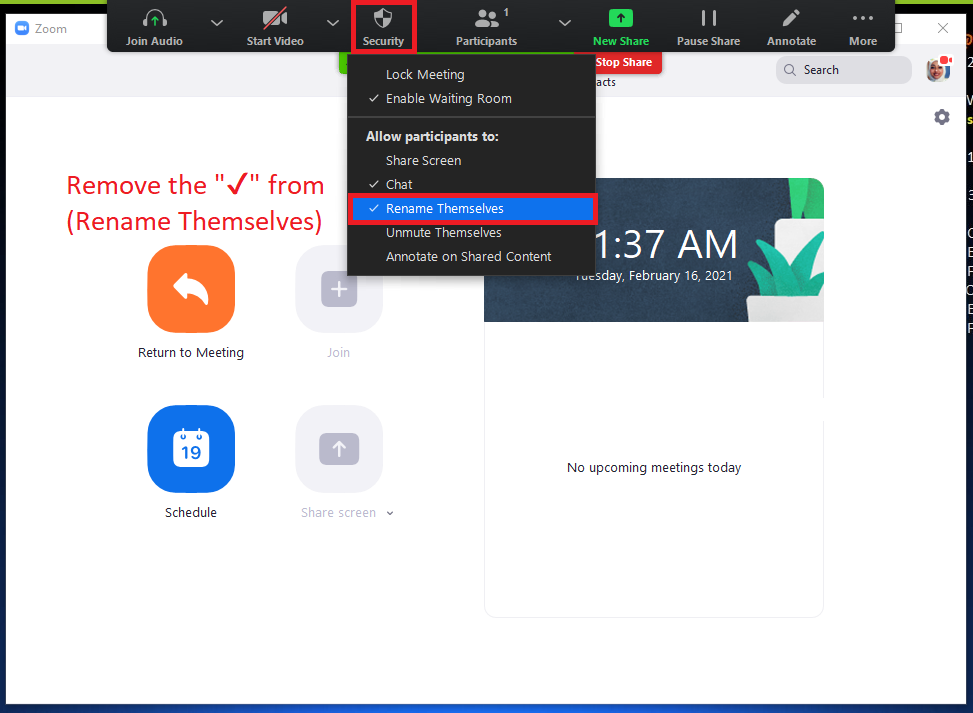
- 26. How To Stop Participants To Rename Themselves?16.02.21
-Once you started your Zoom meeting do this settings:
-Go to "Security" , Then remove the "✓" from "Rename Themselves".
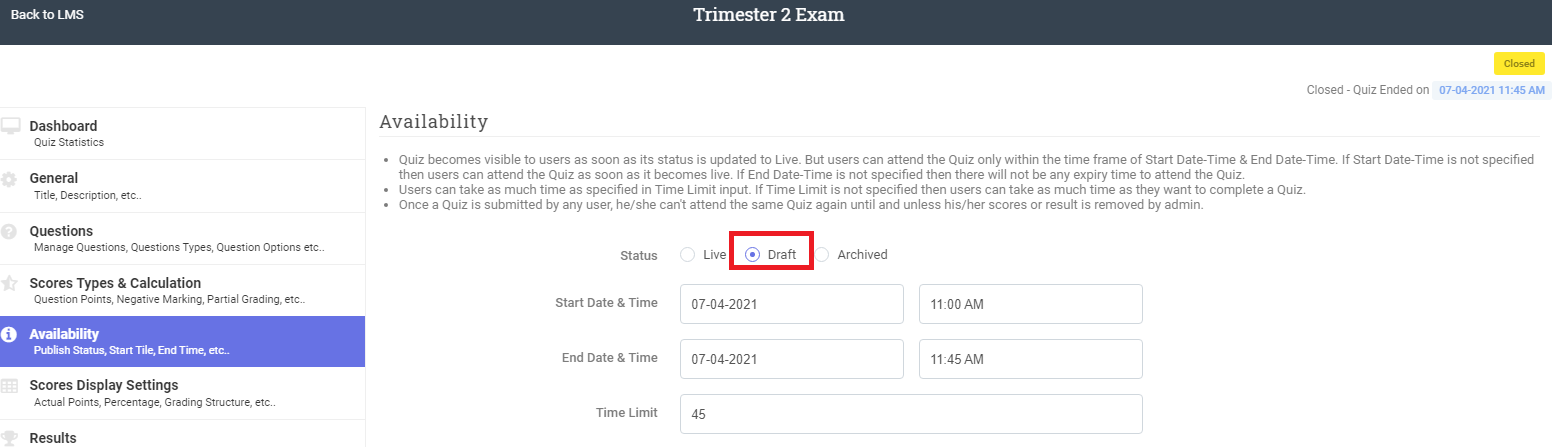
- 27. Archive The Old Quizzes01.04.21
Due to the latest quiz issues it's better when the quiz is complete and all the students have attempted, you can enable the option Archived it'll keep the quiz related information archived in the backend, and archiving helps speed up the system performance, we recommend you to archive the quizzes that are closed.
Important before Archiving The Quiz, Make sure that;
1- ALL STUDENTS HAVE COMPLETED THE QUIZ.
2- STUDENTS' GRADES (SCORES) ARE LINKED TO THE ASSESSMENT.
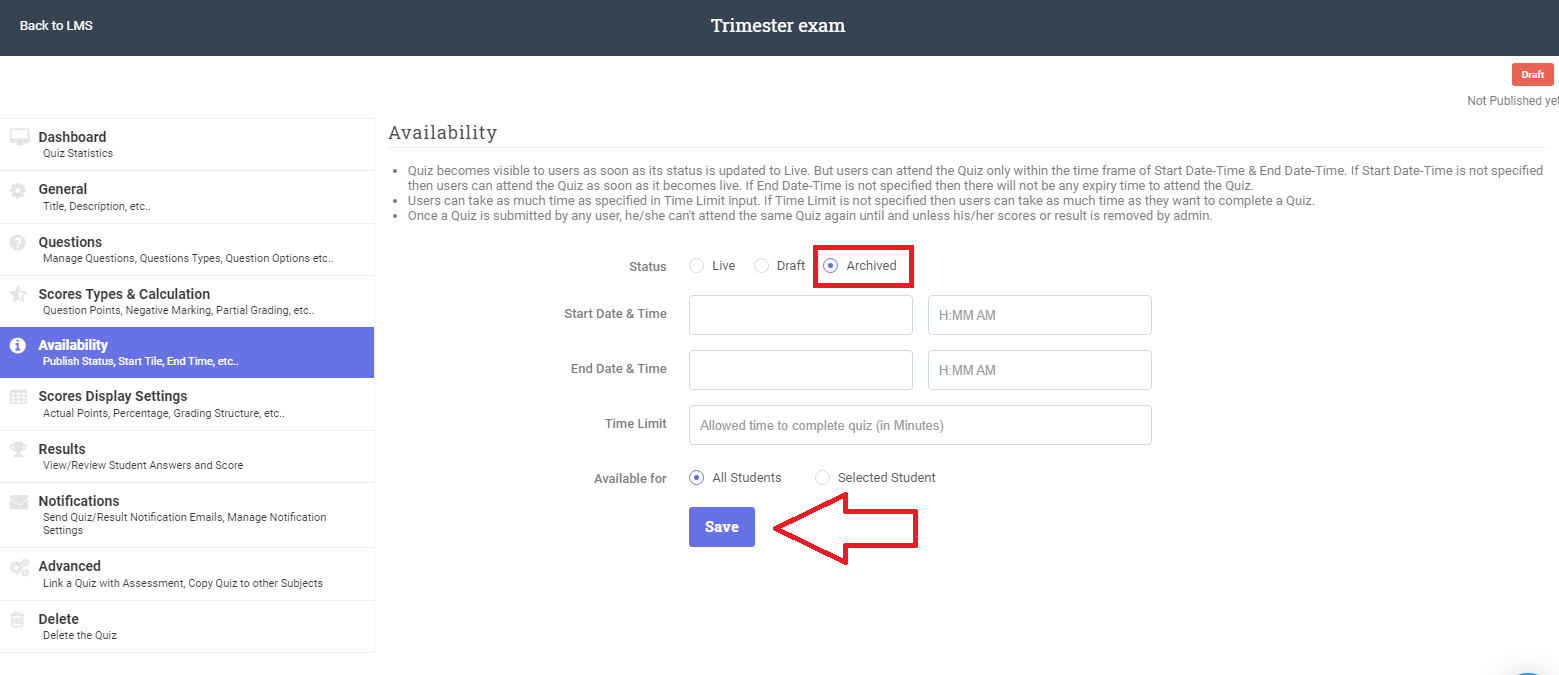
How You Can Archive a Quiz...
- Open the quiz you want to archive---- Go To "Availability"---- Click "Draft" ----Then Save ----Click "Archive ----Then Save .
P.S archive all the draft and the closed quizzes
How You Can Make a Quiz Live Again...
- Open the quiz you want to Make Live Again---- Go To "Availability"---- Click "Live" ----Then Save.
- 29. Social Learning for Teachers12.08.18
The new module of social learning was introduced to encourage students to take advantage of the social network and exchange thoughts and ideas about learning and education.
Go to Modules----> Social Learning
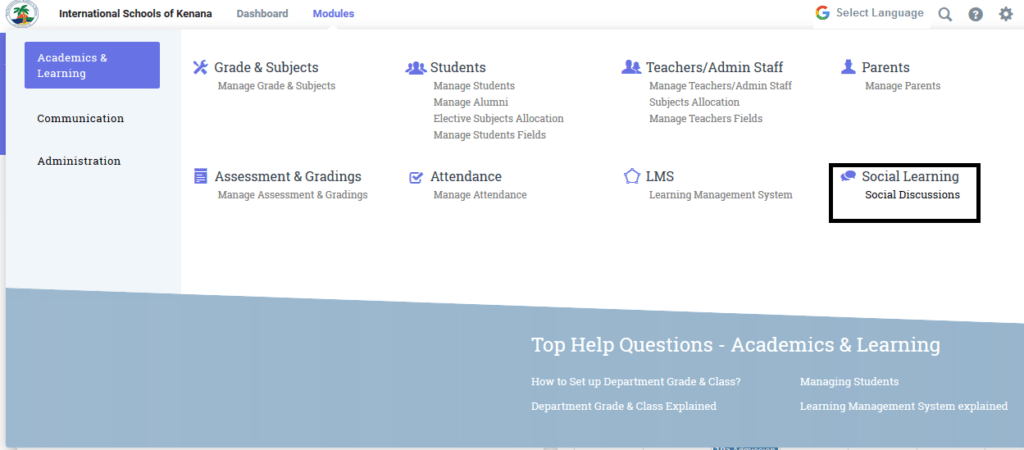
Here you can the students can exchange articles, video links and upload files to share and view. The user can share it with specific students or all the students of a particular Below is a snapshot of an example.
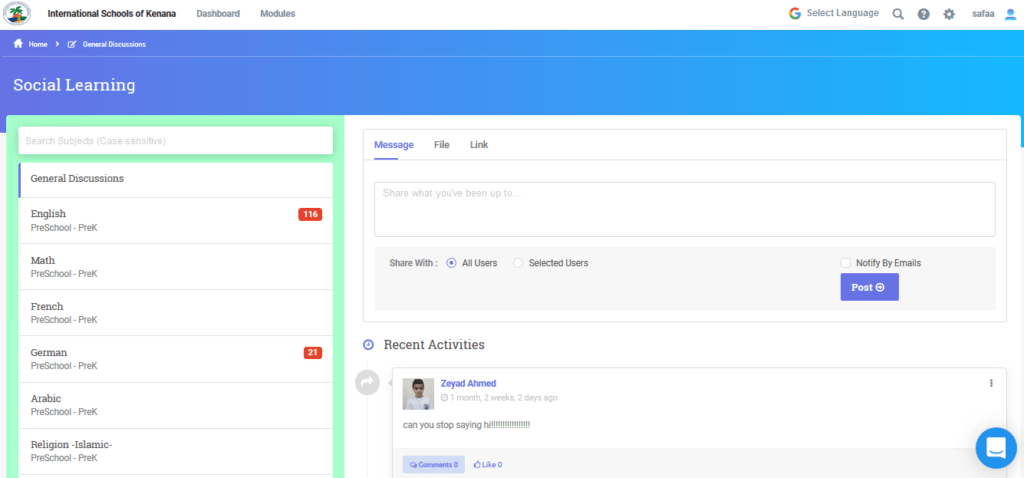
And guess what, This also has a "Like" button 🙂
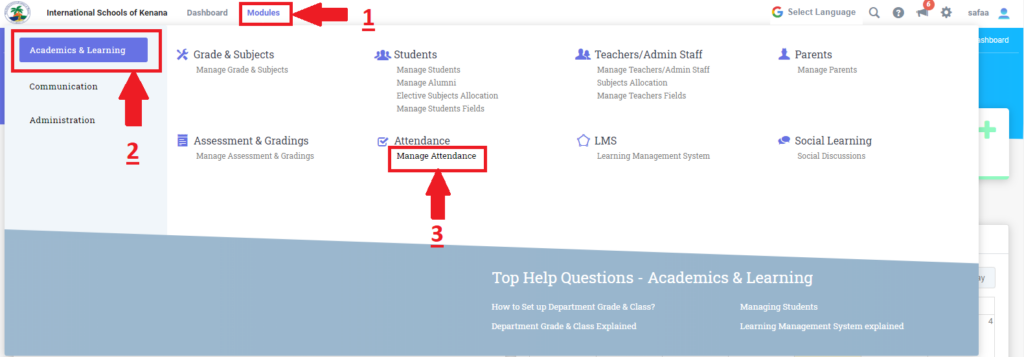
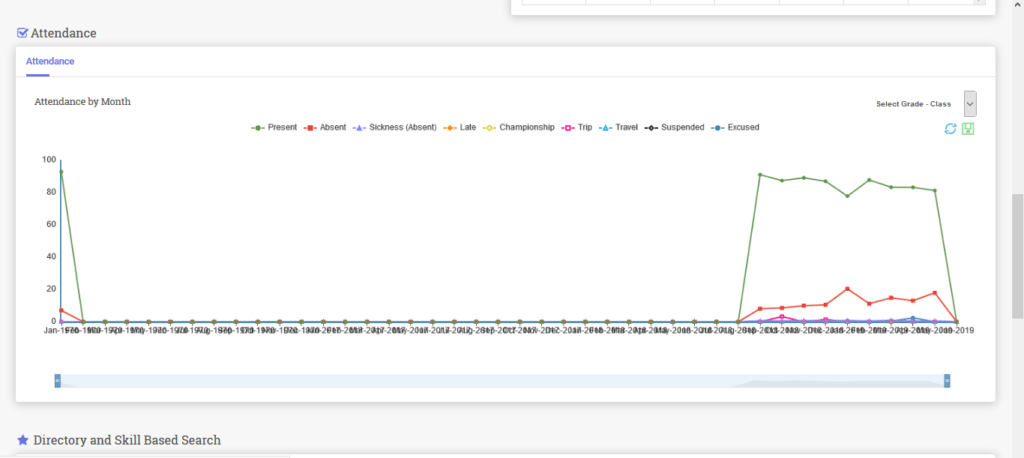
- 30. Attendance Module for Teachers24.06.19
e-Kenana SLMS has an efficient attendance module which will help benefit teachers.
To take attendance, go to modules---->attendance & manage attendance.
Manage attendance by class, session, section,date and subject.
Below is an example of the attendance module. The arrow highlighted in the pciture shows the tab which is used to mark the attendance.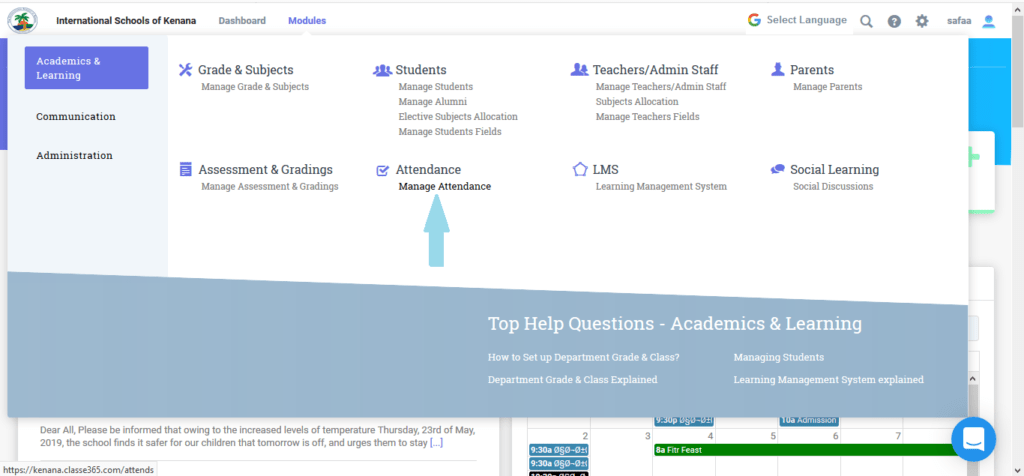
The tab highlighted allows the user to mark the attendance.
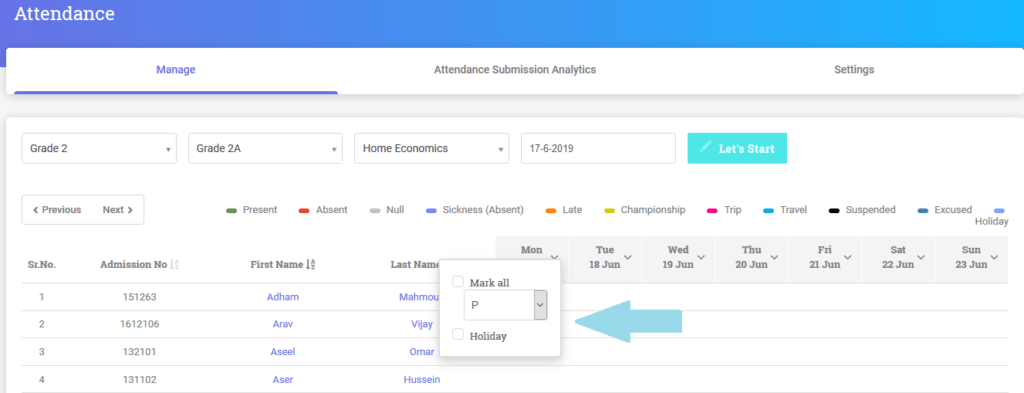
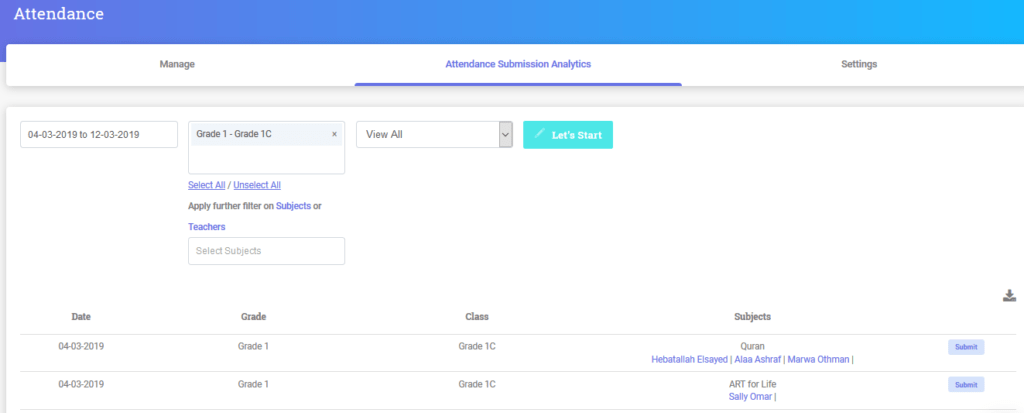
Attendance submission analytics:
This section is shows if the teacher/user has successfully completed taking attendance to a particular class-section on a particular date.
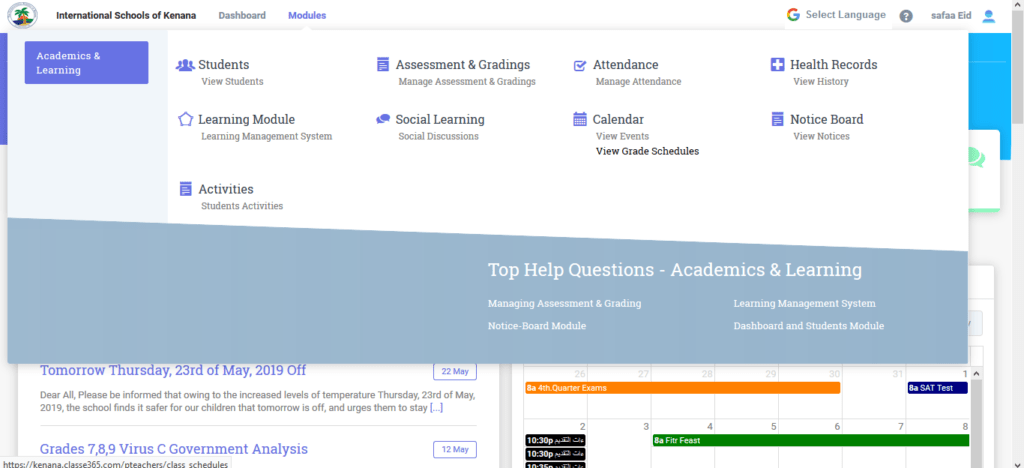
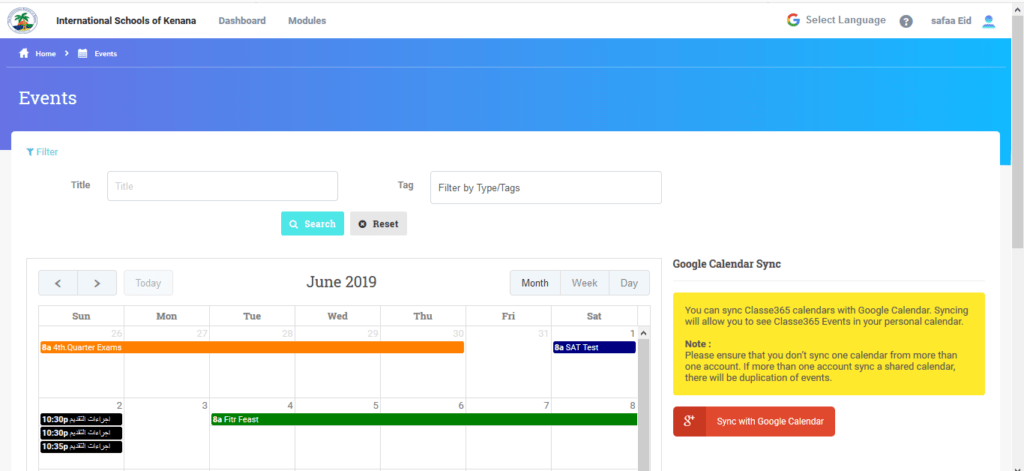
- 31. Calendar Module (Teacher)25.06.19
Go to Events & Class Schedule, go to Modules ----> Calendar as shown in the example below.
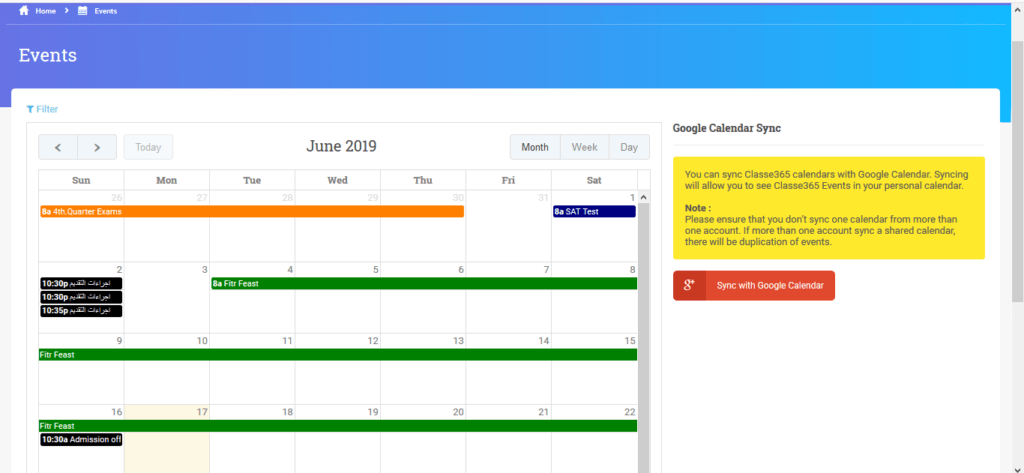
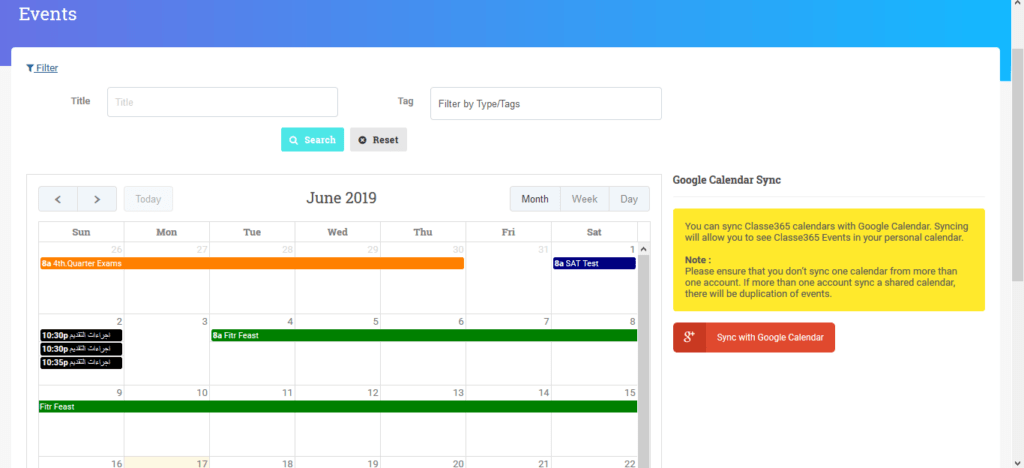
View Events:
You can view all the events in View events, The user can also sync with Google calendar
Calendar.
The user can filter based on the event type/tags. The snapshot below shows the calendar sync and the slot to filter based on the event type/tags.
To view the Event Details, click on the event marked in the calendar.
An Example is shown below.

The user can also filter out based on the advanced search options where the title of the event is queried. An example is shown below.
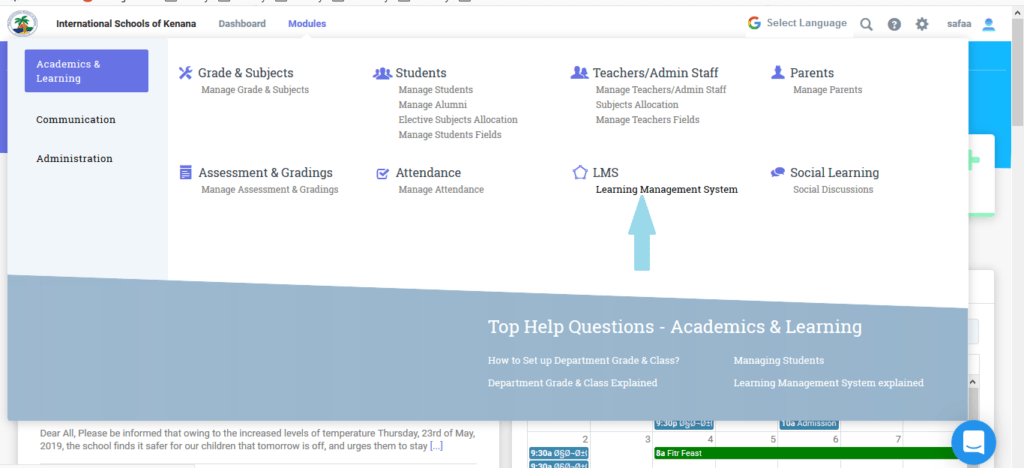
- 32. Learning Management System (LMS)-(Teachers)25.06.19
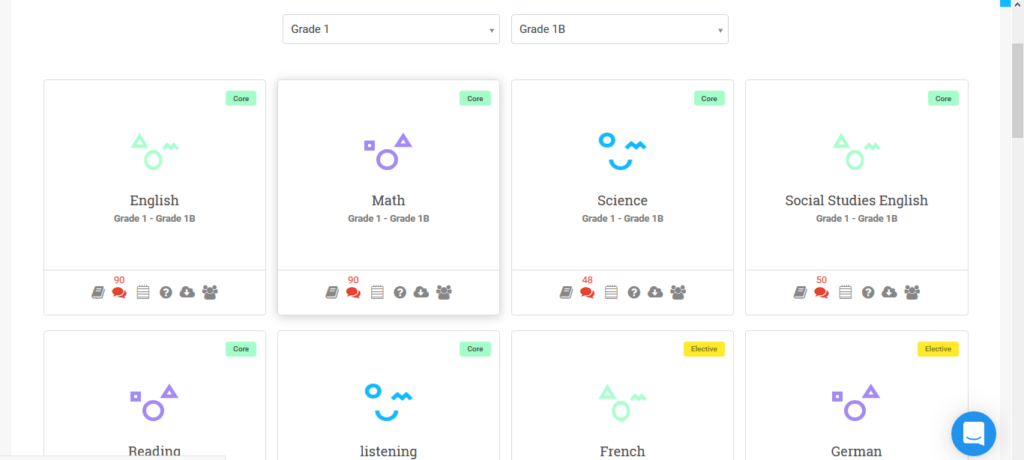
Go to Modules/Dashboard and then select Learning management system, Once inside the LMS module select the class and or section if required.
This will show all the subjects available for the particular class and section, From here we can manage the Curriculum, Discussions, Assessments, Quizzes, Resources and Students.
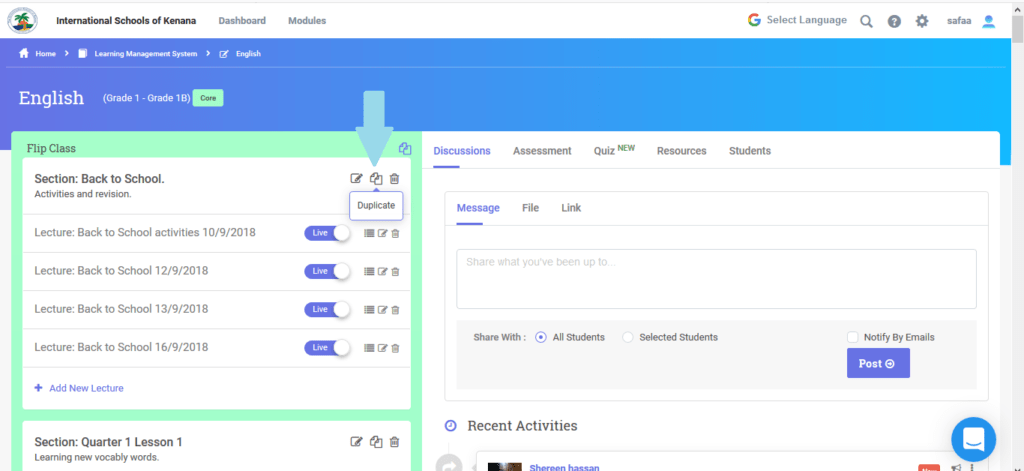
Once the curriculum is selected we can edit section and add section name and the objectives. After the objectives are added we can assign the teacher as per the requirement, Here we can edit the lecture to include Video, Audio, Document, Presentation and Text. The lecture can keep all the documents as a draft and then change the status to Live for the students to access it.
We also support Flip Class, which allows the Curriculum data of one subject to be copied to another subject, Just click on Flip Class from an existing subject and add it to another subject.
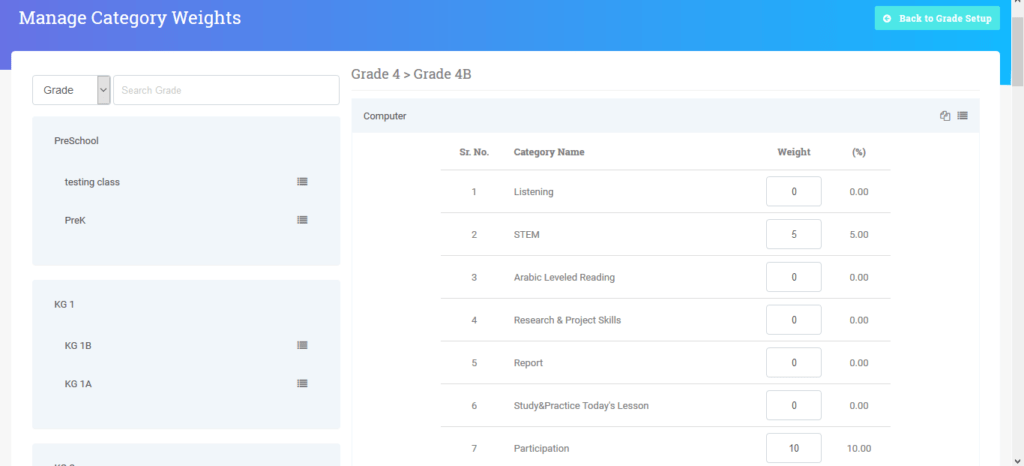
- 33. Managing Assessments & Grading (Teachers)25.06.19
The teachers have access to some of the functionalities of managing assessment and grading. The administrator has full success to the Assessments & Grading Module.
In Grade setup, the teacher has access to managing weights only. Here the teacher can weigh the weights for different categories of assessments. Below is an example of managing weights for different categories of assessments.
Here the teachers can also add an assignment and grade the students for the particular assignment. To add an assignment, click on the Add tab on the top of the page and fill the assessment details. The below image shows an example of adding an assessment for a particular category.
Once the assessment is added, the teacher can grade the assessment, Here is an example of grading an assessment.
Report Card:
e-Kenana SLMS supports printing out the report card as well save it in a PDF format (Please make sure you have the adobe reader installed for this). An example of a report card is shown below.

- 34. Managing Student Activities (Teachers)25.06.19
Teachers can view, manage and give feedback to students on student activities.
The teacher can review, Email, SMS and/or send a private note to the student or parents (Email and SMS can be sent to both students as well as parents).Go to Modules ----> Activities ----> Student Activities, An example is shown below.
The below snapshot shows an example where the user can send an SMS and view the student's activity. The teacher can query the activities by typing in the student's name.
The teacher can also send an email as well. An example snapshot is shown below.
Once the teacher clicks on the view activities, The teacher can view all the activities of the student. An example snapshot is given below.

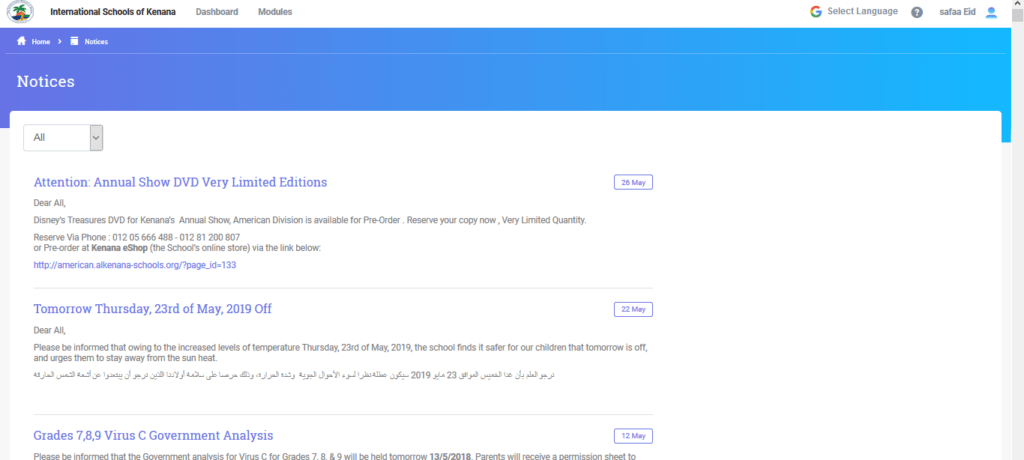
- 35. Notice-Board Module (Teachers)25.06.19
The notice board consists of all the major upcoming events for the calendar year. We can filter it out on the basis of the month or for the entire calendar year.
- 36. Setting up a teacher account25.06.19
Teacher account is initially set-up by the EDTD-ID (Educational Digital Technologies Development & Innovation Department) .
Your administrator will invite you either by SMS or Email to login to e-Kenana SLMS portal.
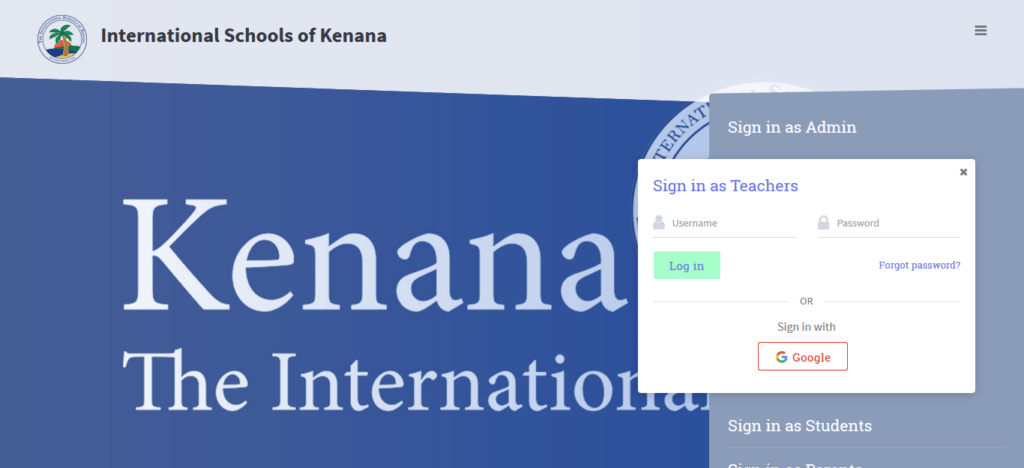
Once you have the login credentials, click on Teacher drop-down option to login., you'll be able to login with your e-Kenana e-mail account.
- 38. Classe365’s Mobile App (New Interface)09.09.19
Presenting Classe365’s Mobile App 2.1!
We are excited and proud to announce the new Classe365 Mobile App! It’s the perfect complement to the online Classe365 web application, which enables you to effectively manage your school’s day-to-day requirements - from administration, learning, communication and much more.
The new Classe365 app has been redesigned to improve its native feel and overall performance.
Aside from the friendlier interface, we developed exciting new features to better equip you with the resources to efficiently engage and collaborate among st Teachers, Students and Parents.
-After you install the classe365 application and opening it,this what you will see.
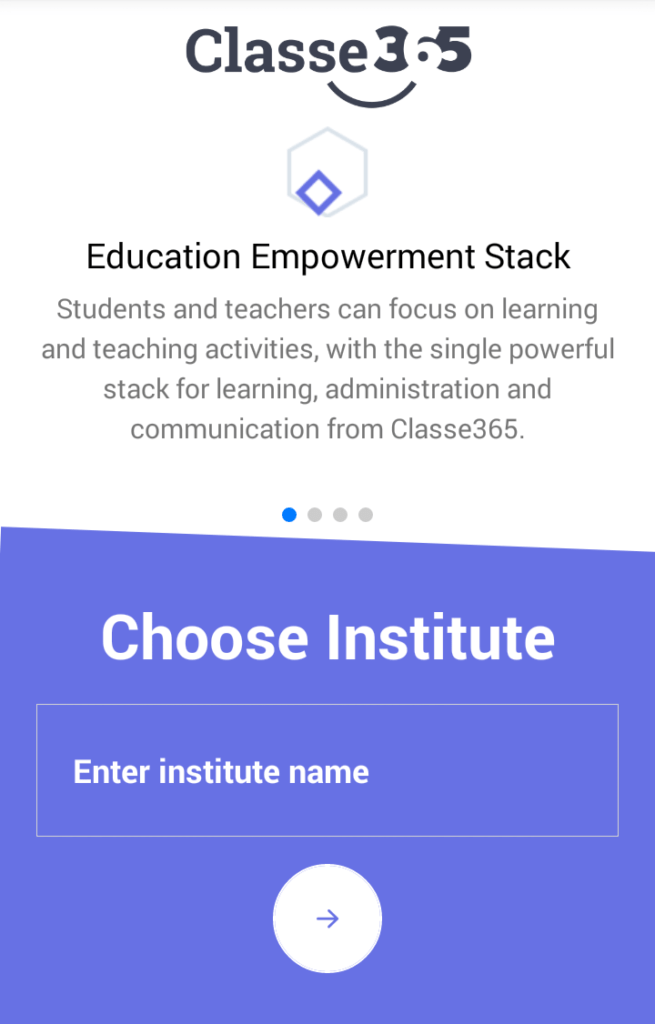
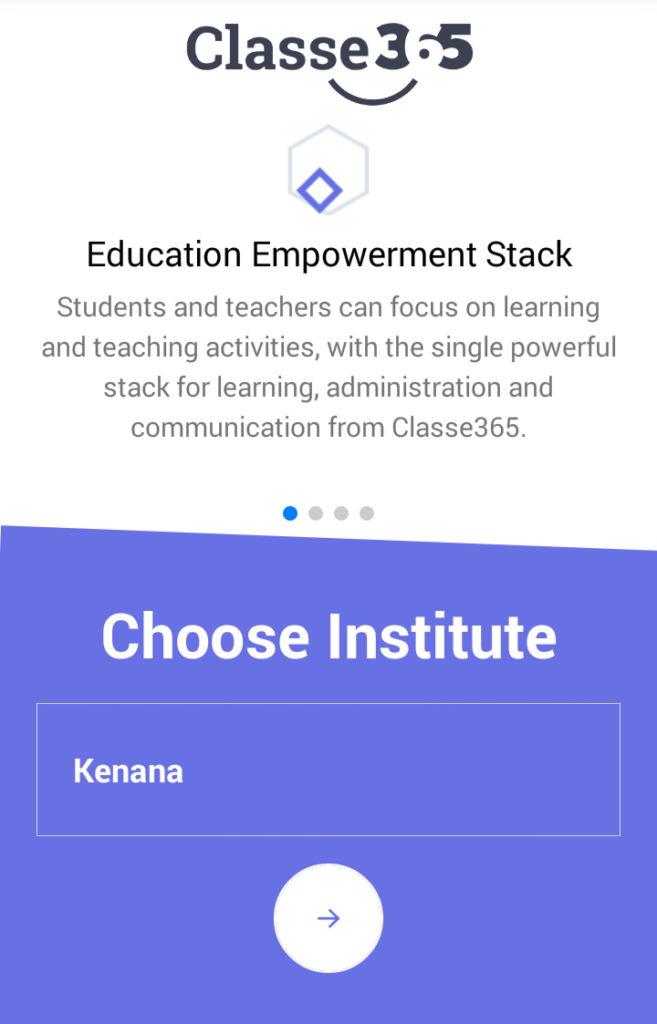
-Write"kenana"in the institute name.
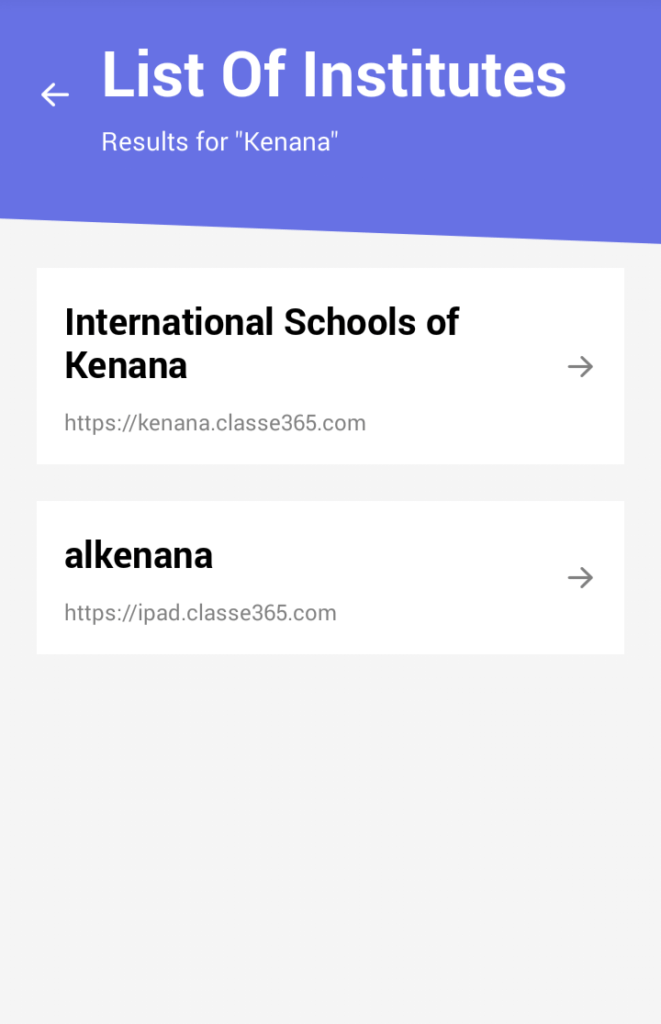
-Select "International Schools of Kenana".
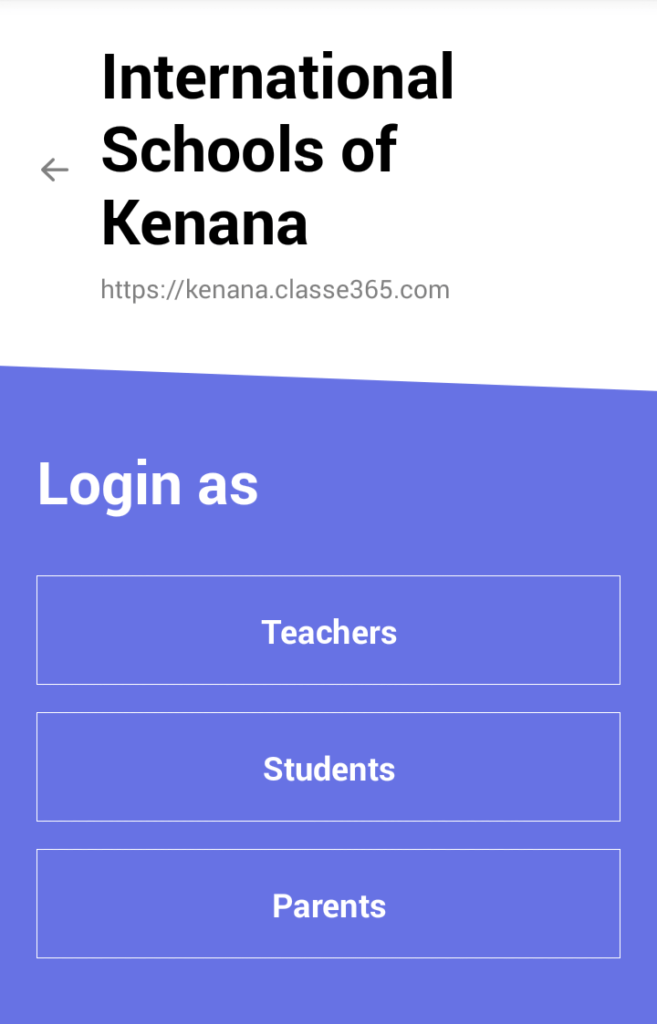
-You can sin in as "Teacher" Or "Student ","Parent".
Here is what to you can look forward to:

Our new interface is built on a technology called React Native. It offers faster mobile development, without sacrificing the end user's experience or application quality. It has also more efficient code sharing across iOS, Android, and the Web. This is our foundation to offer our customer even greater features on the mobile and tablet.
Fully Integrated LMS with Quizzes
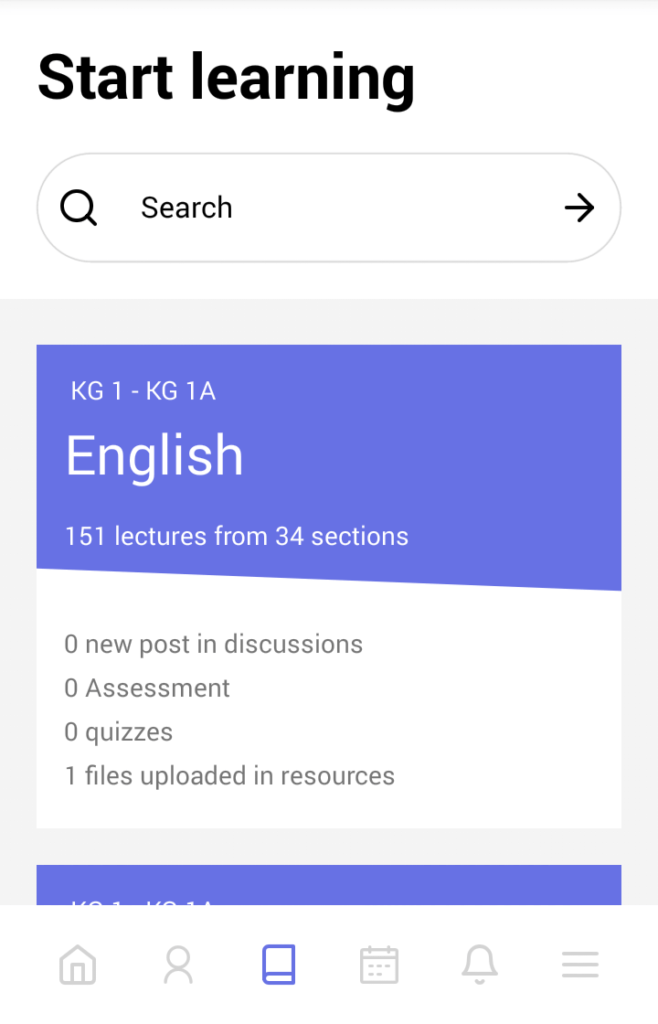
Students have direct access to the content of their assigned subjects. They can view recorded lectures, subject notes, research articles and view online quizzes. The LMS layout is also optimized for better mobile experience.
Simplified attendance tracking using Digital Student ID
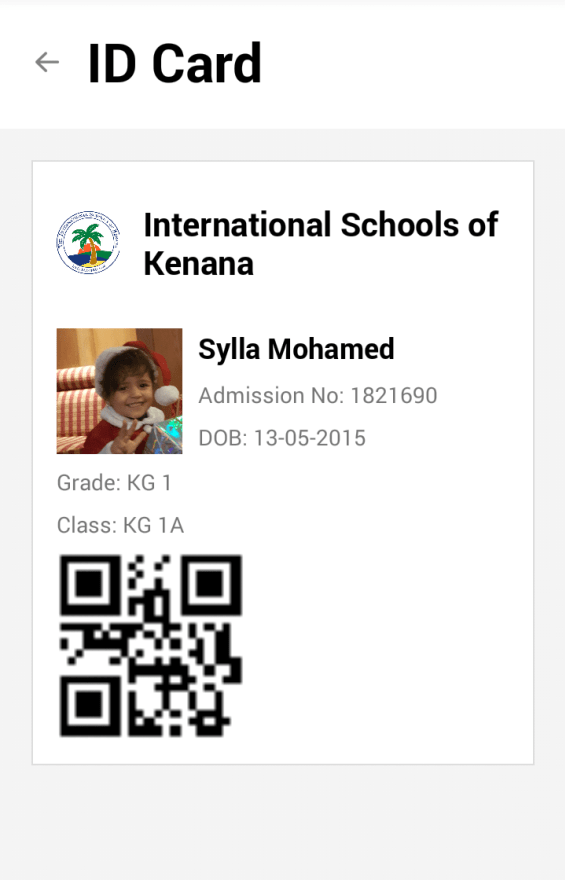
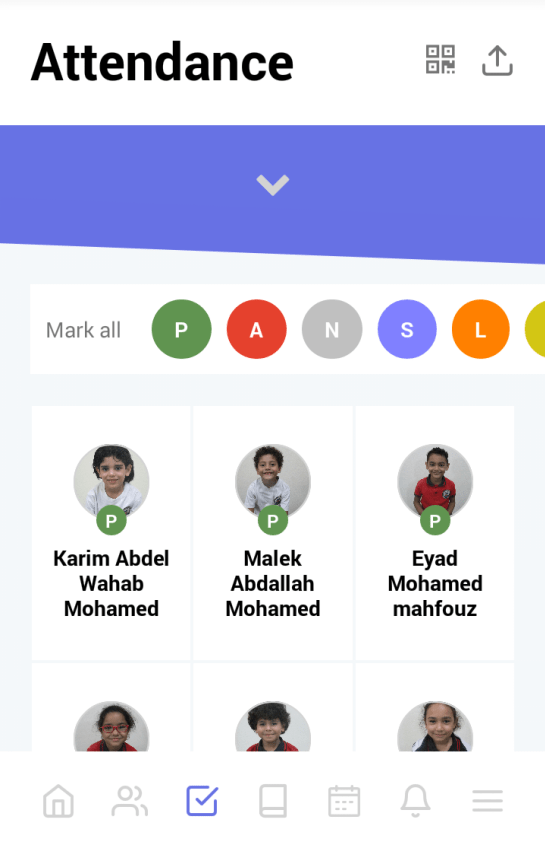
Teachers can use any mobile device to tag their students' daily attendance. They can also opt to scan student’s digital ID cards on their mobile devise for easier attendance tracking. The Digital ID card is now available from the student’s profile.
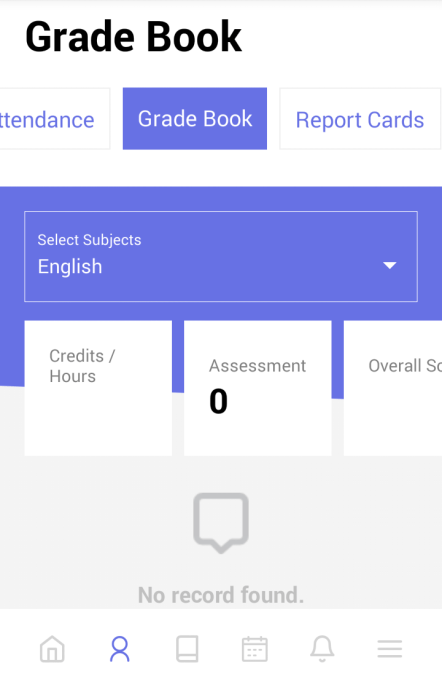
Enhanced Grade Book
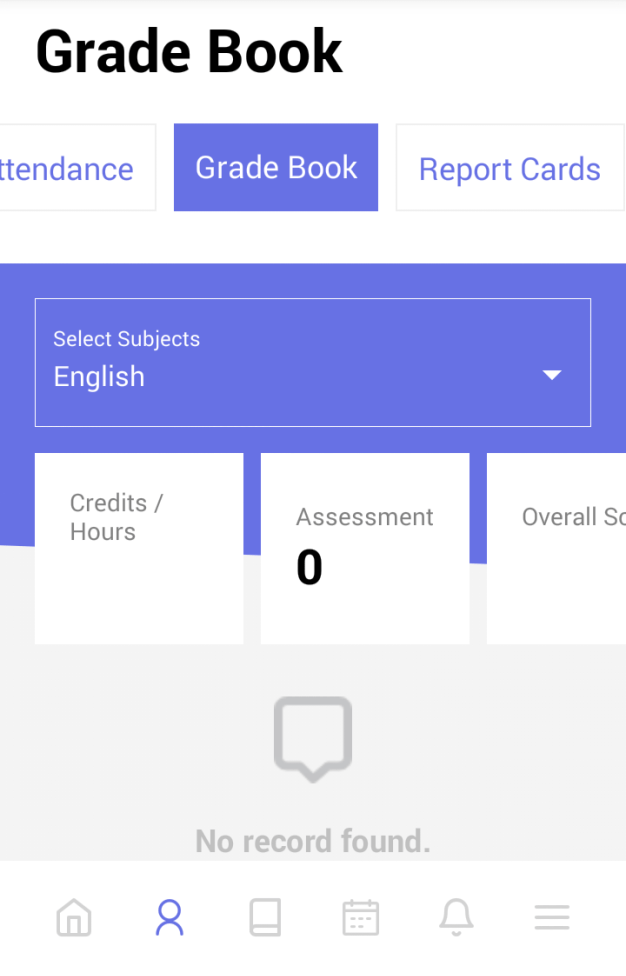
Grade book on the mobile app reflects all the enhancements that were performed on the recent web application upgrade. Parents will also be able to easily view details on assessments and report cards.
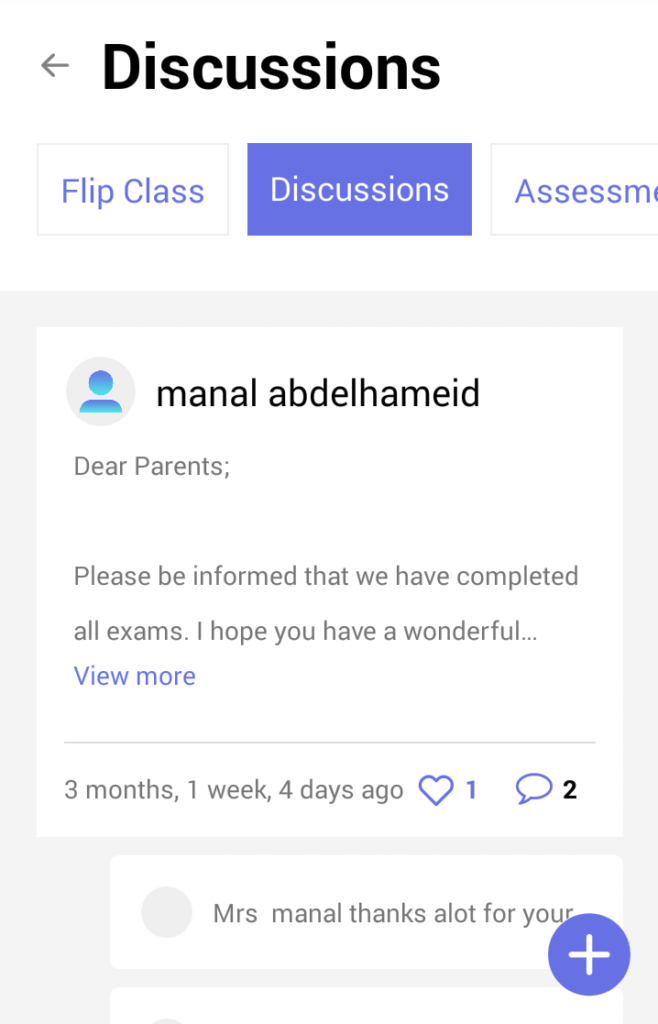
Improvements on notifications and social learning
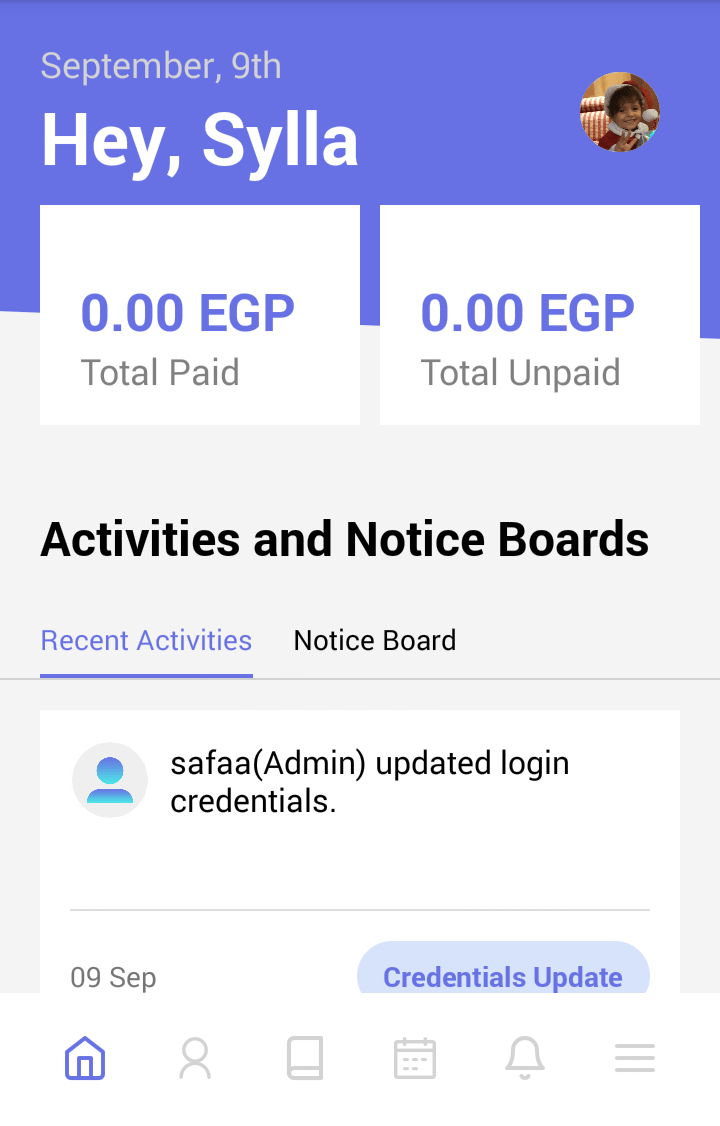
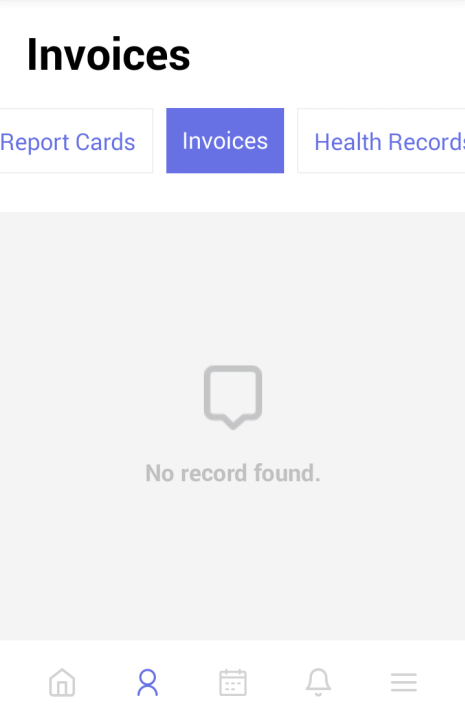
The new dashboard will provide quick summary of all notifications across invoices, events, notices and social learning posts. This enables teachers, students and parents to quickly view the latest updates from their profile.
Download or Update the Classe365 Mobile App from

or

Thanks!
- 42. Teacher Dashboard and Student Module12.08.18
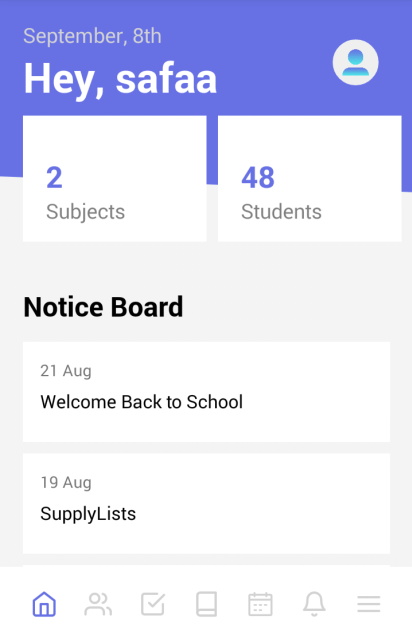
The Teacher Dashboard:
The teacher dashboard consists of LMS, Health Records, Events, Notice Board, Social Learning, Events and Class-Schedule, Birthdays, Attendance & Directory and Skill based Search of Student, Teacher and Alumni.

ATTENDANCE :
DIRECTORY & SKILL BASED SEARCH:
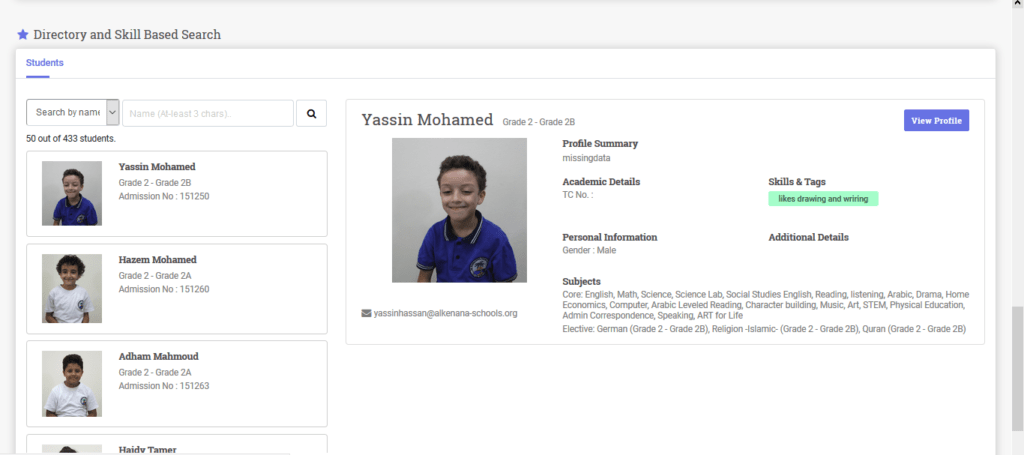
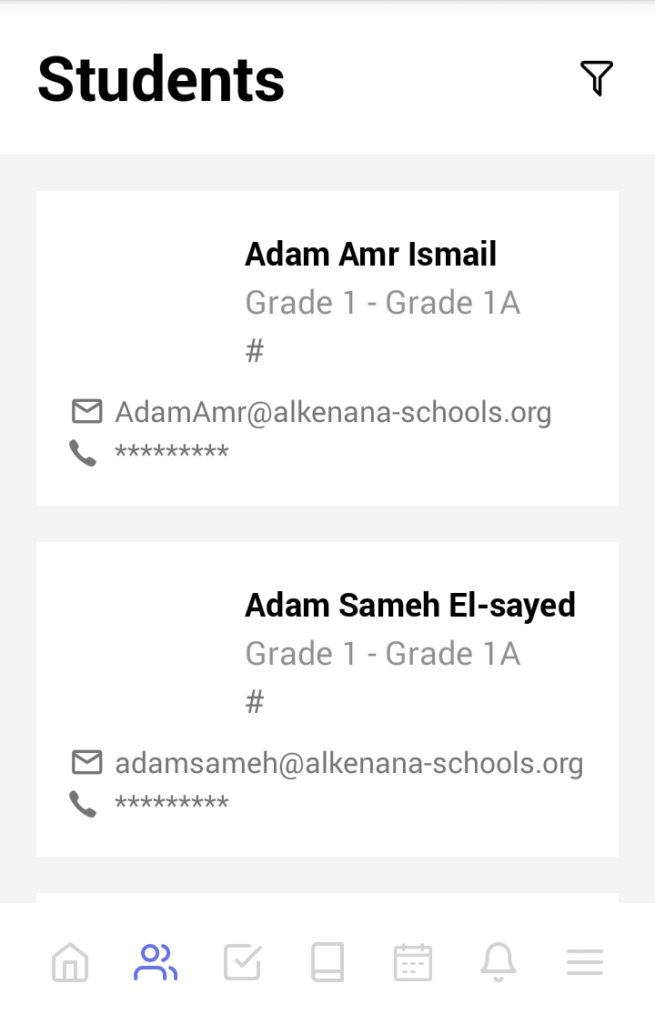
Student Module:In the student module, the teacher can view the profile of the student and can also export the data for future use. The student module gives all the related information about the student to the teacher.