The quiz section of the LMS module can function throughout a course as an informative feedback tool allowing both the instructors and the students to see where they are excelling and areas which need more improvements. In order to effectively create exams and quizzes, it is important to establish and understand the learning objectives that are being measured.
STEP -1: Create Quiz
To create a Quiz, Go to Modules > LMS > Select Class > Select Subject > Quiz > Add New Quiz
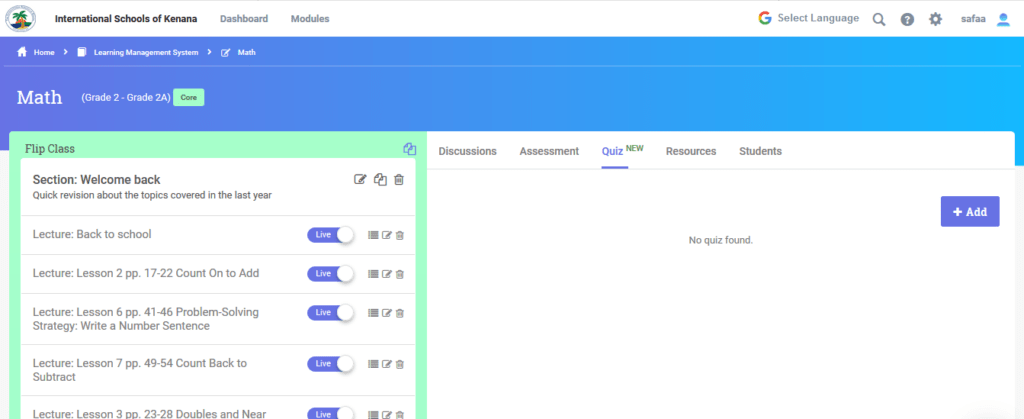
This leads the user to the new quiz section where we can setup quiz related settings, questions and much more.
Now, under “General” side menu, we’ll have three fields as below:
Quiz Title – This is the title/name of the quiz
Description – The purpose or brief explanation of this quiz test.
Feedback – This is the output notified to students when the quiz is completed by the students.
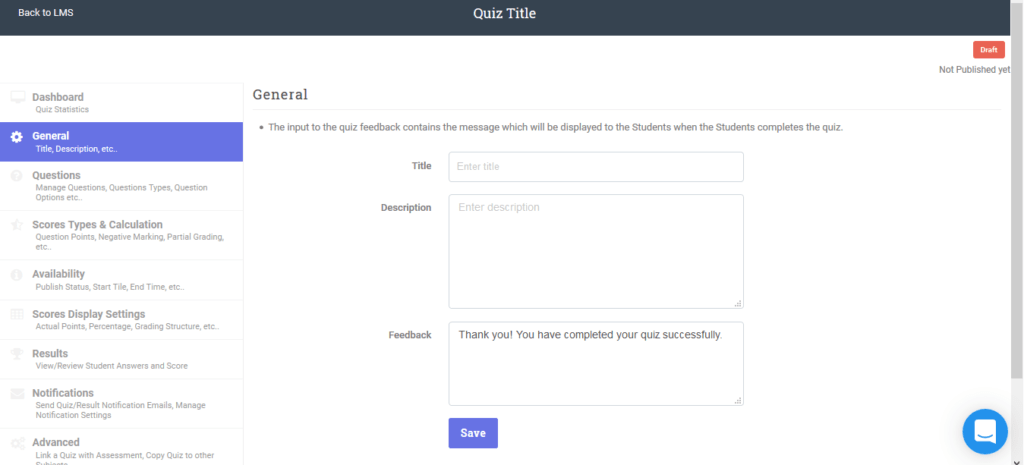
Until we complete the General information all the other menus will be disabled.
Now that we’ve finished the first step in creating the quiz let us add some questions which is shown in next step.
This document only describes on adding quiz questions, if you want to learn more on uploading images in the titles please use the below-attached documentation
Image Support In Quiz Title & Options
STEP-2: Adding Questions
On the left side of the menu navigate to “Questions” to add the questions
There are 2 ways you can add questions:
Bulk Import Questions – We can import the questions from a file.
Adding Questions Manually – We can add the questions manually.
Let’s take a closer look on adding questions:
Bulk Importing:
Bulk import comes in handy when there are large data of questions that needs to be uploaded. This option enables faster data upload and more importantly saves time.
Download the sample template file on the types of questions supported by Classe365, adding a correct answer and much more.
To download sample file, click on the tab which reads “Download Sample File”
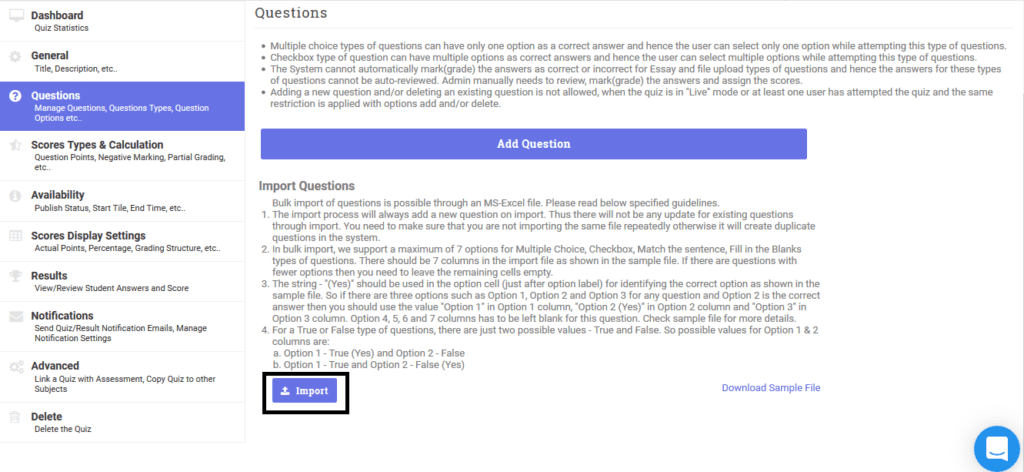
An example of the sample file is shown below;

Let us see what are the required columns needed to upload the file.
Question Title:
Question Title is the sentence worded or expressed so as to elicit information.
Question Type:
The type of question which student needs to answer, we support the following type of questions:
2 a. Multiple Choice – This type of question is normally used to select one answer out of many answers.**
Example:
Question title – Who is considered as the father of modern science*?
* Options – Option-1 = _Galileo_, Option-2 = _Newton_
Galileo is the right answer and hence the user needs to add “_Galileo_ _(Yes)_” in the option list to show that the correct answer is Galileo.
2 b. Checkbox – This type of question is usually used to select more than one answer out of multiple answers.**Example:
Question title -* What is the shape of the moon?
* Options – Option-1 = _Round_, Option-2 = _Crescent,_ Option-3 = _Square_
Now that we know that the shape of the moon is “Round” & “Crescent”, we need to add “Round**_(Yes)_**” and “Crescent**_(Yes)_**” in the option.
2 c. True or False – This type of question is used when a clause/sentence is either said to be true or false
Example 1:
Question title -* Moon is either Crescent or Gibbous or Round ?
* Options – Option-1 = TRUE, Option-2 = False
Now that we know the shape of the moon is “Round” & “Crescent” or “Gibbous” we need to add “TRUE_(Yes)_” and leave the other options as blank.
Example 2:
Question title -* The shape of the moon is Square, Is the sentence correct?
* Options – Option-1 = TRUE, Option-2 = False
Now that we know that the shape of the moon is not Square we need to add “FALSE_(Yes)_” and leave the other column blank.
2 d. Matching – This type of question is used to match the question with the right answer, in the template we use this symbol (“**<=>**”) on right side to upload the correct answer.
Example:
Question title* – Match the following
* Options – Option-1 = Moon <=> Round, Option-2 = Book <=> Rectangle
2 e. Fill in the Blanks – This type of question is used to complete a sentence with the correct answer
Example:
Question title* – The shape of the moon is either [blank] or [blank]
* Options – Option-1 = Round, Option-2 = _Crescent,
We know that moon is either Round_ or _Crescent_ hence we have them in the options, when the student fills in the blank and if the answer matches the answer than the answer is chosen as correct otherwise it is incorrect.
2 f. Essay – This type of question is used to compose a essay on a topic chosen.
Example:
Question title* – Write few lines about Moon.
* Options – _Not applicable_ Here options are not applicable but you can define the Max Characters and number of Rows visible in description box(text-area).
2 g. File Upload – This type of question is used to submit any typed-in files in three formats i.e., PDF, Word and CSV.
The user can define Max File Size and File Format.
Option 1 to Option 8
These options are used as responses for question types Multiple Choice, Checkbox** and Matching.
Note:
* Correct answers will be marked as “Yes”** enclosed within parenthesis in Multiple Choice and Checkbox
* Correct answers are tied within “<=>” separator in Matching.
If out of 8 you only have 5 choices then the rest should be blank.
Question Required
This field is used to validate the question if we want a question to be mandatory then we need to use “Yes**” in the file, else use “**No**”.
Question Feedback
Question Feedback is used to provide feedback to the students. We have two options in Question Feedback they are Single** Feedback, and Correct/Incorrect Feedback**.
Single Feedback – is used when you want to update student about the answer.
Correct/Incorrect Feedback – is used when you want to show why the answer is correct and why the other option is not correct using Feedback Correct and Feedback Incorrect fields respectively.
Maximum Characters – This column is used to provide total number of characters in numerical values to question type Essay.
Display Line – This field provides the height of the text-area for Essay type question.
Maximum File size – This field specifies the file size in Megabytes for question type File Upload
File Types – This field is used to allow the file format to upload in File Upload type question, the allowed file type is PDF, Word and CSV.
Adding Questions Manually:
We can also add questions manually, Click on Add Question

Add the Question Title as per discretion, select the Question Types, Fill in the Options and don’t forget to mark the correct answer, validate the question if required and save the question.
Question Type – Fill In the Blanks you need to use [blank] to insert the blanks.
Question Type – Matching has the responses on the left with correct matching values entered on the right, student selects the matching value.
Question Type – Essay has two parameters to input, one is Maximum Characters and the other is the Display Settings that is in the number of rows visible to type in contents.
Question Type – File Upload also has two parameters to input one is File Size in Megabytes and the other is File Type you can specify more than one file type.
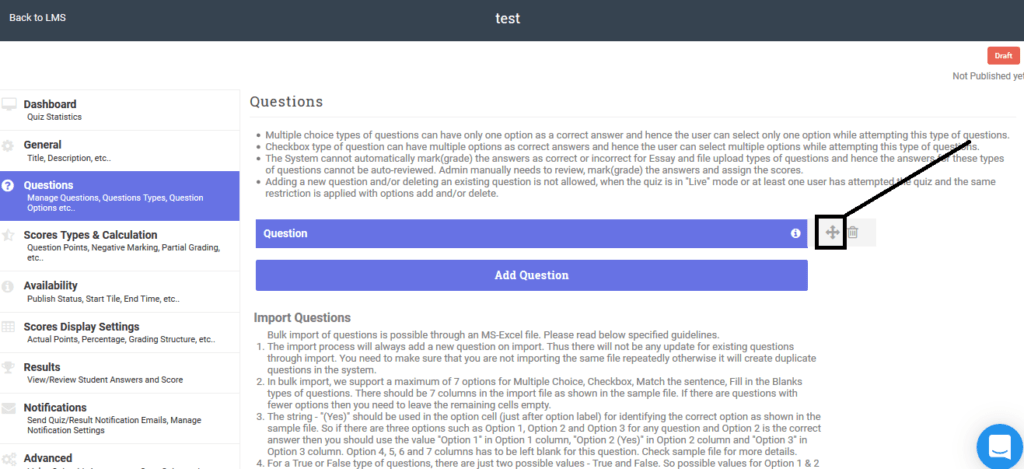
You can change the order of question anytime by dragging and dropping between questions using the below icon
Great! Now that we’ve added questions lets proceed to setting up our quiz. STEP-3: Score Types and Calculation
Score type is used to provide information about the assessment of the quiz.
Score Based – This option enables the quiz to be evaluated with scores.
Points For Each Question
Equal – If the points are equal across all the questions then this option needs to be selected.
Different – this is selected when the questions have different points.
* Equally Distributed – the admin specifies the _Question Scores_ inside the text box which will be equally shared among the options, say example we have 4 options and the point to this question is 1, then each option gets 0.25 points.
* Custom – when custom is enabled admin sets the points to each _options_ when student selects the option the input points are counted.
Negative Marking – This option is enabled when Points for Each Question is Equal and Negative Points for each question is set with equal value.
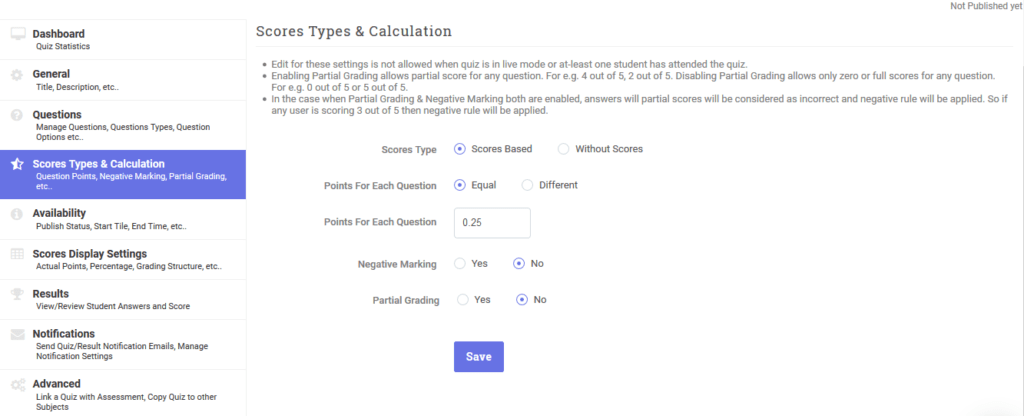
The Below is an example of negative marking when Points for Each Question is Different and Negative marking is enabled.
Partial Grading – It is used when the admin wants to grade the answers partially.
Example: If Partial Grading is enabled then for a question of 5 grades, it can be partially graded like 3/5(3 out of 5 points). If partial grading is disabled then admin can either grant full points or no-points(zero) like 5/5(5 out of 5) or 0/5(0 out of 5).
Now that we have finished step-3 lets make the quiz LIVE in the next step.
STEP-4: Availability
To publish the quiz and make the quiz visible to the students, The user needs to switch from Draft to Live.
The draft status helps the admin to add few questions at a time and add some later.
The following fields are used in Availability:
Status – Live is used to make quiz available on student portal, Draft is used to disable/hide quiz from student portal.
Start Date & Time: Here we specify the start date and time for the quiz.
End Date & Time: Here we specify when the end date and time for the quiz.
Time Limit – Time limit is a numerical value, here we specify the quiz time in minutes, once the student starts the quiz the time starts till the time limit is reached and this is when the quiz terminates.
_Note__:
– If start/End date is not specified then students can attempt quiz anytime with in the given time limit.
– If Time Limit is not specified then students can take as much time as they need to finish the quiz._
Now that we’ve added questions, changed the status let setup score display settings in the next step.
STEP-5: Scores Display Settings
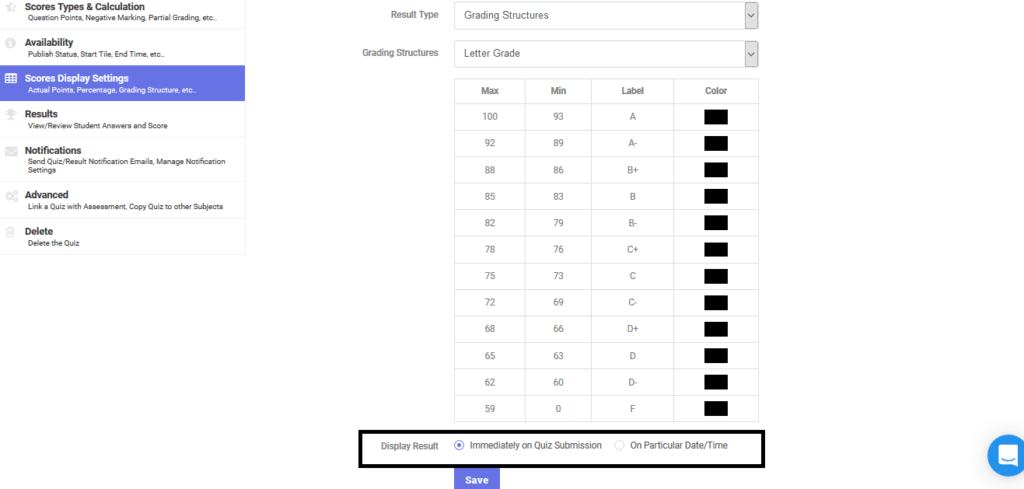
Admin can set the result display settings using score display settings side menu, we have the following settings:
Result Type
* Actual Points – is used when the admin needs to display the actual points which was set in step-3.
* Percentage – is used when the admin wants to display the result in percentage based on Total Points v/s Obtained Points**.
Grading Structure* – when the admin needs to show result in different grades as per the grading scale, then grading structure is used, if we don’t have a grading scale a default scale will be used. We can add new grading scale under Modules > Manage Assessment & Grading > Grade Setup > Grading Scale > Grades > Add.
*Display Result
Immediately on Quiz Submission* will display the result when students finish quiz and submit.
* On Particular Date/Time will display quiz on the specified date and time.
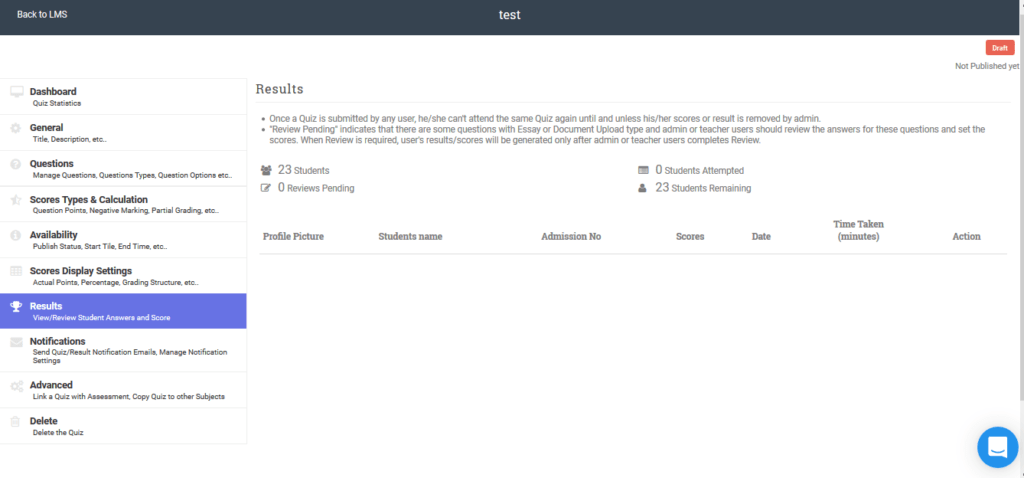
STEP-6: Results
Admin can view results using results side menu.
Note: the questions such as essay, file-upload needs to be assigned scores by admin by verifying the essay and file uploaded and save the scores.
STEP-6: Results
Admin can view results using results side menu.
Note: the questions such as essay, file-upload needs to be assigned scores by admin by verifying the essay and file uploaded and save the scores.
STEP-7: Notifications
Admin can send 2 types of notifications
Quiz Notification Email – all students will be notified via email, we can also edit the email template for quiz notifications.
Result Notification Email – can be sent to all students with result link quiz name and subject.
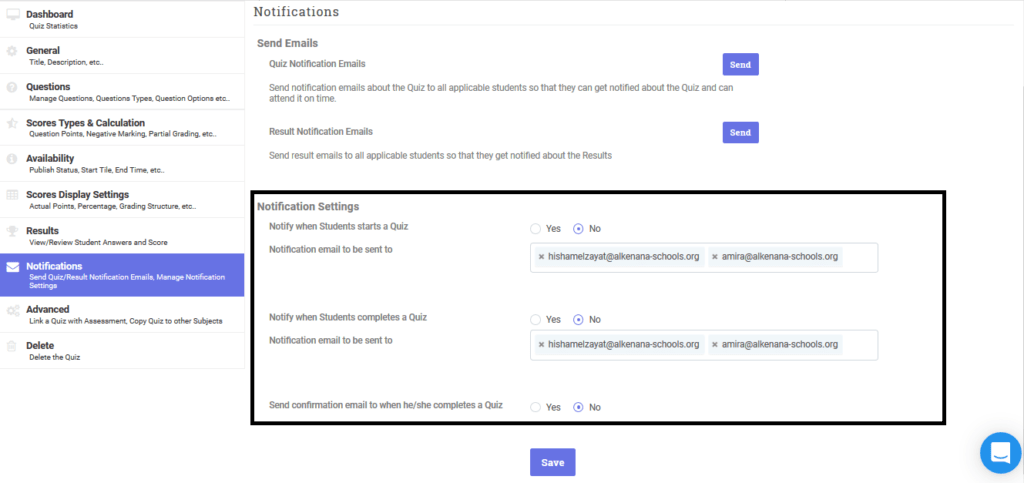
In addition to these we also have notifications to admins whenever student takes up the quiz, completes the quiz, and confirmation when the student completes the quiz.
Notification Settings:
Notify When Student Starts a Quiz – enable this option if the admin should be notified when a student starts the quiz, we can also type in the receivers or sub-admins whom the notifications should be sent.
Notify When Student Completes the Quiz – enable this option when the admin needs to be notified when the quiz is completed.
Send confirmation email to when he/she completes a Quiz – confirmation of quiz completion notification will be sent if this is enabled.
Wondering how to link quiz to grading module? It’s really simple follow next step.
STEP-8: Advanced
We can link the results of the quiz with Grade book, all you need to do is to create new assessment/link to assessment which is created already.
To create new assessment refer this documentation.
Note: You need to setup the assessment grade/points which is equal to quiz grade/points.
